How to Create a DIY Music Streaming Server with Volumio
Music streaming services such as Amazon Music Unlimited, Apple Music, Spotify, Pandora, and Tidal offer the ability to play virtually any song in a few clicks. However, a do-it-yourself (DIY) music streaming server offers more functionality for music lovers. For instance, many rare albums and mixtapes aren't available via the likes of Spotify. Plus, copyright may interfere with the ability to stream music. Whether you want to stream your ultra-rare copy of "Music for Earthworms," have an extensive collection of lossless FLAC vinyl rips, or just want access to your music collection from anywhere, here's how to create a DIY music streaming server with Volumio on the Raspberry Pi and more!
What is Volumio?
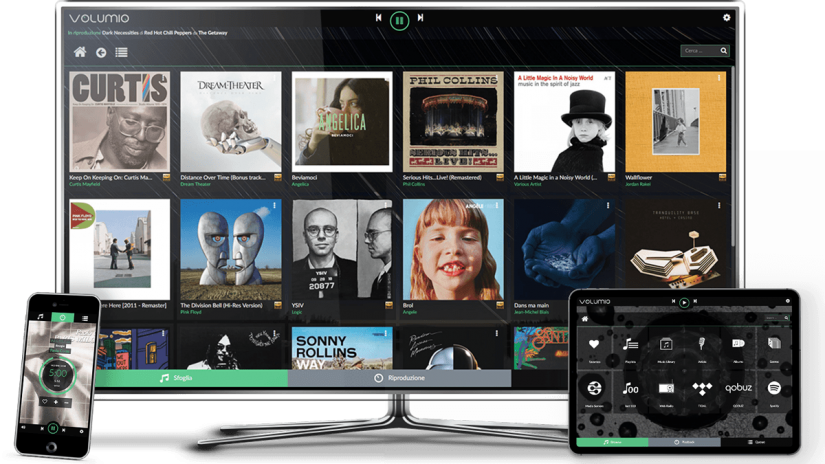 As the name suggests, Volumio is a music streaming server. Similar to the likes of Plex, Emby, Subsonic, Masonic, and Libresonic among others. This multipurpose music streaming server software option boasts support for a variety of music file types including FLAC, MP3, AAC, WAV, DSD, and ALAC. Moreover, you'll find compatibility with the likes of Spotify, Tidel, YouTube, Shoutcast, and DLNA. As such, it's an all-in-one solution for streaming your personal music collection alongside premium web radio. Its server offering runs on everything from Raspberry Pi devices and X86 PCs to the Odroid C1, Odroid C2, ASUS Tinker Board, and Sparky.
Features:
- Excellent file support including FLAC, WAV, AAC, DSD, ALAC, and MP3
- Compatibility with premium music services and web radio i.e. Spotify, Tidal, Icecast
Hardware compatibility:
- Raspberry Pi
- ASUS Tinker Board
- Odroid C1/C2
- x86 PCS
- Sparky
Why Build a Music Streaming Server With Volumio?
You may question the value of building your own music streaming server using with Volumio. Why not simply subscribe to Spotify, Apple Music, Tidal, or another music streaming service? Unfortunately, many streaming services lack rare albums such as mixtapes or never-released on digital LPs. Moreover, if you're like me and have an obnoxiously large collection of FLAC vinyl rips, you might prefer your lossless files available from anywhere. While I'm lucky enough to have a microSD card in my phone, many handsets now forgo removable storage. Though 128GB, 256GB, or even 512GB may sound ample, it quickly fills up, especially when loading uncompressed files. As such, a music streaming server is a fantastic choice.
How to Install Volumio on Raspberry Pi
For a Volumio Raspberry Pi music streaming server, you'll need a Raspberry Pi board, microSD card, power supply, case, and peripherals such as keyboard and mouse. Plus, you'll probably want an external harddrive or large capacity flash drive filled with music.- Raspberry Pi board (Raspberry Pi 4 recommended)
- Case (optional, recommended)
- Peripherals (keyboard, mouse)
- Power supply
- Volumio Image
- Extraction software (i.e. 7Zip)
- Image mounting software (i.e. Etcher)
- microSD card
Total cost: $35+ USD. You can snag a Raspberry Pi board for about $35, though I suggest grabbing a kit instead since it's a better value.
First, head to the Volumio downloads page and download the Volumio Raspberry Pi installer. You'll end up with a zipped disc image file, so begin by extracting the compressed disc image.
Next, with an app such as Etcher, mount the IMG file to a microSD card. When burning completes, pop the Volumio microSD into your Raspberry Pi. Wi-Fi does work with Volumio, but for the initial Volumio set up, I suggest using Ethernet if possible. With a power supply and Ethernet cable plugged in and your microSD card securely in its slot on the Pi, fire up your device.
On another PC, open a web browser and type in volumio.local. This should load its web user interface (web UI). If not, locate your Raspberry Pi's IP address and type that in instead. Pick your preferred language, then give Volumio a name. I simply went with Volumio Pi. Then, hit next.
After that, select your output. You can choose from the HDMI port or audio jack. Alternatively, if you've got a digital to analog converter (DAC), you can toggle that option on and pick your DAC. When you've correctly selected your Raspberry Pi audio output, hit next and continue to network settings.
From here, if you wish to use Wi-Fi instead of Ethernet, find your network and click connect. If your network is password protected, you'll need to enter your password, then you can proceed with Volumio Raspberry Pi installation.
How to Install Volumio on the ASUS Tinker Board
Installing Volumio on the ASUS Tinker Board works pretty much the same. Head to the Volumio downloads page and download the ASUS Tinker Board Volumio image. It's a zipped IMG file, so extract it. Then, using a program such as Etcher, mount the image file to a microSD card, or, if you're using the ASUS Tinker Board S, an eMMC module. Once image mounting completes, pop your boot medium into the Tinker Board, power on your device, and you're ready to start setting up Volumio.
- ASUS Tinker Board or Tinker Board S (save $1 off purchase of $10 or more with code EMSUPPORTER)
- Case (optional, recommended)
- Peripherals (keyboard, mouse)
- Power supply
- Volumio Image
- Image mounting software (i.e. Etcher)
- microSD card or eMMC
Total cost: $60+ USD. You can snag the ASUS Tinker Board for about $60 USD, and depending on what you've got lying around, this could be your only cost. But buying a case, power supply, microSD card or eMMC, and other goodies, the price can quickly jump.
Volumio Spotify and Web Radio Use
You can add music via several methods in Volumio. For web radio such as Volumio Spotify use, click the browser button in the lower lefthand corner of the main Volumio player. Then, click Web Radio. From here, you can sort by genre, top 500 Shoutcast radio stations, and more. Find some web radio stations that you enjoy, and add them to your favorites list.
You can add Spotify to Volumio as well. If you want to listen to Spotify in Volumio, head to Settings > Plugins and find Spotify. Then, merely click Install. Hit the Installed Plugins tab, and you'll see the Spotify plugin with an option to toggle it on and off, plus uninstall. Turn it on, click Settings and enter your user name and password. You can select high-quality music streaming, or turn this off. Unfortunately, Volumio Spotify integration doesn't include the option to import playlists. Still, it's nifty to have your personal music collection and streaming apps available from your Volumio server. Other Volumio plugins include YouTube and Tidal.
How to Add Local Files in Volumio
There are a few different methods for adding local files to Volumio. From another machine on your network, you should be able to view your Volumio music streaming server. The Volumio login is Volumio, and the password is volumio 2. Then, you can remotely drop music files onto your Volumio DIY music server.
Alternatively, you might prefer pointing Volumio to a networked drive. Since I've got a ThinkServer TS140 running Plex, I was easily able to point Volumio to my music folder on my Plex server, and play local files in Volumio over the network. Navigate to Settings > My Music and under Network Drives click Add New Device.
Finally, a USB should work. I had mixed results with this, and I'm not sure if it was a matter of formatting or permissions. You can find your USB drive under Browse > Music Library > USB.
Should You Use Volumio: Review and Volumio Alternatives
Volumio is pretty easy to use and features a pretty user interface. I appreciate its ability to playback music files locally via a microSD card, flash drive, or networked drive as well as web radio stations and premium apps such as Spotify. It's lightweight enough to run on a Raspberry Pi or ASUS Tinker Board, and makes spinning up a music streaming server a breeze.
There are loads Volumio alternatives however. Subsonic, Libresonic, Madsonic, Airsonic, Ampache, Mopidy, Plex, Emby, and piCorePlayer all work. Of these, I've used Plex, Emby, Madsonic, and Libresonic extensively and dabbled in the rest. For movies and TV, I prefer Plex and Emby, though both options work for music and pictures as well. The Sonic-based apps arrive with a clear onus on music streaming.
Overall, Volumio is a fantastic choice for a quick, simple headless music streaming server. It's even compatible with a main media server since you can connect a networked drive. It's well worth setting up on a spare single-board computer (SBC).
What are you using for music streaming?







Leave your feedback...