Custom IoT - MQTT Pub and Sub
Last time we saw the beginnings of our MakerMQTT server that was able to keep a connection alive between a server and a client. This time, we will be adding the publish and subscribing commands to allow us to send and receive data!
Custom IoT Solutions - Intro to the Internet of Things
Custom IoT Solutions - ESP32 vs ESP8266
Custom IoT Solutions - HTTP vs MQTT
Custom IoT Solutions - Create an HTTP Post System
Custom IoT Solutions - How to Make HTTP GET Requests
Custom IoT Solutions - MQTT Overview
Custom IoT Solutions - MQTT Framework
Publish and Subscribe
In the last MakerMQTT project, we learned how to keep a client and server connected using keep alive timers. While this is useful to determine if devices have timed out, and subsequently free up server resources, there was no way for devices to send and receive data to and from the server. Before we look at how this is done, let’s first start by recapping on what publishing and subscribing are.
In MQTT, publishing is when a device saves a value to a specific variable such as “temperature” and “humidity.” Subscribing is when a device requests from the server to receive all updates to a variable as soon as they are made. It is important to understand that in MQTT, all devices subscribed to the same variable will all receive updates to any changes to that variable and any device which publishes to that variable will effectively be sending that value to all subscribers via the server.
Implementing publishing is trivial as a client device will simply send the publish command to the server. From there, the server will either append the new value to an existing variable file or will create a new one. Subscribing, however, is somewhat more complex and requires both our server and client to be able to handle dynamic changes. So, let’s see how we do it!
Publish – Client and Server
The code for publishing data on the client is very trivial and done using the function that takes the variable name and data as strings, appends them to a larger string that contains the PUB command, and then appends this to the out buffer. Since all data to and from the server is in string format, there is no need for type conversions, and the use of the transmitQueue function means we only need to add the command to the message out buffer.

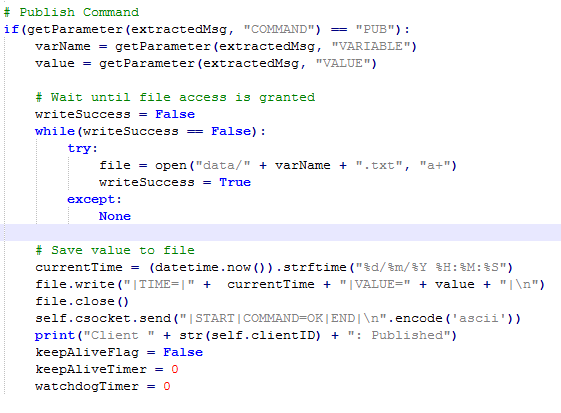
While the server code for handling a publish command may seem complex, it is in fact very simple (personally, I prefer to add more lines of code to breakdown each operation step by step). The if statement first checks to see if the publish command has been issued, and if so, extracts the relevant parameters from the message (variable name and the value). The next block of code is a while loop that continually attempts to open the variable file which stores all past values associated with that variable. If the file is in use, then this will throw an exception which is caught by the try-except block. Eventually, the code will be able to open the file for editing and once done, will exit the while loop.
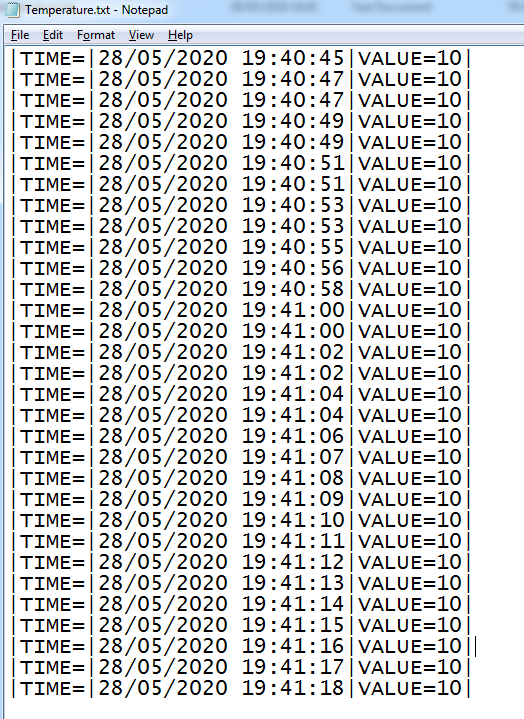
Remember that each variable in our MakerMQTT server has a unique file that stores data in text format!
With the file opened and ready for editing the next step is to get the current time. This is obtained so we can timestamp our variables which gives us the option to either update all subscribes upon a new timestamp OR a new value. The current date and time are then appended to the value that was sent and then saved into its relevant text file. Once saved, the code then sends back the OK command so that the client knows the published variable was saved correctly.
Server Subscribing
Subscribing is somewhat more complex to implement and, on the server, we utilize a useful data type in Python to make implementation easy; dictionaries. Dictionaries can be thought of as arrays that instead of using numbers to access elements instead use names. For example, a dictionary can have elements named “Car Type,” “Color,” and “Model” while their values would be “Volvo,” “Black,” and “V40.” This is very useful in our situation as we can easily refer to subscribed variables in our dictionary by their name as opposed to having to go through the whole array matching the name parameter to the variable we are looking for.
In the initialization of the run function in the client class, the code below shows the dictionary being declared for use.

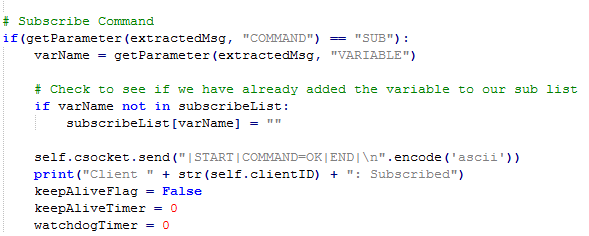
When the subscribe command is sent to the server, it first checks to see if the device has already subscribed to it. If it hasn’t, then the variable is added to the dictionary with an empty string value. After, the client is sent the OK message from the server indicating the successful adding of the variable to the subscribe list.
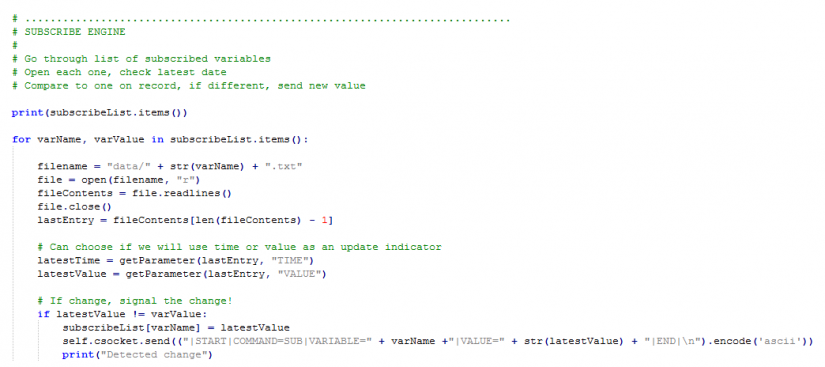
Now that a client device can subscribe to a message, we now need to handle what should happen when that variable changes value. After the message decode block in the server, the next block of code to be executed is the subscribe engine. The first code to be executed is a for loop that goes through each and every variable that the client has subscribed to. For each variable, the variable name and last recorded value are copied into the variables varName and varValue, respectively. Then, the file name that points to that variable is generated, and then the file is opened. Once opened, all the lines in that file are read into an array, fileContents, and the file close. The last entry is then extracted (as this is the latest value to be stored) and the value and timestamp are then obtained.
In this example, we use an if statement to compare the latest value stored in the file with the one stored in our dictionary, and if there is a discrepancy, we send an update to our client with the variable name and its latest value. We also update the value held in the dictionary so that it has the most recent version and thus any change in any variable will result in the subscribe engine detecting this change and sending out the appropriate messages to the connected clients.
Client Subscribing
A client that is to subscribe to a variable is required to store all variables by name and be able to retrieve them. While C++ does not allow us to use data types such as dictionaries, it does allow for the use of objects which we will use.
The MakerMQTT Class, which holds functions related to server communication and message decoding, also holds an array of objects called vars. Each object is of the Variable type (whose definition can be found in the MakerMQTT.h file), and these objects hold a variable name, value, and an enabled flag. It should be stated that a client device using our library is limited to subscribing to 32 variables, but this can be changed by adjusting the #define MAX_VAR 32 line found in MakerMQTT.h.
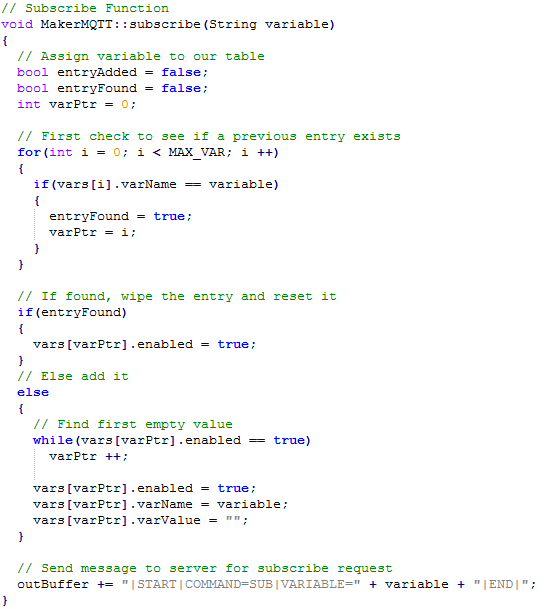
When subscribing to a variable, the client first goes through all 32 variable object entries to find out if we have already subscribed to that variable. If already subscribed, the client will simply set the enable flag to true to indicate that the entry is in use. If not found, then the first available entry in the list of variable entries is found by looking at the enabled flag. Once an empty entry is found the entry’s enabled value is set to true and the details of the variable (such as the name) are passed to it. Afterward, the client sends the subscribe command to the server and thus the client is now subscribed to that variable. This code section should be improved to check for an OK response BEFORE setting the entry, but for the sake of simplicity, we will not bother checking responses.
 Receiving subscribe updates (when a value is changed) is easily handled in the main updateSystem function. If a SUB command is received by the client, then each variable entry is scanned to find the entry that matches the received data from the server, and once found, the entry is updated.

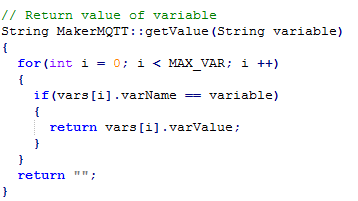
While variables can be accessed from the main program using the dot accessor (e.g. clientEngine.vars[0].varName), this is not an ideal solution. Instead, a simple function is used called getValue() which takes the variable name as a string and returns the value as a string.
Next Project – Callable Functions
This project example has one problem, which is that reacting to a sudden incoming message is difficult. For example, how do we make our client device respond as soon as a message is received? In the next project, the last project of this series, we will implement callable functions which allow us to create a C++ function, and have that called as soon as a variable is received. Thus, we can implement software interrupts and respond immediately to new data.




Leave your feedback...