


Wireless Uv Intensity Monitor With Beetle Esp32 C6
About the project
Will guide you in build an ESPNOW-based UV Intensity monitoring system.
Project info
Difficulty: Easy
Estimated time: 1 hour
License: GNU General Public License, version 3 or later (GPL3+)
Items used in this project
Hardware components
Story
In this project, we’ll build a wireless UV intensity monitor that uses the Beetle ESP32 C6 and the Grove Sunlight Sensor. We’ll leverage the ESP-NOW protocol for efficient, low-latency communication between devices. This setup will allow you to monitor UV intensity remotely and receive real-time updates. Let’s dive into the details! 🚀
Materials Needed 🛠ï¸Â- Beetle ESP32 C6: A compact and powerful microcontroller.
- Grove Sunlight Intensity Sensor: A sensor capable of detecting UV, visible, and infrared light.
- Grove Base Shield: To easily connect the sensor to the Beetle ESP32 C6.
- Jumper wires: For connections.
- USB Type-C cable: To power and program the Beetle ESP32 C6.
- Power source: A battery or USB power bank for portability.

You must check out PCBWAY for ordering PCBs online for cheap!
You get 10 good-quality PCBs manufactured and shipped to your doorstep for cheap. You will also get a discount on shipping on your first order. Upload your Gerber files onto PCBWAY to get them manufactured with good quality and quick turnaround time. PCBWay now could provide a complete product solution, from design to enclosure production. Check out their online Gerber viewer function. With reward points, you can get free stuff from their gift shop. Also, check out this useful blog on PCBWay Plugin for KiCad from here. Using this plugin, you can directly order PCBs in just one click after completing your design in KiCad.
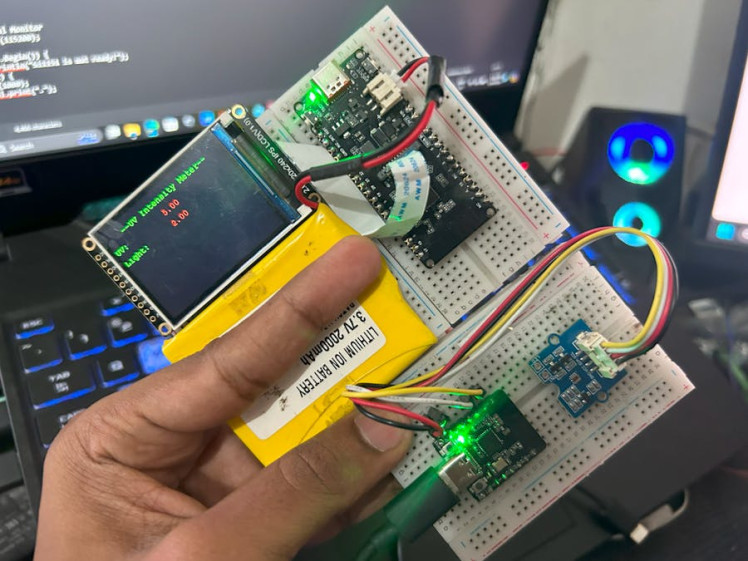
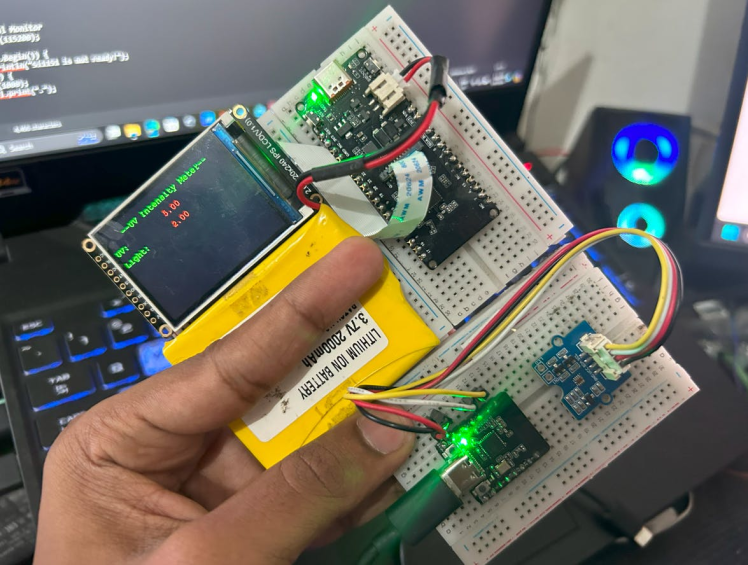
Step 1: Hardware Setup ðŸâ€Â§- Connect the TFT Display to the FireBeetle: Attach the TFT screen to the FireBeetle ESP32 C6. This shield simplifies the data visualization form Grove sensors and modules.
- Connect the Sunlight Sensor: Plug the Grove Sunlight Intensity Sensor into one of the I2C ports on the Beetle ESP32 C6. The I2C ports are usually labeled and color-coded for convenience.
- Power the Board: Connect the boards to a power source using the USB Type-C cable. You can use a battery or a USB power bank if you want to make your setup portable.

- Install Arduino IDE: If you haven’t already, download and install the Arduino IDE from the official website.
Add ESP32 Board to Arduino IDE:
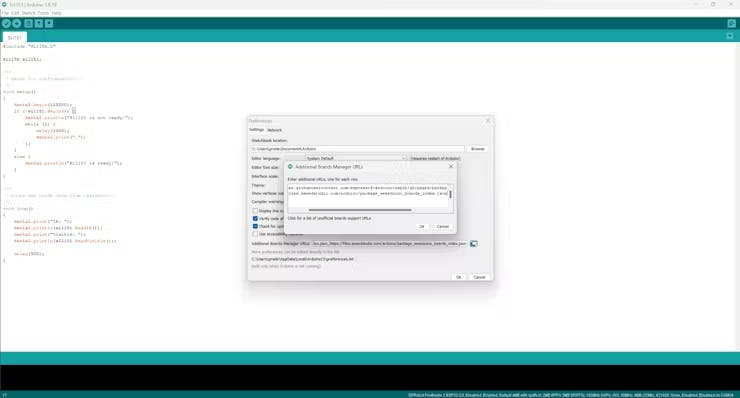
- Open Arduino IDE and go to
File > Preferences. - In the “Additional Board Manager URLs†field, add:
https://raw.githubusercontent.com/espressif/arduino-esp32/gh-pages/package_esp32_index.json.
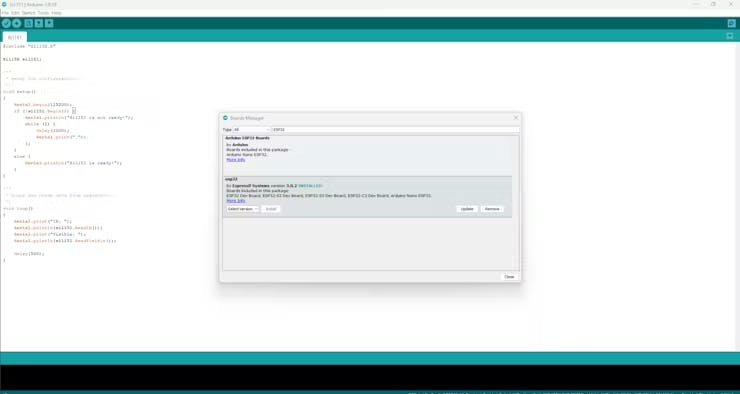
- Go to
Tools > Board > Board Manager, search for “ESP32â€Â, and install the ESP32 board package.
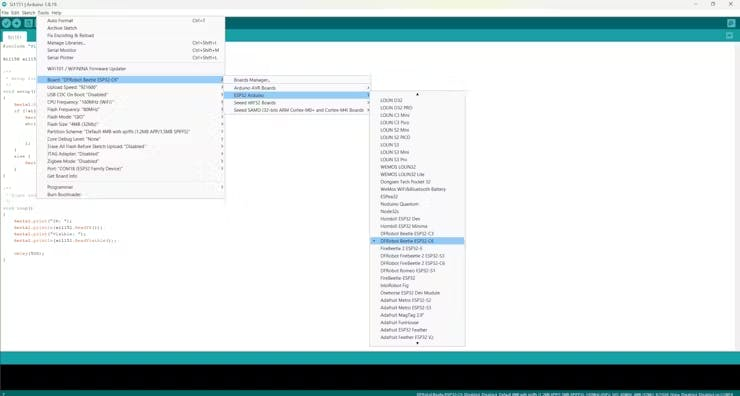
Select the Beetle ESP32 C6 Board:
- Go to
Tools > Boardand selectBeetle ESP32 C6.
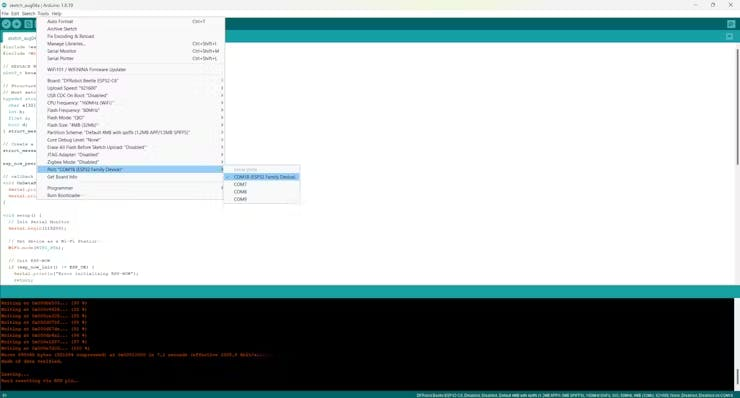
- Choose the correct port from
Tools > Port.
Understanding ESP-NOW:
- ESP-NOW is a wireless communication protocol developed by Espressif. It allows multiple ESP32 devices to communicate with each other without the need for Wi-Fi or a router.
- It operates as a peer-to-peer (P2P) protocol, meaning it allows direct communication between devices.
Configuring ESP-NOW:
- In the setup function, initialize ESP-NOW and register a callback function to handle the status of sent data.
- Add peers to the ESP-NOW network by specifying their MAC addresses.
- Change the receiver FireBeetles MAC address in the transmitter code.
Install Required Libraries:
- Open Arduino IDE and go to
Sketch > Include Library > Manage Libraries.
Search for and install the following libraries:
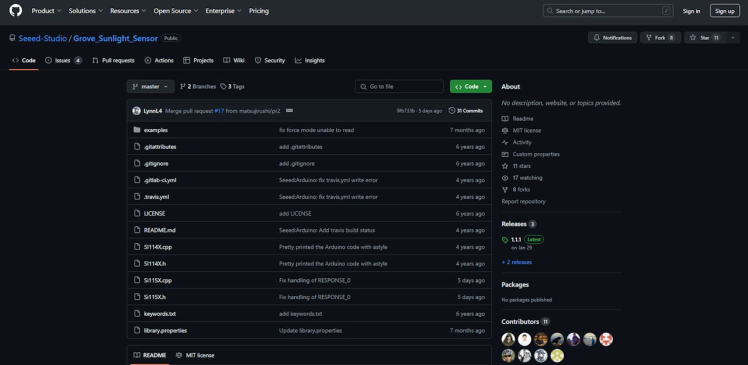
WiFiESP-NOW
Write the UV Intensity Monitoring Transmitter Code:
#include <esp_now.h>
#include <WiFi.h>
#include "Si115X.h"

Si115X si1151;

// REPLACE WITH YOUR RECEIVER MAC Address
uint8_t broadcastAddress[] = {0x54, 0x32, 0x04, 0x08, 0x1E, 0xFC};

// Structure example to send data
// Must match the receiver structure
typedef struct struct_message {
  float a;
  float b;

} struct_message;

// Create a struct_message called myData
struct_message myData;

esp_now_peer_info_t peerInfo;

// callback when data is sent
void OnDataSent(const uint8_t *mac_addr, esp_now_send_status_t status) {
  Serial.print("rnLast Packet Send Status:t");
  Serial.println(status == ESP_NOW_SEND_SUCCESS ? "Delivery Success" : "Delivery Fail");
}

void setup() {
  // Init Serial Monitor
  Serial.begin(115200);

  if (!si1151.Begin()) {
    Serial.println("Si1151 is not ready!");
    while (1) {
      delay(1000);
      Serial.print(".");
    };
  }
  else {
    Serial.println("Si1151 is ready!");
  }

  // Set device as a Wi-Fi Station
  WiFi.mode(WIFI_STA);

  // Init ESP-NOW
  if (esp_now_init() != ESP_OK) {
    Serial.println("Error initializing ESP-NOW");
    return;
  }

  // Once ESPNow is successfully Init, we will register for Send CB to
  // get the status of Trasnmitted packet
  esp_now_register_send_cb(OnDataSent);

  // Register peer
  memcpy(peerInfo.peer_addr, broadcastAddress, 6);
  peerInfo.channel = 0;
  peerInfo.encrypt = false;

  // Add peer
  if (esp_now_add_peer(&peerInfo) != ESP_OK) {
    Serial.println("Failed to add peer");
    return;
  }
}

void loop() {

  Serial.print("IR: ");
  Serial.println(si1151.ReadIR());
  Serial.print("Visible: ");
  Serial.println(si1151.ReadVisible());

  // Set values to send
  myData.a = si1151.ReadIR();
  myData.b = si1151.ReadVisible();

  // Send message via ESP-NOW
  esp_err_t result = esp_now_send(broadcastAddress, (uint8_t *) &myData, sizeof(myData));

  if (result == ESP_OK) {
    Serial.println("Sent with success");
  }
  else {
    Serial.println("Error sending the data");
  }
  delay(2000);
}
Write the UV Intensity Monitoring Receiver Code:
#include <esp_now.h>
#include <WiFi.h>

#include "DFRobot_GDL.h"

#define TFT_DC D2
#define TFT_CS D6
#define TFT_RST D3

DFRobot_ST7789_240x320_HW_SPI screen(/*dc=*/TFT_DC, /*cs=*/TFT_CS, /*rst=*/TFT_RST);

int led = 15;

// Structure example to receive data
// Must match the sender structure
typedef struct struct_message {
  float a;
  float b;
} struct_message;

// Create a struct_message called myData
struct_message myData;

// callback function that will be executed when data is received
void OnDataRecv(const uint8_t * mac, const uint8_t *incomingData, int len) {
  memcpy(&myData, incomingData, sizeof(myData));
  Serial.print("Bytes received: ");


  Serial.println(myData.a);
  float a1 =myData.a;
  Serial.print("Float: ");
  Serial.println(myData.b);
  Serial.print("Float: ");
  float b1 =myData.b;

  Serial.println();


    int16_t color = 0x00FF;
    screen.setTextWrap(false);
    screen.setRotation(1);
    screen.fillScreen(COLOR_RGB565_BLACK);
    screen.setTextColor(COLOR_RGB565_GREEN);
    screen.setFont(&FreeMono9pt7b);
    screen.setTextSize(1.5);
    screen.setCursor(20, 30);
    screen.println("  --UV Intensity Meter--  ");
    screen.setCursor(0, 60);
    screen.println("UV:  ");
    screen.setCursor(0, 90);
    screen.println("Light:  ");

    screen.setTextColor(COLOR_RGB565_RED);
    screen.setCursor(135, 60);
    screen.println(a1);
    screen.setCursor(195, 60);
    screen.setCursor(135, 90);
    screen.println(b1);
    screen.setCursor(195, 90);
    digitalWrite(led, HIGH);
}

void setup() {
  // Initialize Serial Monitor
  Serial.begin(115200);

  screen.begin();
  Wire.begin();
  pinMode(led, OUTPUT);

  // Set device as a Wi-Fi Station
  WiFi.mode(WIFI_STA);

  // Init ESP-NOW
  if (esp_now_init() != ESP_OK) {
    Serial.println("Error initializing ESP-NOW");
    return;
  }

  // Once ESPNow is successfully Init, we will register for recv CB to
  // get recv packer info
  esp_now_register_recv_cb(esp_now_recv_cb_t(OnDataRecv));
}

void loop() {

}- Upload the Code: Connect your Transmitter code Beetle ESP32 C6 and Receiver code to FireBeetle ESP32 C6 to your computer and upload the code using the Arduino IDE.
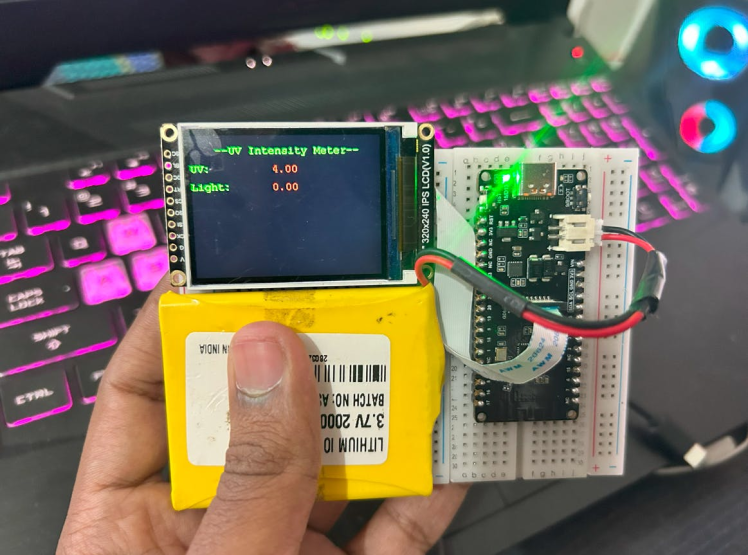
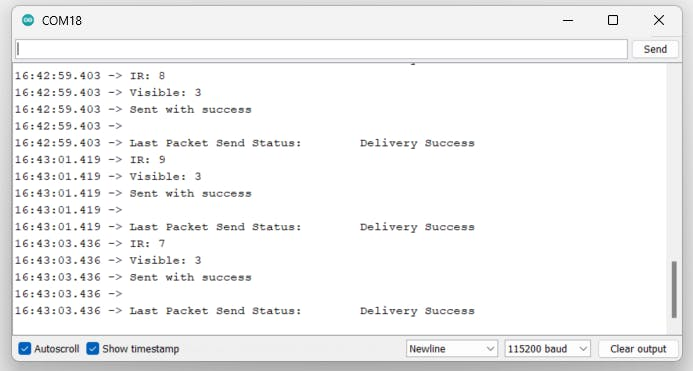
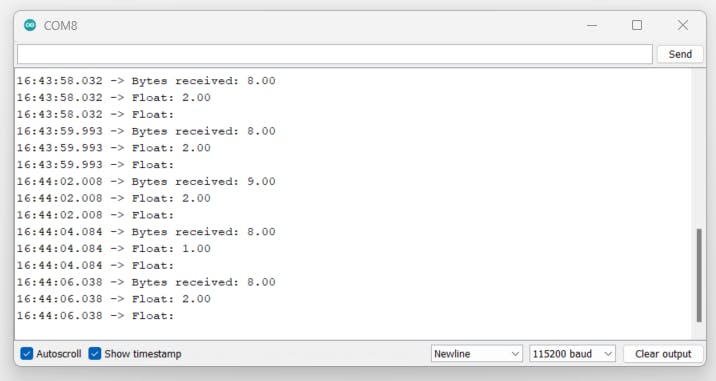
- Test the Sensor: Once the code is uploaded, the sensor will start measuring UV intensity and send the data wirelessly using the ESP-NOW protocol let's see the response from the serial terminal.
Transmitter Response:
ReceiverResponse:
- Libraries and Initialization: The code includes the necessary sensor, Wi-Fi, and ESP-NOW libraries. The sensor is initialized in the
setup()function. - Reading Sensor Data: In the
loop()function, the sensor readings for UV, visible, and IR light are obtained and printed to the serial monitor. - Sending Data via ESP-NOW: The sensor data is sent to a peer device using the ESP-NOW protocol. The
OnDataSentcallback function handles the status of the sent data. - Delay: The
delay(10000)function ensures that the sensor readings and data transmission occur every minute.
Congratulations! You’ve successfully built a wireless UV intensity monitor with the Beetle ESP32 C6 and the Grove Sunlight Intensity Sensor, using the ESP-NOW protocol for communication. This project can be expanded further by adding sensors or integrating with other IoT platforms.
Feel free to share your project and any modifications you make. Happy building! 🛠ï¸Â
Credits
Related products


g