Wio E5 With Things Network Using Micropython
About the project
Will guide to integrate the Wio E5 with Things Network using Mircopython
Project info
Difficulty: Easy
Platforms: Seeed Studio, MicroPython
Estimated time: 1 hour
License: GNU General Public License, version 3 or later (GPL3+)
Items used in this project
Story
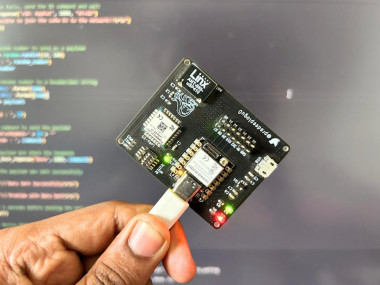
In this detailed tutorial, we will walk through the process of integrating the Wio LoRa-E5 module with The Things Network (TTN) using MicroPython and Xiao ESP32-S3. This project will enable you to transmit data via LoRaWAN using the TTN as the backend for processing your LoRa data.
The Wio LoRa-E5 module supports long-range LoRaWAN communication, while the Xiao ESP32-S3 is a powerful microcontroller with WiFi, Bluetooth, and enough power to run MicroPython efficiently.
By the end of this tutorial, you'll have a functional IoT system capable of sending sensor data over LoRa to the TTN and visualizing it on a dashboard or storing it in the cloud.
📦 Prerequisites🛠︠Hardware:
- 🛰︠Wio LoRa-E5 Module(STM32-based LoRa module)
- 🖥︠XIAO ESP32-S3 (compact ESP32 board)
- ðŸâ€â€” Jumper wires for connecting the modules
- 📠Breadboard for prototyping
- ðŸâ€Å’ USB Cables for flashing and power
🖥︠Software:
- Python 3.x installed on your PC for firmware flashing and serial communication
- Thonny IDE (or any MicroPython IDE of your choice)
- esptool (for flashing MicroPython firmware onto the ESP32-S3)
- MicroPython firmware for XIAO ESP32-S3 from [MicroPython.org](https://micropython.org/download/esp32/

You must check out PCBWAY for ordering PCBs online for cheap!
You get 10 good-quality PCBs manufactured and shipped to your doorstep for cheap. You will also get a discount on shipping on your first order. Upload your Gerber files onto PCBWAY to get them manufactured with good quality and quick turnaround time. PCBWay now could provide a complete product solution, from design to enclosure production. Check out their online Gerber viewer function. With reward points, you can get free stuff from their gift shop. Also, check out this useful blog on PCBWay Plugin for KiCad from here. Using this plugin, you can directly order PCBs in just one click after completing your design in KiCad.
ðŸâ€Â§ Step 1: Flashing MicroPython on XIAO ESP32-S3 and Wio LoRa E5ðŸâ€Â¥ Flashing MicroPython on XIAO ESP32-S3:
1. Download the MicroPython firmware for ESP32-S3 from (https://micropython.org/download/esp32/). Make sure to download the **ESP32-S3 specific firmware.
2. Install esptool:
You'll need the esptool package to flash MicroPython on the ESP32-S3. Install it with:
pip install esptool3. Erase existing firmware on the XIAO ESP32-S3 by connecting it to your PC and running the following command:
esptool.py --chip esp32s3 --port <your-port> erase_flash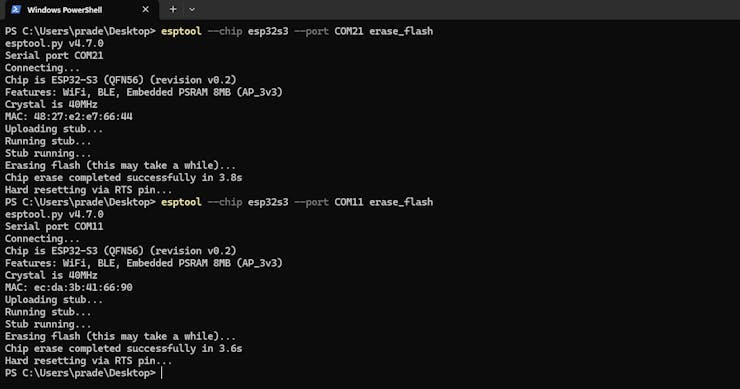
4. Flash the MicroPython firmware:
Replace `<your-port>` with the port the ESP32-S3 is connected to (e.g., `COM4` on Windows or `/dev/ttyUSB0` on Linux). Then, run:
esptool.py --chip esp32s3 --port <your-port> write_flash -z 0x1000 esp32s3-<your-firmware>.bin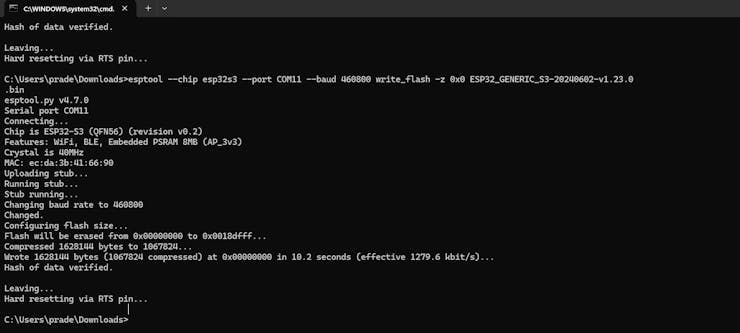
🚀 Flashing Wio LoRa-E5:
The Wio LoRa-E5 module communicates primarily over UART using AT commands. You won't flash MicroPython onto it but will communicate with it through AT commands from the XIAO ESP32-S3.
For detailed instructions on setting up the Wio-E5 with firmware, refer to the [Seeed Studio documentation]
ðŸâ€Å’ Step 2: Wiring ConnectionsHere’s how you can connect the **XIAO ESP32-S3** to the **Wio LoRa-E5** module using UART:

Ensure that you connect the pins correctly, especially the TX and RX, as this will facilitate communication between the devices.
ðŸâ€Â§ Step 3: Setting Up Thonny IDE for ESP32-S31. Download and install Thonny IDE if you haven't already.
2. Select **ESP32** as your MicroPython interpreter.
3. Plug in your XIAO ESP32-S3, and in Thonny, go to Tools > Options > Interpreter, then select the correct Port corresponding to your device (e.g., `COM3` on Windows or `/dev/ttyUSB0` on Linux).
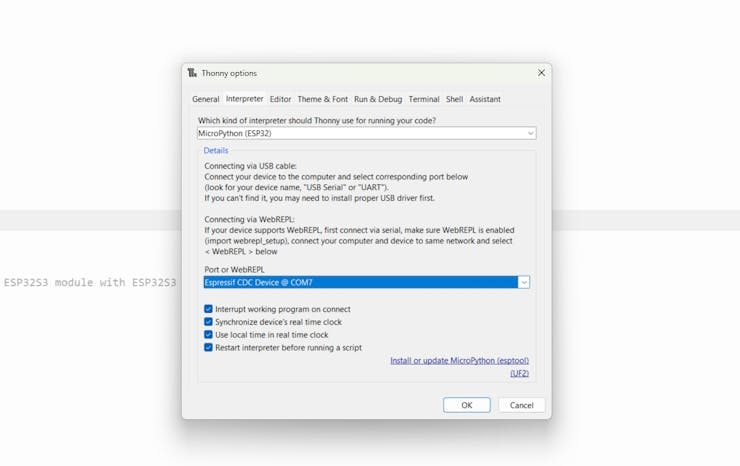
Verify the connection by running:
print("Hello from XIAO ESP32-S3!")If the message prints to the terminal, you are connected!
🧑â€Â💻 Step 4: MicroPython Code to Communicate with LoRaWAN NetworkNow, we’ll write MicroPython code on the Xiao ESP32-S3 to send and receive data to/from the Wio-E5 for LoRa communication.
# Connect to The Things Network (TTN) and publish some test data
# Put your key here (string). This should match the AppKey generated by your application.
#For example: app_key = 'E08B834FB0866939FC94CDCC15D0A0BE'
app_key = 'E08B834FB0866939FC94CDCC15D0A0BE'

# Regional LoRaWAN settings. You may need to modify these depending on your region.
# If you are using AU915: Australia
# band='AU915'
# channels='8-15'

# If you are using US915
# band='US915'
# channels='8-15'
#
# If you are using EU868
band='EU868'
channels='0-2'


from machine import UART, Pin
from utime import sleep_ms
from sys import exit

uart1 = UART(1, baudrate=9600, tx=Pin(43), rx=Pin(44))
join_EUI = None   # These are populated by this script
device_EUI = None

### Function Definitions

def receive_uart():
    '''Polls the uart until all data is dequeued'''
    rxData=bytes()
    while uart1.any()>0:
        rxData += uart1.read(1)
        sleep_ms(2)
    return rxData.decode('utf-8')

def send_AT(command):
    '''Wraps the "command" string with AT+ and rn'''
    buffer = 'AT' + command + 'rn'
    uart1.write(buffer)
    sleep_ms(300)

def test_uart_connection():
    '''Checks for good UART connection by querying the LoRa-E5 module with a test command'''
    send_AT('') # empty at command will query status
    data = receive_uart()
    if data == '+AT: OKrn' : print('LoRa radio is readyn')
    else:
        print('LoRa-E5 detectedn')
        exit()

def get_eui_from_radio():
    '''Reads both the DeviceEUI and JoinEUI from the device'''
    send_AT('+ID=DevEui')
    data = receive_uart()
    device_EUI = data.split()[2]

    send_AT('+ID=AppEui')
    data = receive_uart()
    join_EUI = data.split()[2]

    print(f'JoinEUI: {join_EUI}n DevEUI: {device_EUI}')

def set_app_key(app_key):
    if app_key is None or app_key == 'None':
        print('nGenerate an AppKey on cloud.thethings.network and enter it at the top of this script to proceed')
        exit()

    send_AT('+KEY=APPKEY,"' + app_key + '"')
    receive_uart()
    print(f' AppKey: {app_key}n')


def configure_regional_settings(band=None, DR='0', channels=None):
    ''' Configure band and channel settings'''

    send_AT('+DR=' + band)
    send_AT('+DR=' + DR)
    send_AT('+CH=NUM,' + channels)
    send_AT('+MODE=LWOTAA')
    receive_uart() # flush

    send_AT('+DR')
    data = receive_uart()
    print(data)


def join_the_things_network():
    '''Connect to The Things Network. Retry on failure.'''
    max_retries = 5
    retry_count = 0

    while retry_count < max_retries:
        send_AT('+JOIN')
        data = receive_uart()
        print(data)

        status = 'not connected'
        while status == 'not connected':
            data = receive_uart()
            if len(data) > 0: print(data)
            if 'joined' in data.split():
                status = 'connected'
                break
            if 'failed' in data.split():
                print('Join Failed. Retrying...')
                break

            sleep_ms(1000)

        if status == 'connected':
            break
        else:
            retry_count += 1
            print(f"Retry {retry_count}/{max_retries} in 5 seconds...")
            sleep_ms(5000)

    if retry_count >= max_retries:
        print("Max retries exceeded. Giving up.")
        exit()


def send_message(message):
    '''Send a string message'''
    send_AT('+MSG="' + message + '"')

    done = False
    while not done:
        data = receive_uart()
        if 'Done' in data or 'ERROR' in data:
            done = True
        if len(data) > 0: print(data)
        sleep_ms(1000)

def send_hex(message):
    send_AT('+MSGHEX="' + message + '"')

    done = False
    while not done:
        data = receive_uart()
        if 'Done' in data or 'ERROR' in data:
            done = True
        if len(data) > 0: print(data)
        sleep_ms(1000)

test_uart_connection()

get_eui_from_radio()

set_app_key(app_key)

configure_regional_settings(band=band, DR='0', channels=channels)

join_the_things_network()

while True:
    # Send example data
    print("sending test messages")
    # Convert the random number to a hexadecimal string
    temp=100
    payload = '{:04x}'.format(temp)
    payload1 = '{:04x}'.format(temp)
    CP = payload + payload1

    print("payload : ", CP)

#   send_message("Hello World!")
    send_hex(CP)
    sleep_ms(5000)
The device will attempt to join the LoRaWAN network. The response should confirm whether the join was successful.
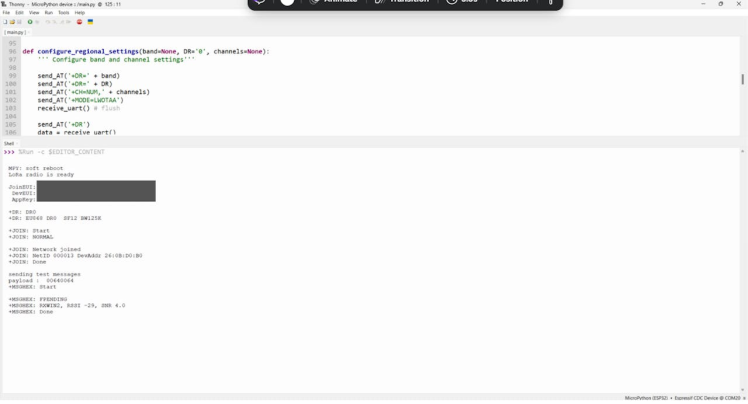
Before we get into the hardware setup, let’s configure the application on **The Things Network** (TTN). TTN is a free, community-driven platform for LoRaWAN network services.
🛠︠5.1 Create a TTN Account
1. Go to the [TTN Console](https://console.thethingsnetwork.org/), and sign up or log in.
2. Choose your **cluster** based on your region (e.g., **EU1**, **US1**).
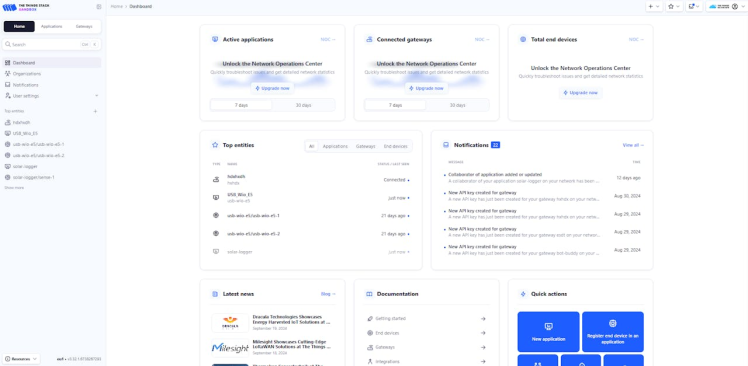
🛠︠5.2 Create an Application
1. In the TTN console, click on Applications and then Create an Application.
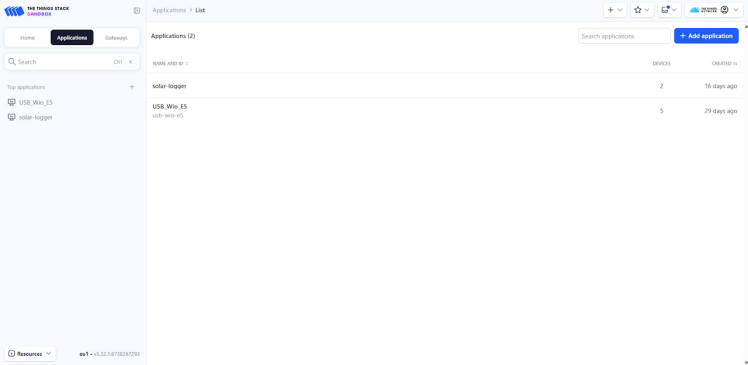
2. Fill in the details:
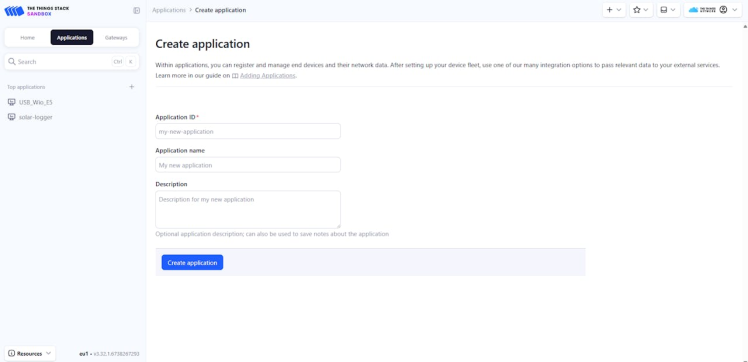
3. Once created, navigate to the application overview page.
🛠︠5.3 Register Your Device
1. Under your application, click Devices → Register end device.
2. Choose a Manually registered device.
3. Fill in the fields:
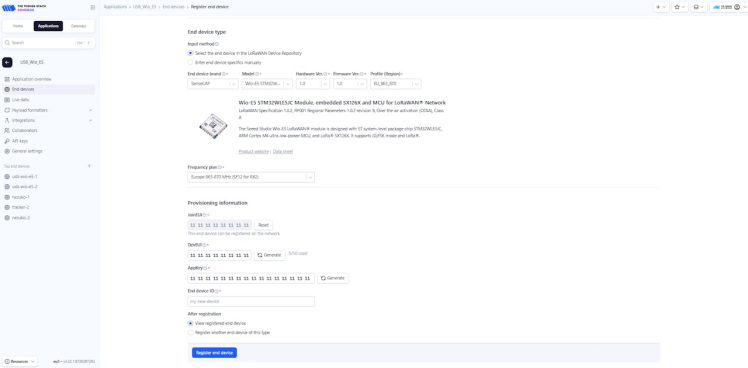
Now look into the TTN console, you can see your device response.
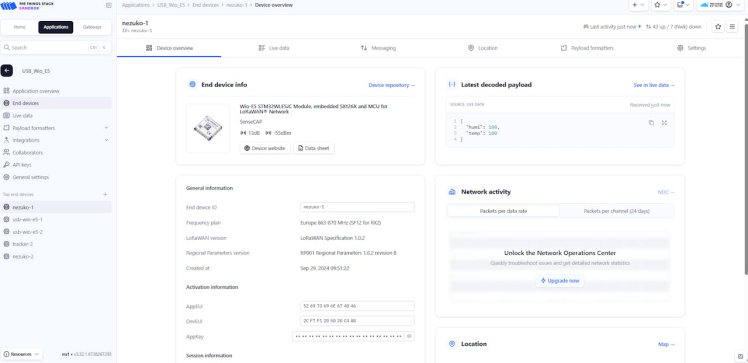
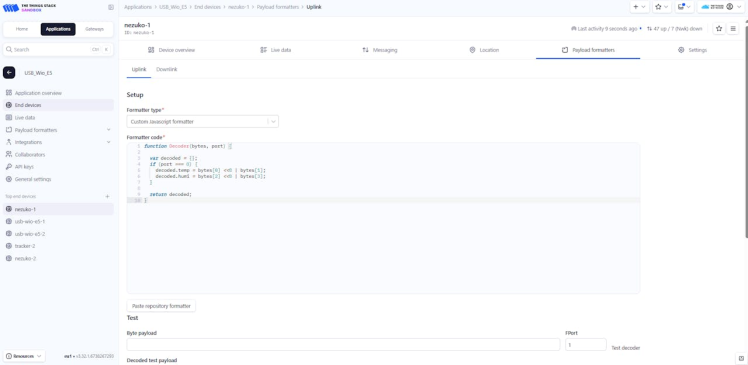
Next, we have to add a payload formatted to view our data.
function Decoder(bytes, port) {

  var decoded = {};
  if (port === 8) {
    decoded.temp = bytes[0] <<8 | bytes[1];
    decoded.humi = bytes[2] <<8 | bytes[3];
  }

  return decoded;
}
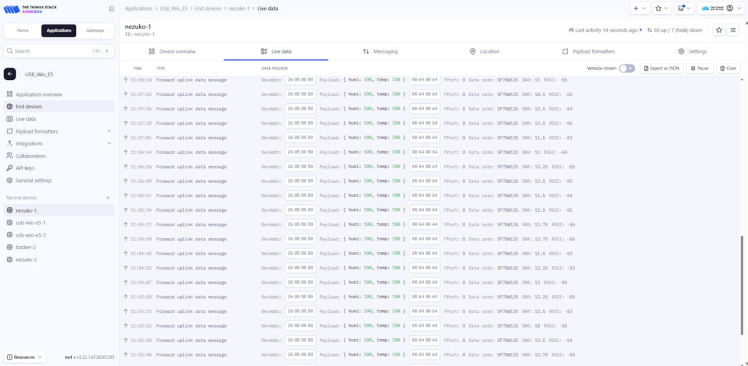
Finally, you can see your actual data in the TTN console.
- Add Sensors: Connect sensors like temperature, humidity, or GPS to your Xiao ESP32-S3 and send this data to TTN.
- Cloud Integration: Forward data from TTN to cloud platforms like AWS, Azure, or Google Cloud for further processing.
- Data Visualization: Use platforms like Qubitro to visualize the incoming data from TTN.
You’ve successfully integrated the Wio LoRa-E5 with The Things Network (TTN) using MicroPython and the Xiao ESP32-S3. You can now send data over LoRaWAN to the TTN, where it can be forwarded to cloud services, stored in databases, or visualized on a dashboard.
Happy coding and building your LoRaWAN IoT applications! ðŸŒÂ📡




Leave your feedback...