Transfer Learning Model On Google Aiy Vision Kit
About the project
Collect training data with Google AIY Vision Kit, build Hand Gesture Classifier via transfer learning, and deploy it on Google Vision AIY.
Project info
Difficulty: Moderate
Platforms: Google
Estimated time: 1 day
License: GNU General Public License, version 3 or later (GPL3+)
Items used in this project
Story
Motivation
I always wanted to build my own training data set and use it to train the deep learning model. This project, which is the second part of Hand Command Recognizer on Google AIY Vision Kit, explains how to:
- Collect a training dataset of 1,500 hand command images with Google AIY Vision Kit.
- Use this dataset and transfer learning to build the Hand Command Classifier by retraining the last layer of MobileNet model.
- Deploy Hand Command Classifier on Edge AI device – Google AIY Vision Kit.
A fairly accurate model with a latency of 1-2 seconds runs on the Google AIY Vision box and does not require access to the Internet or the Cloud. It can be used to control your mobile robot, replace your TV remote control, or for many other applications.
Classifier Design
Two important qualities of a successful deep learning model used for real-time applications are robustness and low latency.
Model robustness can be improved by having a high degree of control over the image background. This would also help to reduce the model training time and the size of the required training data set.
Model latency can be improved if we reduce the possible search region and would only look for the hand command in a specific part of the image where this command is likely displayed (instead of scanning the entire image with sliding windows of different sizes.)
To achieve these goals I took advantage of the state-of-the-art face recognition model pre-installed on Google AIY Vision Kit.
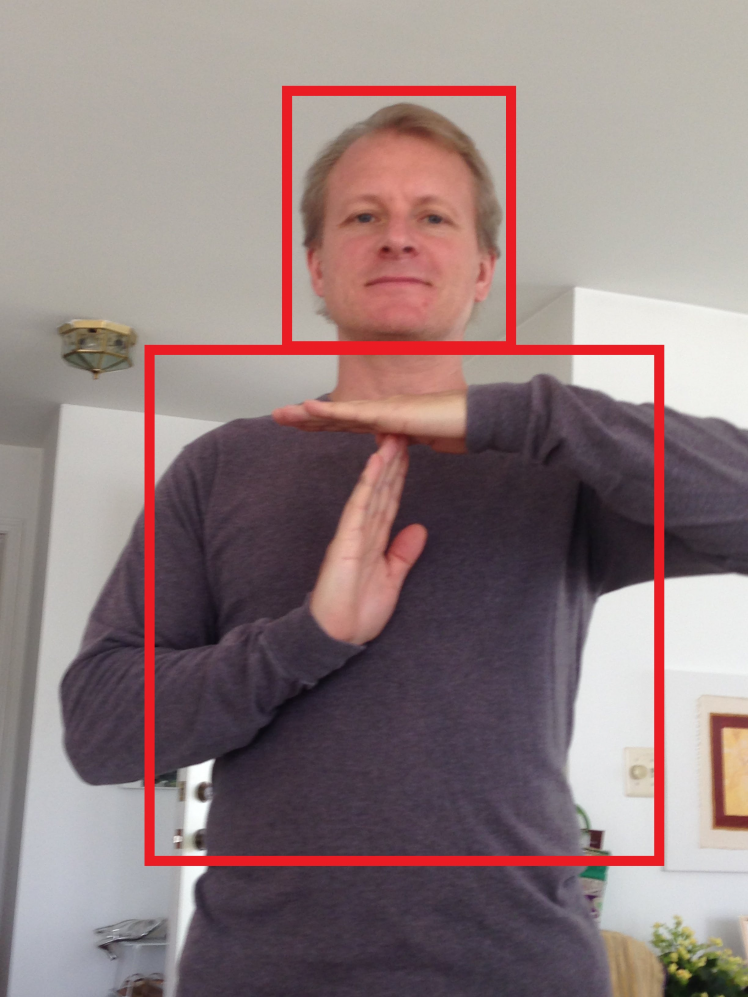
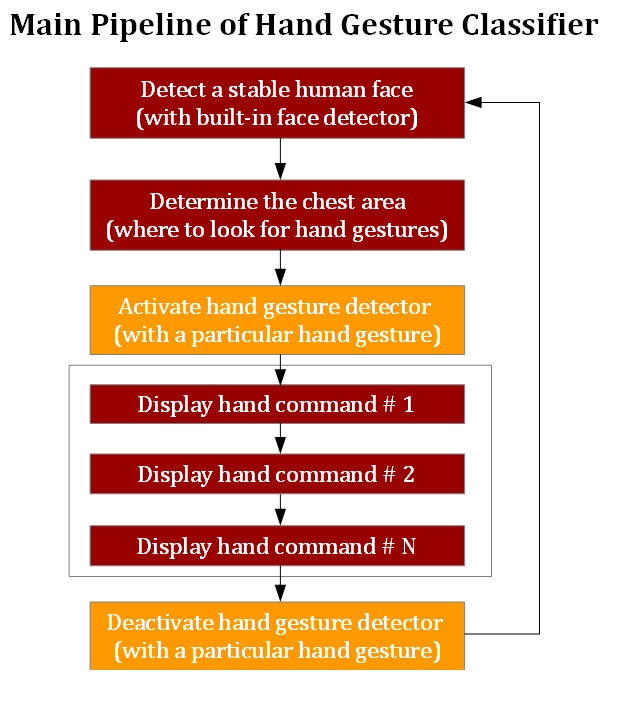
This is how the Hand Command Recognizer works. First, the recognizer tries to detect and locate a human face on the image and make sure it is stable and does not move around. Given the size and location of the detected face box, the recognizer estimates the size and location of the chest box where the hand commands will likely be displayed. This eliminates the need for searching for the hand command over the entire image and therefore greatly reduces the latency during model inference.
 Location of head determines the location of chest box with hand commands

Because we can decide what T-short of jacket we put on, we have a high degree of control over the background of the classified image which increases the model robustness, eliminate the need to collects the large training data set and reduces the model's training time. A diversity of possible backgrounds is also limited (by the number of available T-shirts and jackets in our wardrobe.)
Step 1. Setting Up Google AIY Vision Kit
- Buy Google AIY Vision Kit and assemble it following these instructions
- Power the assembled Google AIY Vision Kit
- Start Dev terminal
- Stop and disable joy_detector_demo application which is set to start automatically after the booting
sudo systemctl stop joy_detection_demo.service
sudo systemctl disable joy_detection_demo.service
- Update OS
sudo apt-get update
sudo apt-get upgrade
- Clone the GitHub repository with hand gesture classifier and navigate to the project folder
cd src/examples/vision
git clone https://github.com/dvillevald/hand_gesture_classifier.git
cd hand_gesture_classifier
chmod +x training_data_collector.py
Step 2. Collect Training Images
The script training_data_collector.py builds the training data set for your model. It records the images with your hand command and stores them in the sub-folder with the label (class) name of the folder training_data.
Every time you run the script you should provide the values for two arguments:
- label = the name of the class with a particular hand gesture you are recording
- num_images =number of images you want to record during the session
Example:
./training_data_collector.py --label no_hands --num_images 100
This command would record 100 images with hands down (no_hands) and place them in the sub-folder named no_hands of the folder training_data. If the sub-folder no_hands or the main folder training_data doesn't exist, the script will create it. If it exists, the script will add 100 new images recorded during this session to the existing images stored in no_hands.
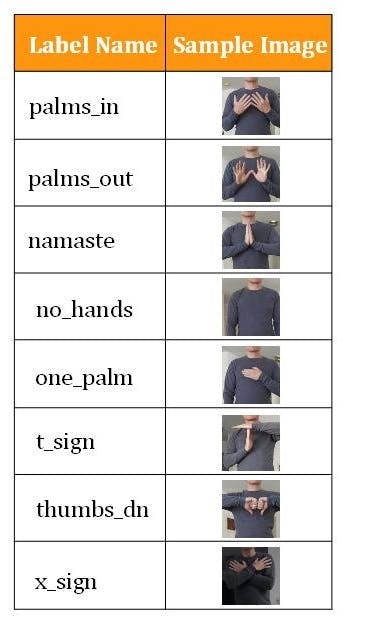
I used the following hand commands and labels to train my model
 Model Labels (Classes) with Sample Images
In order to make the image collection process easier, each recording session is broken down into two stages.
- Raw image capturing. This first stage starts when the LED on the top of the Google AIY Vision Kit is RED. During this stage, the raw images (and the size of location of face box detected on each image) are recorded and stored in the temporary folder.
- Image post-processing. This second stage starts when LED on the top of the Google AIY Vision Kit turns BLUE. During this stage, each recorded raw image is cropped, resized to 160 x 160 pixels and saved in the sub-folder of the training_data folder with the name of the hand gesture label (class.)
Practical suggestions during the collection of training data:
- Make sure that both your headbox and your chest box fit in the image. Otherwise, the training image will not be saved.
- Select a reasonable number of images (100-200) to capture within the session so you don't get tired. I recorded 200 images which took about 2-3 minutes to collect.
- Make sure that the hand gesture you are recording match the label you specified in --label argument.
- Vary the position of your body and hands slightly during a session (moving closer or further away from the camera, slightly rotating your body and hands, etc.) to make your training data set more diverse.
- Record the images in 2-5 different environments. For example, you may record 200 images for each label wearing a red T-shirt in a bright room (environment #1), then record another 200 images for each label wearing a blue sweater in a darker room (environment #2), etc.
- Make sure that in each environment you record the training images for all labels so there is no correlation between the particular environment and specific hand command.
- Capture images in the room bright enough so your hands are clearly visible. For the same reason use T-shirts/sweaters with plain and darker colors.
- Review the images you collected and remove the bad ones if you see any.
Step 3. Train Your Model
There is a great tutorial TensorFlowfor Poets explaining how to retrain MobileNet on your custom data using TensorFlow Hub modules. Follow Steps 1 to 4 of these instructions. The only differences are
- Instead of Step 3 (Download the training images) copy the folder with the training data which you collected (named training_data) from Google AIY Vision kit to your computer. The folder training_data will be used to train your model instead of the folder flower_photos mentioned in TensorFlow for Poets tutorial.
-
At Step 4 (Re)training the network use
IMAGE_SIZE=160instead of 224 or your model will not compile.
Below is a screenshot with the command to train your model (the script retrain.py can be found in the Code section below or on GitHub repository.)
python-m script.retrain
--bottleneck_dir=tf_files/bottlenecks
--how_many_training_steps=1500
--model_dir=tf_files/models/
--summaries_dir=tf_files/training_summaries/"mobilenet_0.50_160"
--output_graph=tf_files/hand_gesture_classifier.pb
--output_labels=tf_files/hand_gesture_labels.txt
--architecture="mobilenet_0.50_160"
--image_dir=tf_files/training_data
--random_brightness 15
There are several optional training parameters you can play with which can make your model more robust - for example I used random_brightness to randomly change a brightness of the training images. The available parameters are well explained in retrain.py
Once the training is completed, you should get the frozen retrained graph hand_gesture_classifier.pb and a file with labels hand_gesture_labels.txt. Feel free to skip the rest steps of TensorFlowfor Poets tutorial.
Step 4. Compile Model on Linux Machine
The retrained frozen graph hand_gesture_classifier.pb should then be compiled on a Linux machine (I successfully ran it on Ubuntu 16.04; Google tested it on Ubuntu 14.04) using this compiler. Make sure you don't run it on Google Vision Kit!
./bonnet_model_compiler.par
--frozen_graph_path=hand_gesture_classifier.pb
--output_graph_path=hand_gesture_classifier.binaryproto
--input_tensor_name=input
--output_tensor_names=final_result
--input_tensor_size=160
This step creates the file hand_gesture_classifier.binaryproto. You can find more information on Google AIY projects page.
Step 5. Upload Your model to Google AIY Vision Kit and Run It!
Upload hand_gesture_classifier.binaryproto and hand_gesture_labels.txt to Google AIY Vision Kit and run it
Hand Command Classifier on Google AIY Vision kit in ActionTHANK YOU!


Leave your feedback...