The Nap Button
About the project
A simple project that uses an old Speaker pHAT and a Pi Zero to make a nice-sleep inducing sound, on the press of a button.
Project info
Difficulty: Easy
Platforms: Adafruit, Digilent, Raspberry Pi, Pimoroni
Estimated time: 2 hours
License: GNU General Public License, version 3 or later (GPL3+)
Items used in this project
Hardware components

|
heatsink | x 1 | |

|
Pimoroni wire | x 1 | |

|
raspberry pi zero case | x 1 | |

|
Pimoroni power supply | x 1 | |

|
Digilent Standoffs | x 1 | |

|
micro sd card | x 1 | |

|
Adafruit touch button | x 1 | |

|
Pimoroni raspberry pi zero | x 1 |
View all
Story

Intro Button
White noise can really help drown out sounds and help people relax and get to sleep - so I thought why not try a quick project with a Raspberry Pi to generate white noise or any sleeping aid sound with a the tap of a button.
And despite the fact the supply chain issue may be coming to an end; it's still pretty hard to get a Raspberry Pi now so why not build it with some parts from an old project?
Hardware Button
I am actually re-using some older tech I had built prior - so the main hardware instructions for this can be found at my old PiBadge project. Just follow the part where the button is hooked up to the Speaker pHAT.
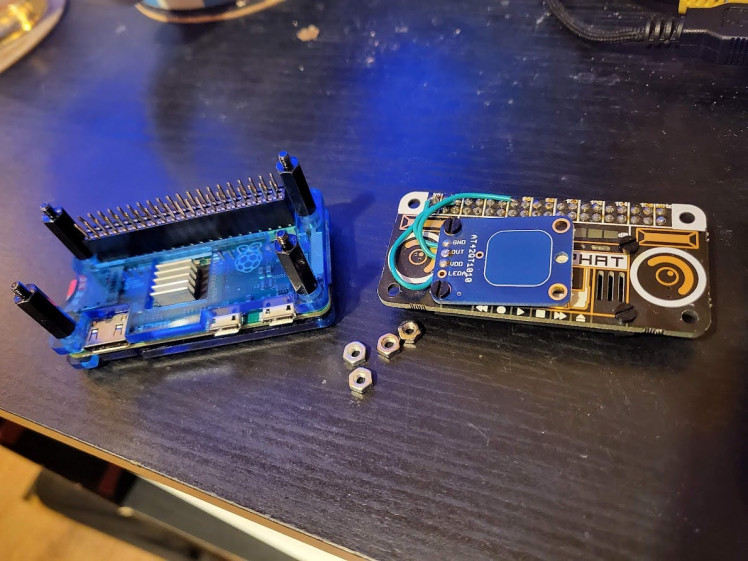
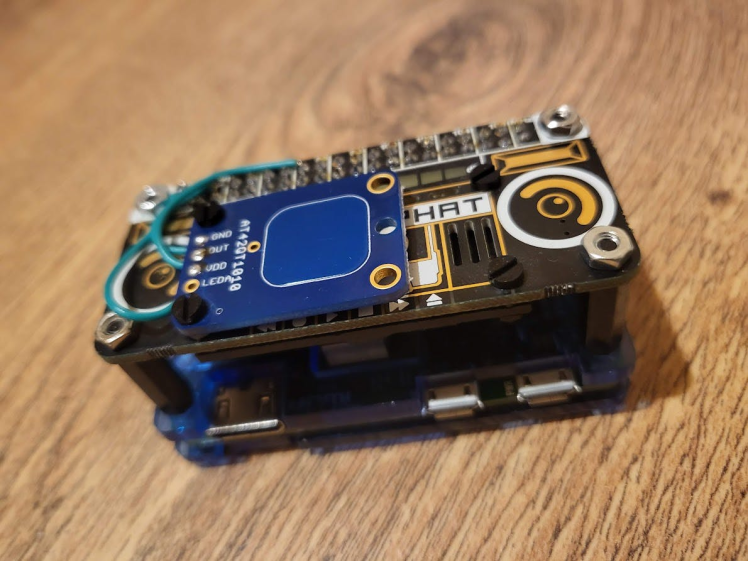
The difference with this project is that the HAT is put on a Pi with just a normal case and no battery (will be powered from mains) along with a heatsink and some standoffs to allow the speaker room to fit.

But essentially any button wired into a Pi Zero and with audio output should be able to run this, it would just need some code tweaking if the button is hooked up to a different pin etc.
Hardware done - I also added in a couple of nuts to act as spacers between the touch button and the pHAT to make it look a bit cleaner:

Code Button
For this project I used the Raspberry Pi Legacy (32 bit) option in the RPi Imager; this is because it seemed to be more compatible with the Speaker pHAT and takes up less SD Card space.
Can grab the code here, into the Pi's home directory. It uses the RPi.GPIO and pygame libraries to play the audio file and interact with the Raspberry Pi's input/output pins.
The SleepMachine class is the main component of the program. When an instance of this class is created, the __init__ method is called, which sets up the audio file to be played and initializes the volume, debounce timers and other handy things.
The play_pause_sound method is used to play or pause the audio file, depending on the current state of the sleep machine. This method is called when the button is pressed, which is handled by the button_callback method.
The button_callback method is called every time the button is tapped. This method includes a debounce feature, which ensures that the button press is registered only once per-tap; other wise it would activate multiple times.
Finally, the program sets up an event detection for the button, using the add_event_detect method from the RPi.GPIO library. This allows the program to listen for button presses and call the button_callback method when needed.
The repo also includes a boot.sh file which creates a virtual environment named venv using the virtualenv command.
The fourth line activates the virtual environment using the source command, which makes the virtual environment's Python interpreter and installed packages available to the nap_button program.
The fifth line installs the required Python packages for the nap_button program using the pip3 command and the requirements.txt file.
The sixth line installs some additional libraries that are required by the nap_button program using the apt-get command. I found that without these pygame mixer would throw errors.
Finally, the seventh line runs the nap_button.py program using the python3 command. This will start the nap_button program itself.
Ensure the speaker pHAT software is installed:
curl -sS https://get.pimoroni.com/speakerphat | bashWhich is from the instructions here.
Next is to find a nice sleep-inducing noise of your choice, grab it as a wav file or mp3 and drop it into the audio folder as:
sleep_noise.mp3There's also a config file under the config folder where the following variables can be adjusted:
volume = 0.3
audio_file_name = 'sleep_noise.mp3'
button_pin = 23
button_debounce_time = 0.5
The boot.sh file can be setup to be run on login, I've used.~/.bashrc and added at the bottom of the file:
sudo chmod +x ~/nap_button/boot.sh
~/nap_button/boot.sh
Also disabling the onboard audio will ensure the Speaker pHAT gets used, under /boot/config.txt comment out the line:
#dtparam=audio=onI also set the OS to boot into CLI mode and autologin, which can be done by the Raspberry Pi Configuration option in the program menu.
and finally it's a good idea to set the SD Card to be read-only using the instructions here. This way the Pi can be unplugged without having to shut it down etc.
Action Button
I used a generic white noise track I found from a quick Google, but of course anything can be used; just be careful with the volume - I left it at 0.3 to be safe on first run.
It works quite nicely - easy to plug in; tap to play, tap to pause. Switching off is as easy as unplugging, due to the read-only file system; this should reduce the chances of any corruption from the hard power offs.
It could be modified to allow for a longer press of the button to do a clean shutdown, which would allow the file system to stay rw and combined with a Pi Zero W would allow for wireless access to swap out the sound on it over the network.
Could even use a Zero 2 W in future and utilised the extra power for voice commands using Whisper integrated into the project using my custom integration code here.
The only real issue I found was that the pHAT won't work too well with more bass-y tones but that shouldn't be too much of an issue. I did try it with the main menu music from Total Annihilation and it wouldn't play it properly due to the lower end of the audio not able to be played by the speaker.
Also I found that the touch button would randomly activated on certain power supplies - I can't tell if this is some interference around it; or something to do with the power supplies grounding. The button pin is set to be pulled down but it still does it; however using an official Raspberry Pi power supply it works just fine.
Let me know what you think! Hopefully will be a bigger project coming soon to sign off the year so keep an eye out for that!

Sweet dreams.


Leave your feedback...