

Sign Language Translator

Made by CodersCafeTech / 3D Printing / Artificial intelligence / Communication / Voice / Wearables
About the project
A wearable Sign Language Translator powered by the VIAM and Raspberry Pi.
Project info
Difficulty: Moderate
Platforms: Raspberry Pi
Estimated time: 5 days
License: Apache License 2.0 (Apache-2.0)
Items used in this project
Hardware components

Story
In a world where communication barriers persist for individuals unable to speak, sign language stands as a vital means of expression. However, the necessity of a third-party interpreter often impedes spontaneous and natural communication, posing challenges for seamless interaction. To address this prevalent issue, we've developed an innovative electronic device equipped with AI technology capable of detecting hand symbols and translating them into audible speech in real-time. Powered by the VIAM app and the Raspberry Pi Zero, our aim is to empower individuals who are deaf or hard of hearing to communicate more freely and independently, eliminating the constant reliance on interpretation assistance.
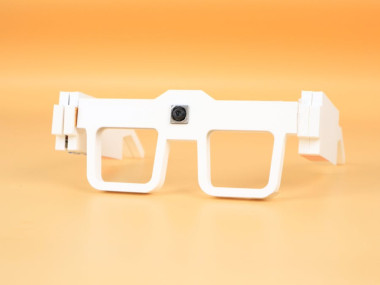
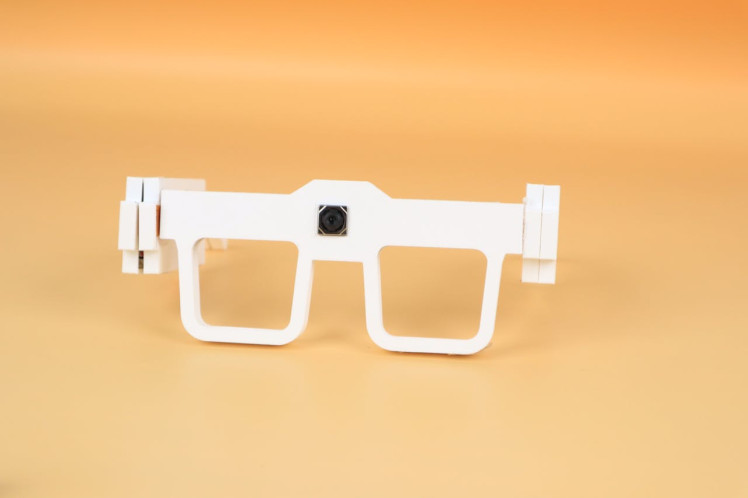
The electronic device we've created takes the form of wearable spectacles, providing a practical and discreet solution for communication barriers. Designed to be worn by individuals with disabilities, the spectacles seamlessly integrate into everyday life, allowing users to communicate effortlessly with those who do not know sign language. This wearable design not only enhances accessibility but also promotes a sense of independence and autonomy, empowering users to express themselves confidently in various social and professional settings.
In addition to promoting inclusivity and independence, our device represents a significant advancement in assistive technology. By leveraging AI-driven sign language detection and translation capabilities, we're not only breaking down communication barriers but also fostering greater understanding and empathy among individuals of diverse abilities. Ultimately, our goal is to create a more inclusive society where communication is seamless and accessible to all, regardless of linguistic or physical barriers.
HardwareFor our project, we needed a powerful single-board computer (SBC) to handle the complex tasks involved in sign language translation. While the Raspberry Pi 5 was initially considered, its size constraints led us to choose the Raspberry Pi Zero 2 W, which offers a good balance of performance and compactness.


The key feature of the Raspberry Pi Zero 2 W is its impressive performance capabilities. It features a quad-core 64-bit Arm Cortex-A53 CPU clocked at 1GHz, powered by the Raspberry Pi RP3A0 system-in-package (SiP). With 512MB of LPDDR2 SDRAM, this upgraded processor delivers a significant 40% increase in single-threaded performance and an impressive fivefold boost in multi-threaded performance compared to the original Raspberry Pi Zero.
To capture accurate hand gestures for our project, we opted for the Raspberry Pi Camera Module 3 (v3). This updated version of the camera module offers several improvements over its predecessors. It features a 16:9 aspect ratio and a fixed autofocus lens, along with a larger camera lens and a new 11.9-megapixel sensor. These enhancements ensure precise image capture, essential for reliable sign language translation.


To install the OS on the Raspberry Pi just follow this guide.
These are the main hardware used. Then we can discuss the software.
VIAMVIAM is a software platform designed to streamline the development and management of smart machines. These machines are essentially robots or devices equipped with sensors and computing power, allowing them to interact with their environment. VIAM simplifies tasks for developers by providing a consistent interface for controlling these machines, collecting data, and even incorporating machine learning capabilities.
VIAM's open-source and modular design gives developers flexibility. They can choose the functionalities they need and integrate VIAM with various hardware components. Additionally, VIAM offers cloud-based solutions for managing and scaling large numbers of smart machines.
These are the main terminologies used in the VIAM app.
- Smart machine in Viam consists of at least one computer, typically a single-board computer, running viam-server and communicating with any hardware connected to it by signalling through a digital data pin.
- The term component describes a piece of hardware that a computer controls, like an arm or a motor.
- The term Services are built-in software packages that make it easier to add complex capabilities such as motion planning or object detection to your machine.
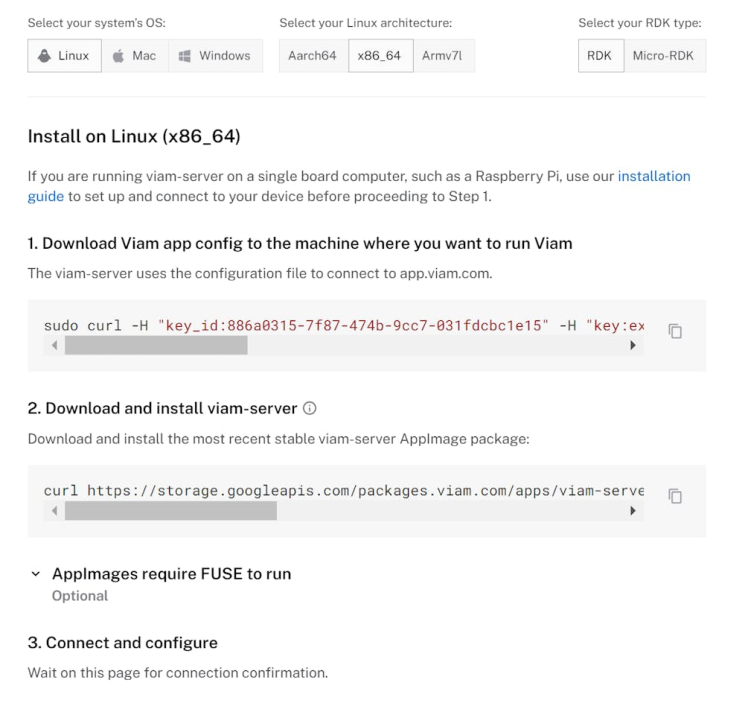
So we can start creating our smart machine. The process is pretty simple. First we logged onto the VIAM app and created a new machine. Then we installed the VIAM server by running these commands which are given in the image below. Just follow this guide if you have any doubts.
Once the Viam server successfully starts running on the Pi Zero 2W, you can see the device's online status on your dashboard.
So it's time to add the camera component, then only we can capture the image of the signs. csi-pi module is used here to get that job done.
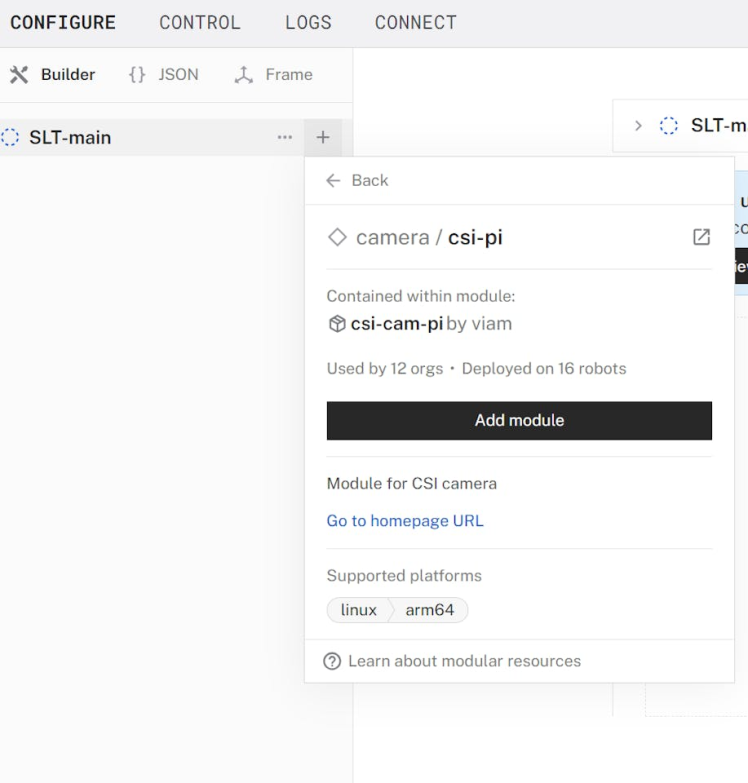
This module easily integrates CSI Cameras into your Viam projects using this camera module. These are the attributes given.

The camera is working perfectly. The below image shows the live view from the camera that is accessed in the control tab.

Now's the moment to integrate computer vision into the system by setting up the vision service for the machine.
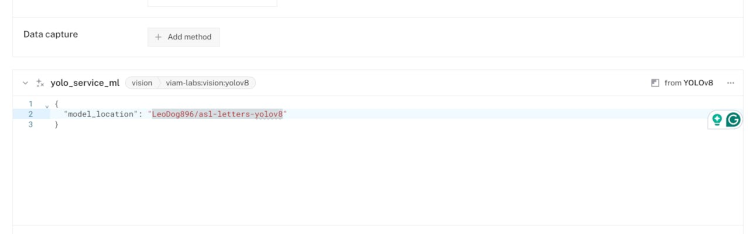
While Viam's default mlmodel vision service is compatible with Tensor Flow Lite models, this project employs a YOLOv8 model. To achieve this, we'll utilize a module from the modular resource registry designed to enhance Viam with YOLOv8 integration.
With the YOLOv8 module, we have gain the capability to leverage any YOLOv8 model seamlessly to the Viam machines.
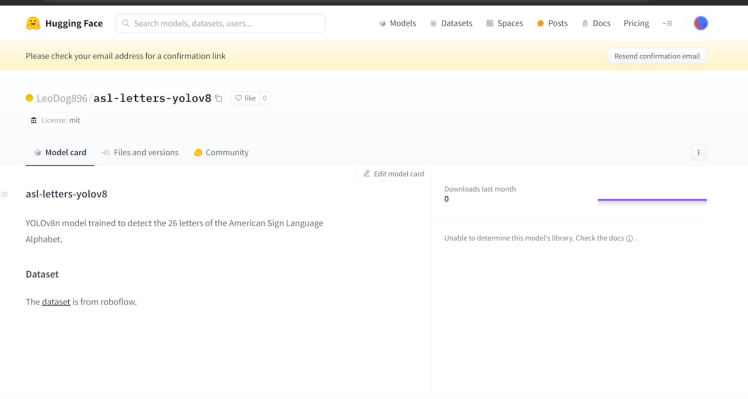
We have used a yolov8 model from the hugging face that is capable of reading the 26 letters of American sign language alphabets.
So we added the yolov8 module.

In the attributes field of the vision service, we just put our model location.
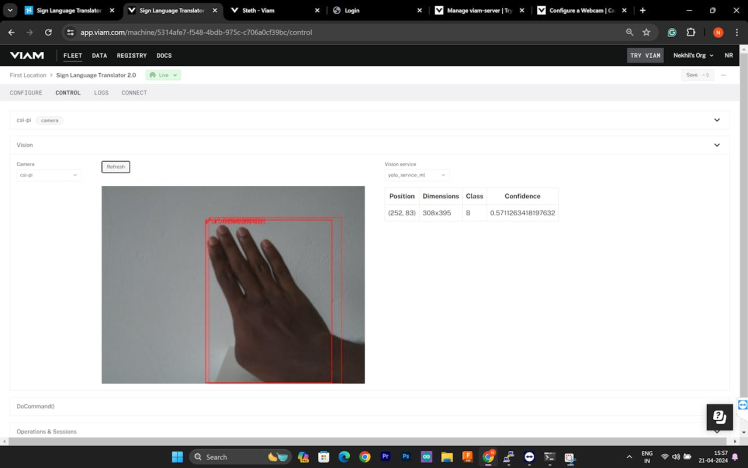
It's time to test the vision service. Here is the output shown on the control tab when the letter b is shown to the camera. It is working perfectly.
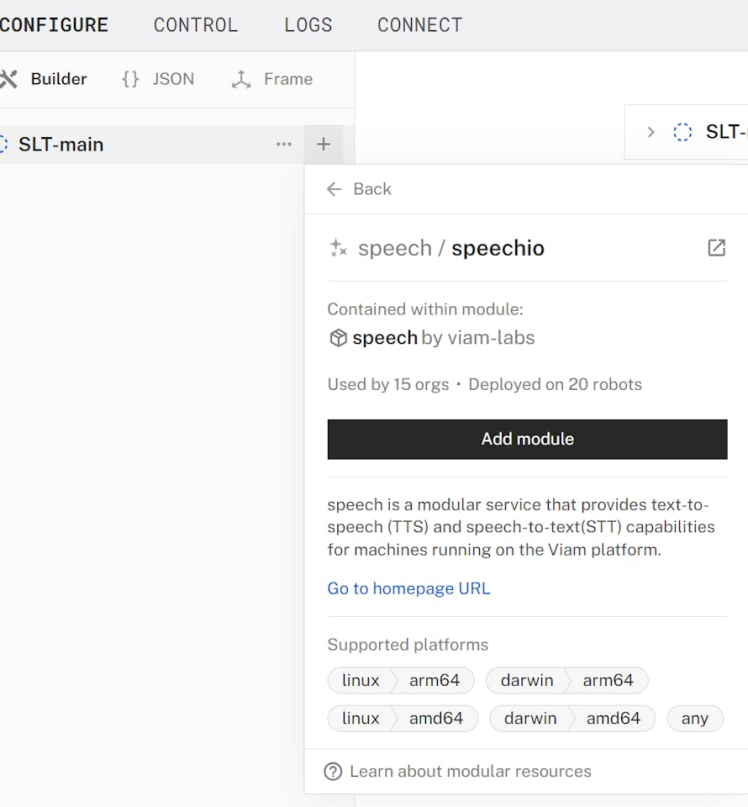
So we can detect the sign language letters. Next, we need to add a text-to-speech service to speak these letters.
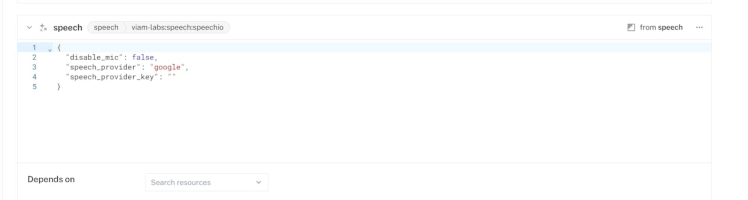
For that, we used the speech service from VIAM. It is a modular service that provides text-to-speech (TTS) and speech-to-text (STT) capabilities for machines running on the Viam platform.
We have used google as the speech provider. The below image shows its remaining attributes.
So we added all the required services and components to the Smart machine.
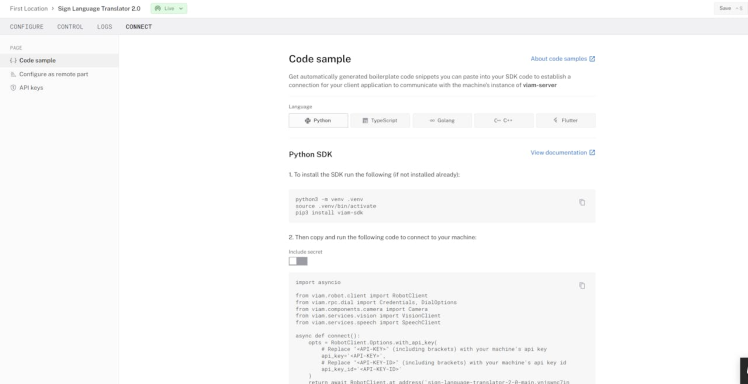
To run this project we are using their Python SDK and they also provide a 70% completed code snippet to get started with. To install the Python SDK just go to their connect tab.
The Raspberry pi zero 2W has no audio output jack, so either we need to use a shield or a sound card with the micro USB adapter.
So we decided to go with the USB sound card. The main problem is the size of the sound card.
USB sound card

In this project the space is premium so we decided to remove the case and the audio jack and decided to solder directly to the sound card.
Here is the final module which we will get after removing the unnecessary parts.

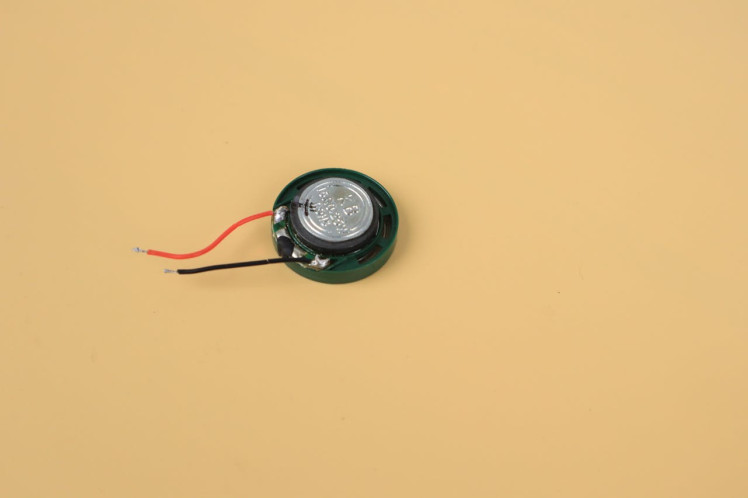
We used a 16-ohm 0.25-watt speaker to play the output audio. The audio performance is not that much good. This is just a prototype so that's enough for it.
Speaker

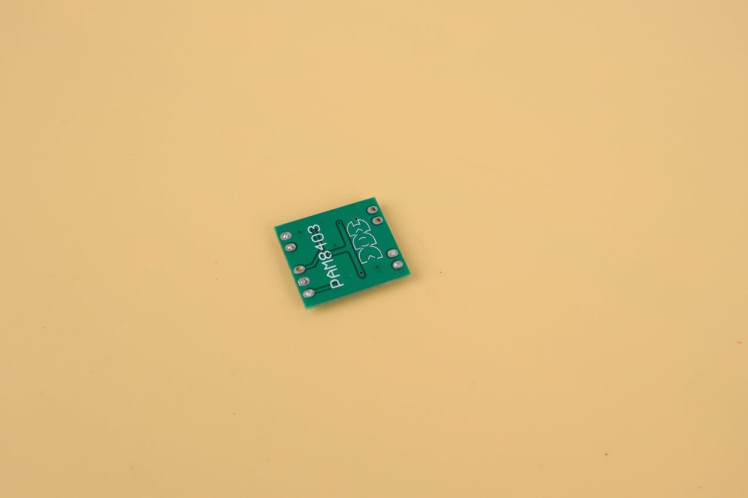
The audio is very feeble so we used a PAM8043 amplifier module.
PAM8043 amplifier module

PAM8043 amplifier module
The case for this project is designed on the Fusion 360 and 3D printed with the PLA filament.


So let's start assembly. Refer to the images below for the assembly.


This is the device we got after the assembly
Here is the demo video of the Sign Language Translator.
American Sign Language for reference

The motivation behind the project stems from the desire to foster greater inclusivity and accessibility in communication. By providing real-time translation of sign language into a universally understandable format, the device aims to bridge the communication gap between individuals who use sign language and those who do not. Future iterations of the project aim to expand the device's capabilities to interpret more complex elements of sign language, such as hand movements and orientations, to provide a more nuanced translation.
Schematics, diagrams and documents
Code
Credits
Related products


Leave your feedback...