How To Connect Bme280 To Raspberry Pi Pico Micropython
About the project
I will show you how to quickly set up the BME280 Pressure, Temperature, and Humidity sensor for the Raspberry Pi Pico.
Project info
Difficulty: Easy
Platforms: Raspberry Pi, MicroPython
Estimated time: 1 hour
License: GNU General Public License, version 3 or later (GPL3+)
Items used in this project
Hardware components
Story
The BME280 is a sensor that measures temperature, humidity, and pressure. It is often used in weather stations, environmental monitoring systems, and other applications that require accurate measurement of these parameters. The sensor is small and low-power, making it suitable for use in portable devices and battery-powered systems. It communicates with a microcontroller or computer via I2C or SPI interface.
In this tutorial, I will show you how to quickly set it up for the Raspberry Pi Pico.
If you do find this useful please like comment and subscribe:Step 1: Physical Setup
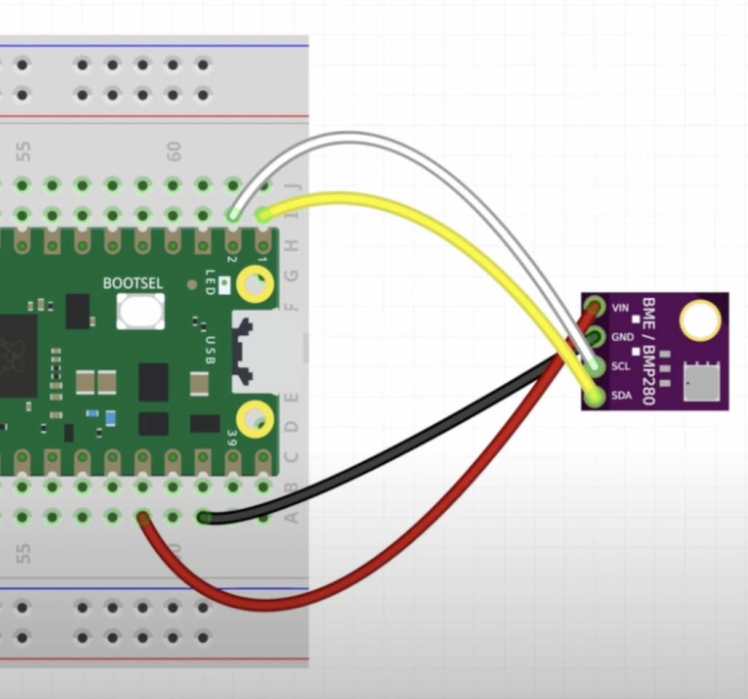
You will need four jumper wires to connect your BME280 to your Raspberry Pi Pico. This is shown in the diagram. This is all you need in terms of the physical setup.
Note you do not have to use a breadboard, you can use a female-to-female connector if you have your Raspberry Pi Pico W soldered with pins. I recommend a breadboard in general and I already assume you have some at handy if you are working with electronics.
Step 2: Download BME280 Library
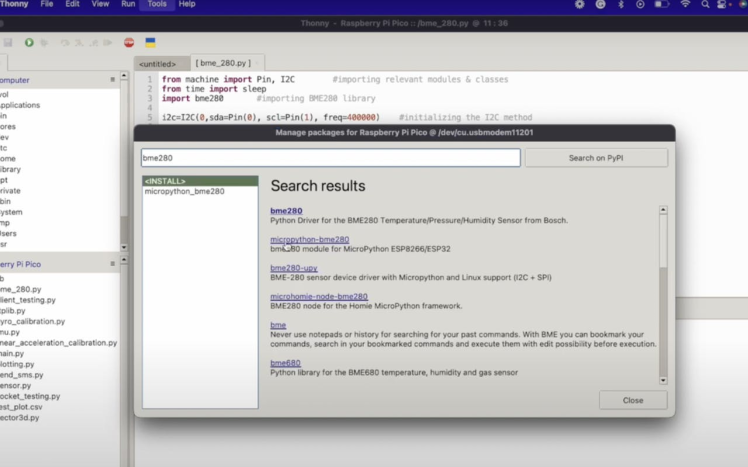
I used the Thonny Package manager to simply download the package.
Go to Tools > Packages and then search BME280, download the MicroPython version!
If you are not using Thonny you can find the code online and just copy it to a file on your Pi. Here is the GitHub page for their library.
Step 3: Create a Python File on Your Raspberry Pi Pico With the Following Codefrom machine import Pin, I2C #importing relevant modules & classes
from time import sleep
import bme280 #importing BME280 library
i2c=I2C(0,sda=Pin(0), scl=Pin(1), freq=400000) #initializing the I2C method
while True:
bme = bme280.BME280(i2c=i2c) #BME280 object created
print(bme.values)
sleep(2) #delay of 2sIf you enjoyed this tutorial please subscribe or leave a like on my Youtube Channel. Hope you had an easy setup process for your BME280. Thanks!
Credits

mahmood-m-shilleh
Mechanical and Software Engineering Background. University at Buffalo 2019 Texas A&M 2021 I make data pipelines for my day job. Outside of work, I participate in online communities regarding Full Stack Engineering, Microelectronics, and more. You can find more details about me on my Youtube Channel. https://www.youtube.com/@mmshilleh Feel free to reach out!


