Groovin’ With Pdm, Neopixels, And Xiao Nrf52840 Sense!
About the project
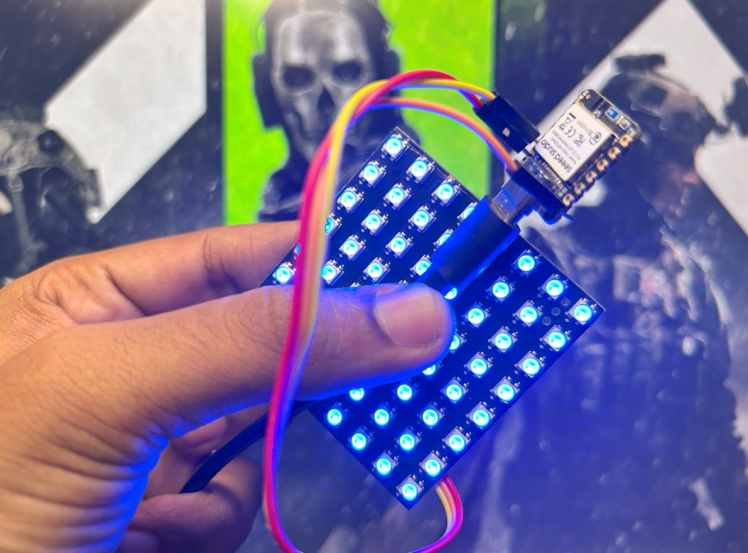
Will guide you to build a PDM react Neo Pixels.
Project info
Difficulty: Easy
Platforms: Seeed Studio
Estimated time: 1 hour
License: GNU General Public License, version 3 or later (GPL3+)
Items used in this project
Story
Hey, sound seekers and light chasers! 🎶👩â€ÂðŸâ€Â§ Today, we’re diving into an electrifying project where sound meets lights: PDM microphone + NeoPixels + Xiao nRF52840 Sense. This project will turn sound waves into visual rainbows using the magic of electronics. And yes, we’ll make it as fun as possible because, honestly, flashing lights and sound-reactive gadgets are life. 😎


You must check out PCBWAY for ordering PCBs online for cheap!
You get 10 good-quality PCBs manufactured and shipped to your doorstep for cheap. You will also get a discount on shipping on your first order. Upload your Gerber files onto PCBWAY to get them manufactured with good quality and quick turnaround time. PCBWay now could provide a complete product solution, from design to enclosure production. Check out their online Gerber viewer function. With reward points, you can get free stuff from their gift shop. Also, check out this useful blog on PCBWay Plugin for KiCad from here. Using this plugin, you can directly order PCBs in just one click after completing your design in KiCad.
What You'll Need 🛠ï¸ÂFirst, let’s gather all the cool components you’ll need to bring this project to life:
1. Seeed Studio Xiao nRF52840 Sense 🌟This microcontroller is a pocket-sized wizard! It’s got an onboard PDM microphone, Bluetooth, and an IMU. This means it can hear, move, and talkâ€â€kind of like a robot dog, but smaller. ðŸÂ•
- Why this one? It’s the tiny titan for low-power, wireless projects. It’s also just about the size of a postage stampâ€â€so it’ll fit anywhere!
- These addressable RGB LEDs are the life of the party! 🎉 With these, we’ll light up based on sound levels picked up by the PDM microphone.
- Pro tip: The more LEDs, the more dramatic the light show. Let’s make it a mini-rave, shall we? 🎶💡
- Because we’re civilized makers, we’ll need a USB-C cable for programming and jumper wires for easy connections. Breadboards make things less messyâ€â€though messy is kinda fun too. 🤷â€Â♂ï¸Â
Before diving into the exciting stuff, we’ve gotta get our Xiao ready. This step is like waking up your Xiao with a nice cup of coffeeâ€â€let’s get that brain buzzing. ☕
- Install Arduino IDE if you haven’t already. Don’t worry, it’s quick and painless.
- Install the Seeed Xiao nRF52840 boards via the Arduino IDE board manager. You’ll also need the Adafruit PDM and Adafruit NeoPixel libraries.
Got it? Awesome! High-five! ✋
Now, plug in your Xiao using the USB-C cable, and let's get that code cooking. ðŸÂ³
Step 2: Connecting the NeoPixels and Microphone 🎤💡Now let’s wire things up before jumping into the code.
Connecting the NeoPixel Strip:- VCC to 3.3V: Give the LEDs some juice! Hook up the VCC of your NeoPixel to the 3.3V pin on the Xiao.
- Ground to Ground: Can’t forget the GND connectionâ€â€it’s like the BFF connection between components. 😇
- Data to D6: Finally, connect the DIN (data input) on your NeoPixel strip to D6 on the Xiao. This is how your Xiao tells the NeoPixels to dance!
Your wiring should now look like an electrical symphony 🎶 (or spaghetti, depending on your skills with jumper wires).
Step 3: The Code – Making Lights Dance to Sound 💃✨Now comes the magic trick: we turn sound into light. Using the PDM microphone on the Xiao nRF52840 Sense, we’ll capture sound and make our NeoPixels react accordingly.
Here’s the code that does it all. Pop this into your Arduino IDE:
#include <Adafruit_NeoPixel.h>
#include <PDM.h>

#define PIN 0
#define NUMPIXELS 64

Adafruit_NeoPixel pixels(NUMPIXELS, PIN, NEO_GRB + NEO_KHZ800);

// buffer to read samples into, each sample is 16-bits
short sampleBuffer[256];

// number of samples read
volatile int samplesRead;

void setup() {
  Serial.begin(9600);
  while (!Serial);

  pixels.begin();
  pixels.setBrightness(51); // Set brightness to 20% (255 * 0.2 = 51)
  pixels.show(); // Initialize all pixels to 'off'

  // configure the data receive callback
  PDM.onReceive(onPDMdata);

  // initialize PDM with:
  // - one channel (mono mode)
  // - a 16 kHz sample rate
  if (!PDM.begin(1, 16000)) {
    Serial.println("Failed to start PDM!");
    while (1) yield();
  }
}

void loop() {
  // wait for samples to be read
  if (samplesRead) {
    // print samples to the serial monitor or plotter
    for (int i = 0; i < samplesRead; i++) {
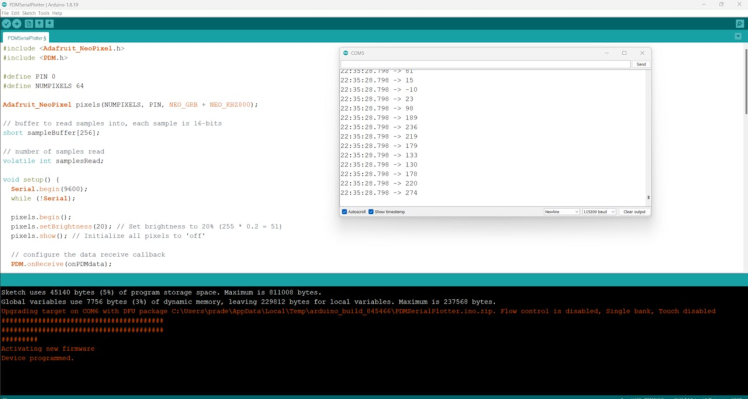
      Serial.println(sampleBuffer[i]);
    }

    // Visualize the audio data on the NeoPixel matrix
    visualizeAudio();

    // clear the read count
    samplesRead = 0;
  }
}

void onPDMdata() {
  // query the number of bytes available
  int bytesAvailable = PDM.available();

  // read into the sample buffer
  PDM.read(sampleBuffer, bytesAvailable);

  // 16-bit, 2 bytes per sample
  samplesRead = bytesAvailable / 2;
}

void visualizeAudio() {
  // Find the maximum sample value
  int16_t maxSample = 0;
  for (int i = 0; i < samplesRead; i++) {
    if (abs(sampleBuffer[i]) > maxSample) {
      maxSample = abs(sampleBuffer[i]);
    }
  }

  // Increase sensitivity by adjusting the mapping range
  uint8_t brightness = map(maxSample, 0, 16384, 0, 255); // Adjusted from 32767 to 16384
  uint32_t color = pixels.Color(brightness, 0, 255 - brightness);

  // Set all pixels to the mapped color
  for (int i = 0; i < NUMPIXELS; i++) {
    pixels.setPixelColor(i, color);
  }
  pixels.show();
}
- PDM Microphone Setup: We’re using Adafruit’s PDM library to capture sound. The microphone listens to the sound levels and records it as amplitude values.
- Sound to Light Mapping: We take the sound amplitude and map it to a color value, so louder sounds produce brighter or different-colored lights. 🎤🌈
- NeoPixel Control: We use these color values to change the color of each NeoPixel based on how loud it is. The louder it gets, the more the lights go crazy! 💥
- Plug the Xiao back in and upload the code.
- Clap, speak, or crank up your music! 🎶 Watch the NeoPixels react to the sound. The louder the noise, the more vibrant and crazy the colors will be.
Your lights should be doing a mini dance show by now! 🙌
Pro Tip: If your lights aren’t reacting much, try increasing the gain on your PDM microphone in the code by using pdm.setGain(30) (or higher).
Now that you’ve got the basic sound-reactive lights working, it’s time to spice things up a bit. Here are some ideas to take this project to the next level:
1. Use Bluetooth to Control Colors Remotely 📱You’ve got Bluetooth onboard, so why not? Connect your phone to the Xiao and control the NeoPixels wirelessly.
2. Create a Wearable! 👗Who wouldn’t want sound-reactive lights on a jacket or hat? Simply hook everything up to a portable battery, and you’re now a walking disco. Just… don’t wear it to meetings. 😅
3. Add Different Sound Effects 🎶Modify the code to display different patterns or colors for specific sound frequencies (like bass, treble, etc.). You could even add different modes like “Bass Blast†or “Rainbow Danceâ€Â.
Conclusion: Let the Party Begin! 🎉Congratulations! 🎊You’ve just turned sound into a colorful light show with PDM, NeoPixels, and the Xiao nRF52840 Sense. Now every sound in your room has a little more pizazz, and you’ve got a project you can show off to your friends!
Remember: whether it’s a whisper or a booming bass, the lights will follow. 🌈
And now, it's your turn to experiment: try different light patterns, and sound effects, or even build an entire sound-reactive installation. The sky’s the limit, and the only rule is: the louder, the better. 💥


Leave your feedback...