

Esp32 Display Tutorial: Draw Gui With Lovyangfx丨lesson 2
Made by Elecrow / Communication / Displays / Home Automation / IoT
About the project
Learn to draw graphics and text on your ESP32 display using LovyanGFX and TFT_eSPI libraries.
Project info
Difficulty: Easy
Estimated time: 1 hour
License: GNU General Public License, version 3 or later (GPL3+)
Items used in this project

Story
ESP32 Display Tutorial: Draw GUI with LovyanGFX丨Lesson 2
Hi everyone! Welcome to the second lesson of the CrowPanel ESP32 HMI tutorial. In this lesson, I will demonstrate how to display arbitrary graphics and text on the screen. To achieve this effect, we need to use two graphics libraries: the TFT_eSPI library and the LovyanGFX library.
If you haven’t seen the former CrowPanel Tutorials, please refer here:
# Lesson 1: Setting Up the Development Environment with CrowPanel
What are TFT_eSPI and LovyanGFX
TFT_eSPI and LovyanGFX are both libraries for interfacing with TFT (Thin Film Transistor) displays using ESP microcontrollers, such as the ESP8266 and ESP32. They are commonly used in hobbyist and professional projects that involve small displays.
TFT_eSPI
TFT_eSPI is a graphics library designed for TFT displays, providing an efficient way to manage and render graphics on these displays using ESP8266 and ESP32 microcontrollers.
Features:
- Supports a wide range of TFT displays with various controllers like ILI9341, ST7735, ST7789, and more.
- Offers hardware-accelerated graphics functions, improving performance.
- Provides a set of drawing functions (lines, circles, rectangles, text rendering, etc.).
- Compatible with Arduino IDE.
- Includes touch screen support for displays with integrated touch controllers.
- Allows for the use of SPIFFS (SPI Flash File System) for storing images and fonts.
Usage: Often used in projects where low-cost, small-sized color displays are needed, such as IoT devices, custom GUIs, and portable gadgets.
LovyanGFX
LovyanGFX is another graphics library similar to TFT_eSPI but aims to provide more advanced features and flexibility, particularly for use with the ESP32 microcontroller.
Features:
- Supports a wide range of displays and display controllers.
- Optimized for high performance with the ESP32, leveraging its dual-core processing capabilities.
- More configurable and flexible compared to TFT_eSPI, allowing for advanced graphics rendering techniques.
- Offers extensive support for different pixel formats and color depths.
- Provides features for sprite rendering and off-screen drawing.
- Supports DMA (Direct Memory Access) for faster data transfers.
- Integrates well with the ESP-IDF (Espressif IoT Development Framework).
Usage: Suitable for more complex projects that require high-performance graphics, such as advanced GUIs, gaming applications, and any project that can benefit from the additional flexibility and performance enhancements offered by LovyanGFX.
Both libraries are popular in the ESP32 and ESP8266 communities for their ability to simplify the development of graphical applications on TFT displays, making it easier to create visually appealing and functional interfaces. The choice between them often depends on the specific requirements of your project and the support for the display driver in the library.
Choosing the Right Library
Based on the display drivers and the size of the TFT boards, our choice in the tutorial is listed below:
- For 2.4-inch, 2.8-inch, or 3.5-inch boards, we’ll use the TFT_eSPI library.
- For 4.3-inch, 5-inch, or 7-inch boards, we’ll use the LovyanGFX library.
Displaying Graphics with LovyanGFX Library
1. Open the Course File: Navigate to the code used in the second lesson and open it. Download the code here.
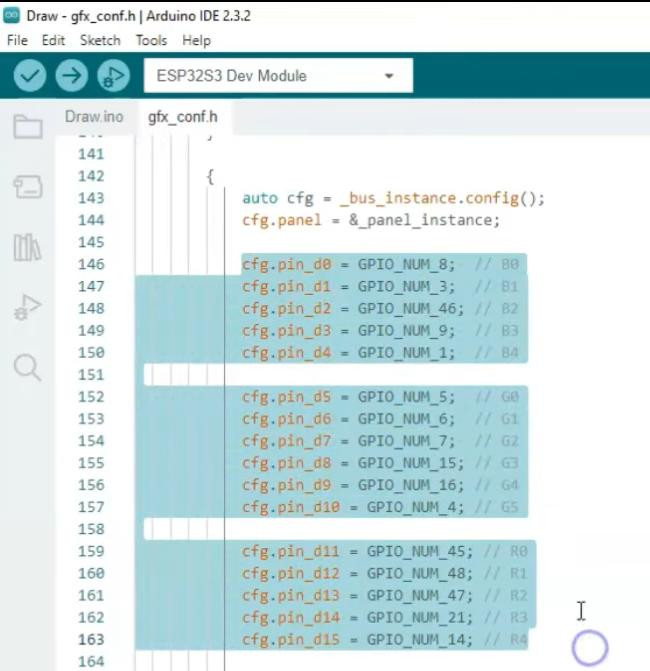
2. Configuration: The configuration code for the display and touch parts is in the gfx_conf.h file. This file includes the header file for the LovyanGFX library and uses its display driver code.
Based on your hardware, modify the macro definitions as needed.
- For a 5-inch board, no modifications are needed.
- For a 7-inch board, comment out the 5-inch macro and uncomment the 7-inch macro. (Remember to comment out the other two unused macros; otherwise, it will cause errors.)
3. Modify the code based on the Hardware Information: As I use the interface provided by the LovyanGFX library, I only need to complete this code based on the hardware information of the board. Use the schematic diagram of your board to find the necessary pin connections. For me is the schematic diagram for the 5" board. Adjust the configuration code based on these connections. Download the schematic diagram here.
- The pin labels indicate their connections.
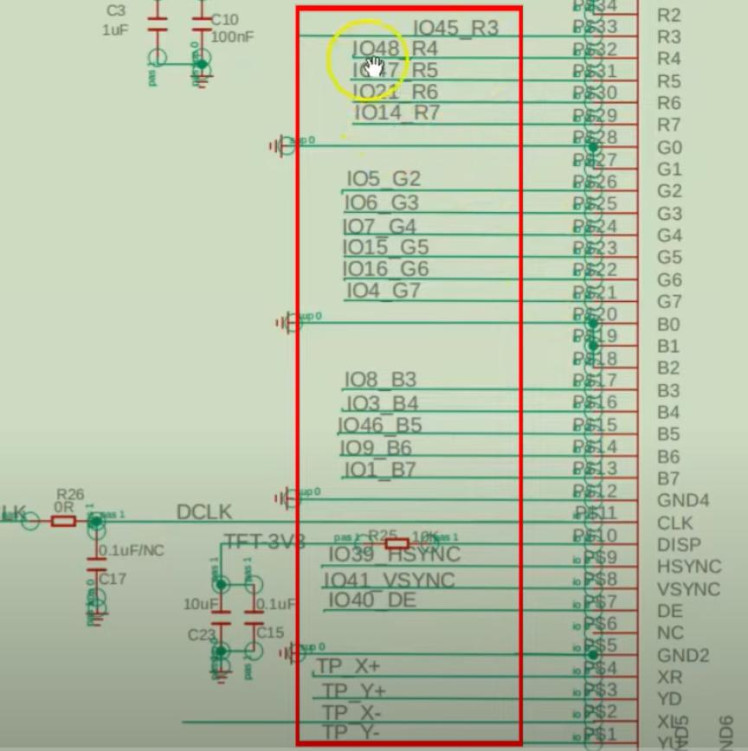
- This code section configures hardware connections with brief comments after each line.
- According to the schematic, GPIO8 is connected to B3 instead of B0. So we need to update the code comments accordingly. Adjust B0 to B4 in the comments to match B3 to B7 for clarity.
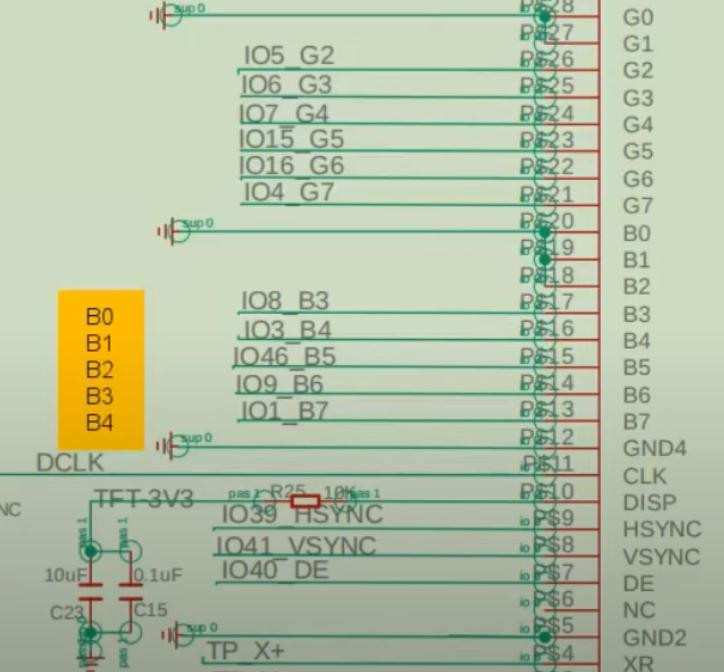
- Next, examine G0 to G5. The schematic shows G2 to G7 are actually used, matching the pins and code.
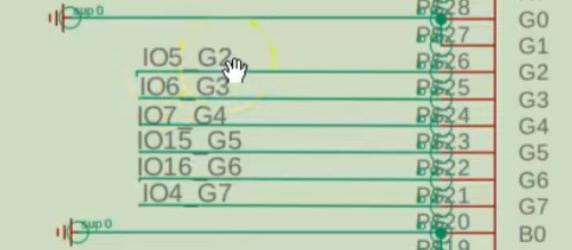
- The same method applies to R0 to R4. This screen uses RGB565 encoding, with red, green, and blue occupying 5, 6, and 5 bits respectively, totaling 16 bits. Hence, the screen's color depth is 16 bits. Besides the 16 IO pins for colors, other IO pins must also match the code. Refer to the schematic for these connections.

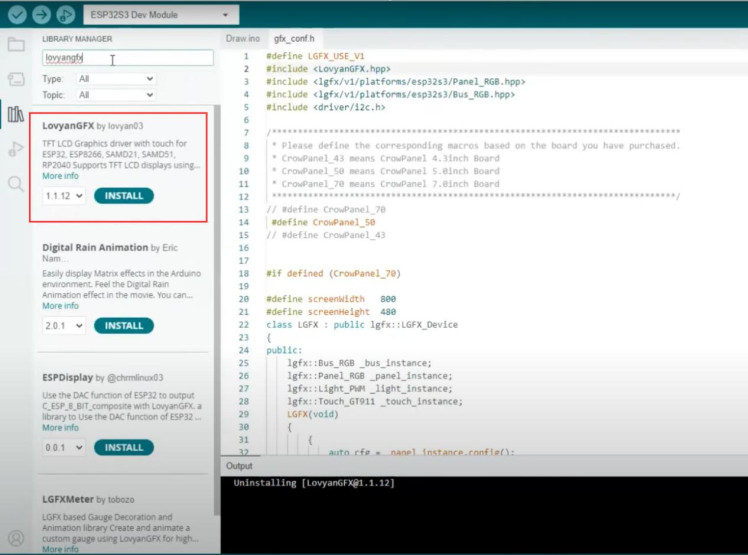
5. Install the Library: Open the library manager in the IDE, search for "LovyanGFX," and install it. I choose the latest version.
6. Understanding LovyanGFX Library: For example:
- fillScreen(): Fills the entire screen with a specified color.
- fillCircle(): Draws a solid circle at given coordinates.
- setCursor(): Sets the cursor at a certain coordinate.
- print(): Prints specified characters at the cursor location.
You can find more introductions about LovyanGFX here.
Displaying Graphics with TFT_eSPI Library
1. Open the Course File: Find the common code for 2.4-inch, 2.8-inch, and 3.5-inch screens in the course folder and open it.
2. Understanding TFT_eSPI Library: This graphic library allows you to call functions to display arbitrary patterns and characters. For example:
- fillScreen(): Fills the entire screen with a certain color.
- fillCircle(): Draws a solid circle at given coordinates.
- setCursor(): Sets the cursor at a given coordinate.
- print(): To display the specified characters at the cursor location.
3. Install the Library: Click on Sketch, find the Include Library, open the Manage Library, search for "TFT_eSPI," and install the latest version provided by Bodmer.

4. Configure the Library:
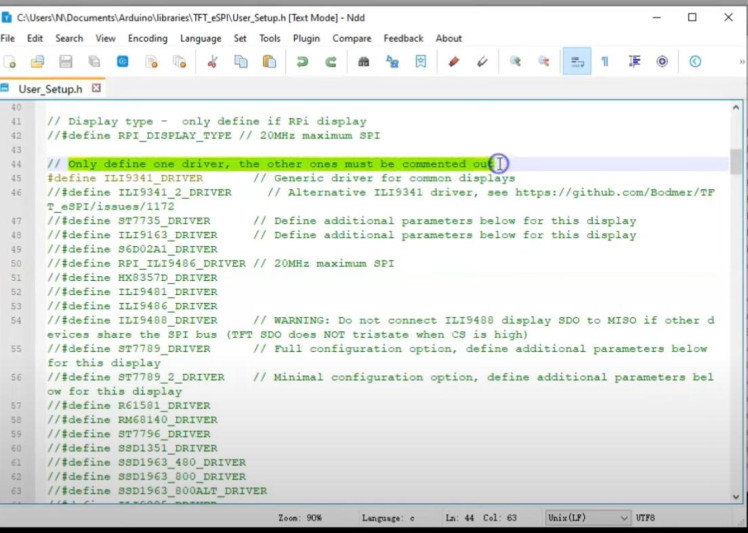
- Locate the User_Setup.h file in the TFT_eSPI library directory and open it with any edito


- Select the corresponding driver for your screen based on its chip (e.g., ILI9341 for a 2.4-inch screen). We can only define one driver, the other ones must be commented out. You can find this information at the CrowPanel Page.

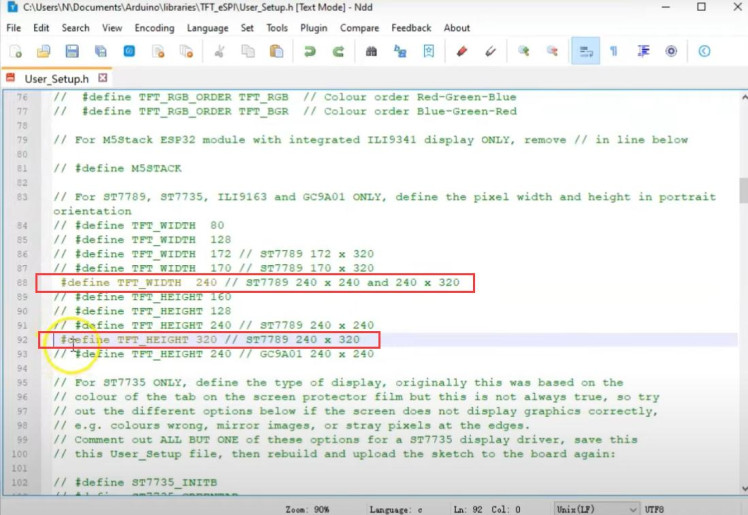
- Set the screen resolution in the configuration file. Remember to uncomment the resolution of your board. You can also find this information at the CrowPanel Page.
- Configure the pin information based on the board's schematic.
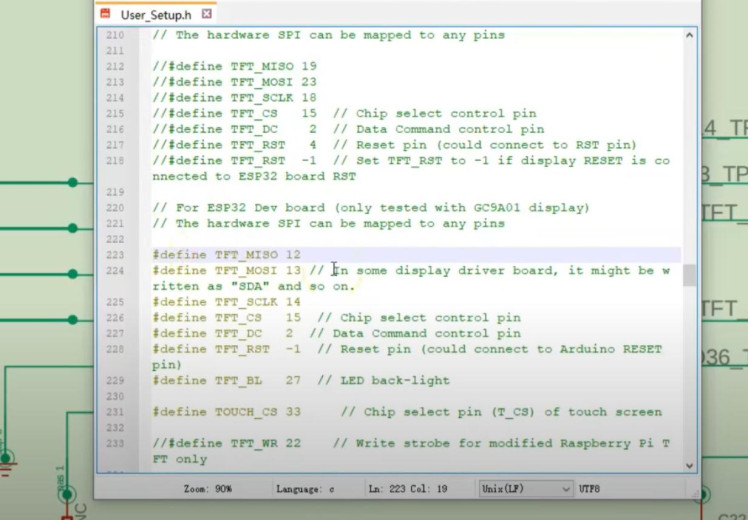
5. Pin Configuration: Modify the pin configurations to match your board’s hardware setup. To save time and avoid mistakes, you can also copy the code at the TFT_eSPI Setup file. If so, you can jump to the part of Compiling and Uploading the Code. Otherwise, please follow the steps below:
- MOSI (in some display driver boards, it might be written as “SDAâ€Â): Set to the IO13 pin connected to SDA in the schematic.
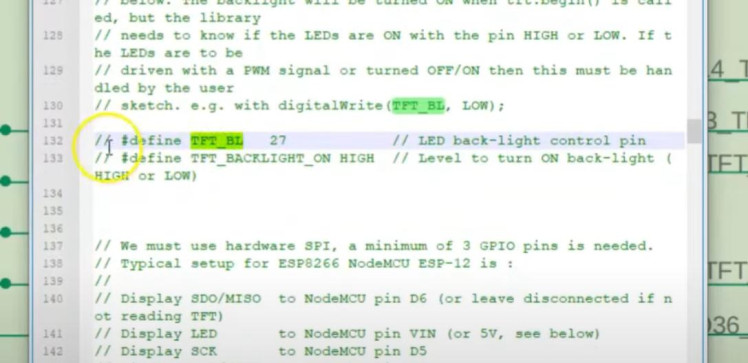
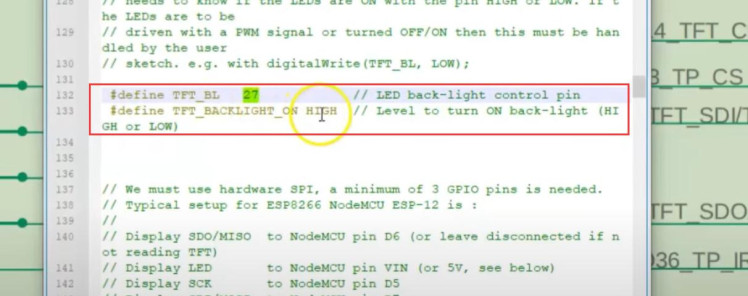
- TFT SCLK, CS, D/C, RESET should also be set according to the schematic. And LED back-light pin should be connected to IO27.
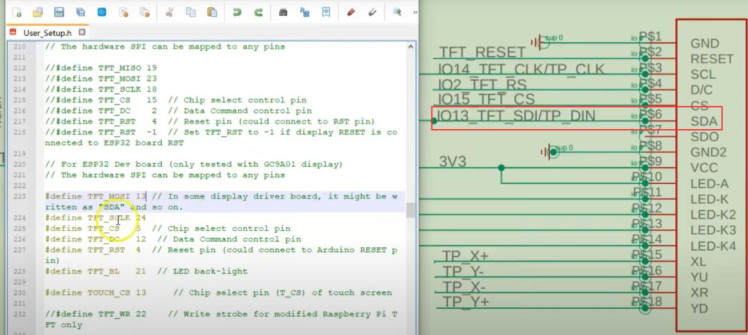
- The touch screen of CS should be set to 33.
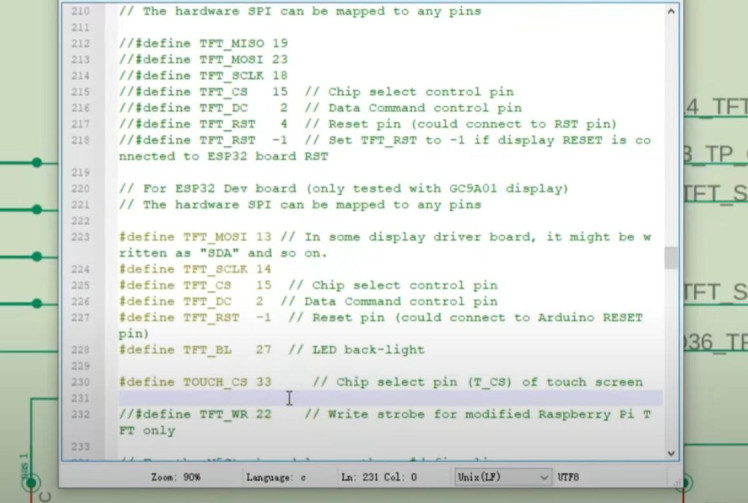
- #define TFT_MISO 12
- Comment on the two sentences shown in the picture:
Compiling and Uploading the Code
1. Select Compilation Environment: In the Arduino IDE, configure the environment based on your board. For example, for a 5-inch screen, go to Tools > Board, select ESP32S3 Dev Module, set PSRAM to OPI PSRAM, go to Partition Scheme, and select Huge APP.
If you wanna know how to set up the development environment, learn it here.
2. Upload the Code: Connect the board to your computer with a USB cable, select the correct serial port, and click upload.
Conclusion
By following these steps, you should be able to configure and use the LovyanGFX and TFT_eSPI libraries to display graphics and text on different screen sizes. Experiment with various functions to draw your favorite patterns and enhance your understanding.
If you found this tutorial helpful, please subscribe Elecrow’s Youtube channel. for updates on new lessons. See you next time!
Code
Credits
Related products


Leave your feedback...