Energy Monitor With Blues Notecard
About the project
Monitor energy consumption of any load using Blues Notecard and the pzem-004T energy meter module.
Project info
Difficulty: Moderate
Platforms: Arduino, Blynk, DFRobot, Espressif, Blues Wireless
Estimated time: 3 hours
License: MIT license (MIT)
Items used in this project
Hardware components
Story
If you've ever wanted to limit the energy consumption of a specific load in your home or elsewhere, this project is perfect for you. In this project, we will use the Blues Notecard, ESP32, PZEM-004T, and Blynk to build an energy monitoring device. Additionally, we'll configure in-app push notifications to alert you when a set energy threshold is exceeded.
How it WorksBefore diving into the technical details, here's a brief overview of how the device operates:
The Energy Monitor measures key electrical parameters, including voltage, current, power, and the energy consumed by the connected load. This data is then sent to the cloud for visualization and processing.
In the cloud, a function monitors energy consumption and triggers an alert when the usage reaches or exceeds a predefined threshold. The user is notified via a push notification on their mobile phone. They can then decide whether to turn off the device, which can be done remotely.
PZEM-004T V3.0To be able to measure energy we will be utilizing the PZEM-004T AC communication module. The module is mainly used for measuring AC voltage, current, active power, frequency, power factor and active energy, the module is without a display function, and the data is read through the TTL interface.
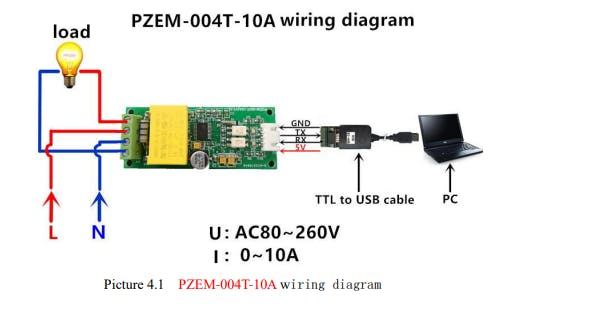
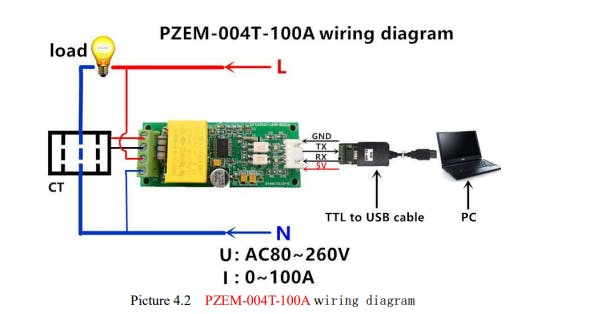
The module is available in two variants:
- PZEM-004T-10A: Features a built-in shunt for measuring currents up to 10A.
- PZEM-004T-100A: Utilizes an external transformer to handle currents up to 100A.
Here’s a clear breakdown of the parameters for the PZEM-004T module:
1. Voltage- Measuring Range: 80~260V
- Resolution: 0.1V
- Measurement Accuracy: ±0.5%
PZEM-004T-10A:
- Measuring Range: 0~10A
- Starting Current: 0.01
PZEM-004T-100A:
- Measuring Range: 0~100A
- Starting Current: 0.02A
- Resolution: 0.001A
- Measurement Accuracy: ±0.5%
PZEM-004T-10A:
- Measuring Range: 0~2.3kW
PZEM-004T-100A:
- Measuring Range: 0~23kW
- Starting Power: 0.4W
- Resolution: 0.1W
Display Format:
- <1000W: Displays one decimal (e.g., 999.9W).
- ≥1000W: Displays only integers (e.g., 1000W)
- Measurement Accuracy: ±0.5%
- Measuring Range: 0.00~1.00
- Resolution: 0.01
- Measurement Accuracy: ±1%
- Measuring Range: 45Hz~65Hz
- Resolution: 0.1Hz
- Measurement Accuracy: ±0.5%
- Measuring Range: 0~9999.99kWh
- Resolution: 1Wh
- Measurement Accuracy: ±0.5%
Display Format:
- <10kWh: Displayed in Wh (e.g., 9999Wh).
- ≥10kWh: Displayed in kWh (e.g., 9999.99kWh).
- Reset Energy: This can be reset via software.
information sourced from the PZEM-004T datasheet.
Blues NotecardTo push the energy readings to the cloud we would be using the Blues Notecard. The Blues Notecards allows us to easily send and receive information to and from any device, anywhere, and at any time via cellular, Wi-Fi, Lora, or Satellite without having to change a single line of code. The same code will work for whatever connectivity option you choose.
One aspect I appreciate about the Blues Notecard is its ability to queue data for cloud routing when there’s no internet connection. Once the connection is restored, it automatically sends the queued data.
Setting Up Your Blues NotecardKey Concepts to KnowBefore you dive in, it's important to understand a few key concepts:
The Notecard is a device-to-cloud data pump that reduces the complexity of building connected solutions with a secure, reliable cellular, Wi-Fi, or LoRa connection. It's a System-on-Module (SOM) that's ready for embedding into any project.
Notecarriers are development boards that help you get started quickly with the Notecard. There are a variety of Notecarriers designed to fit different needs, from prototyping with a Feather-based MCU to deploying a production solution.
Notehub is the cloud service the Notecard uses to securely send and receive data. Notehub also provides a console for fleet management and secure connectors for routing data to 3rd-party cloud applications.
A Note is a JSON object containing developer-provided content. A Note is the primary means of sending data to/from a Notecard.
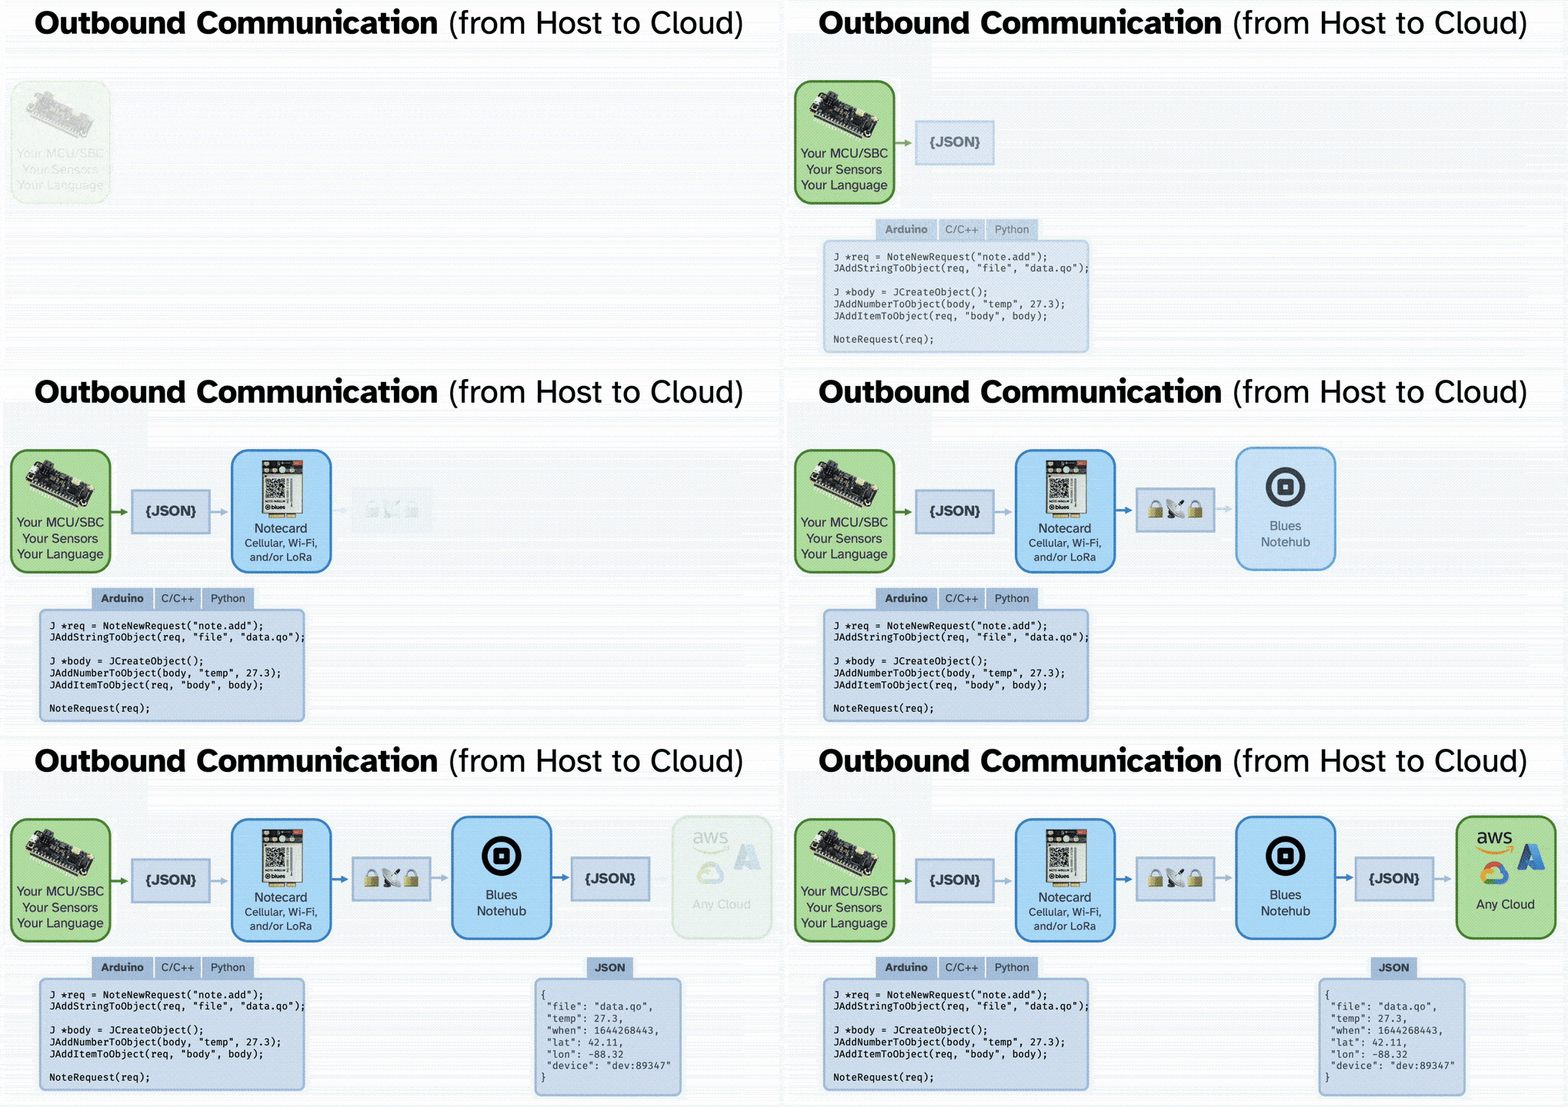
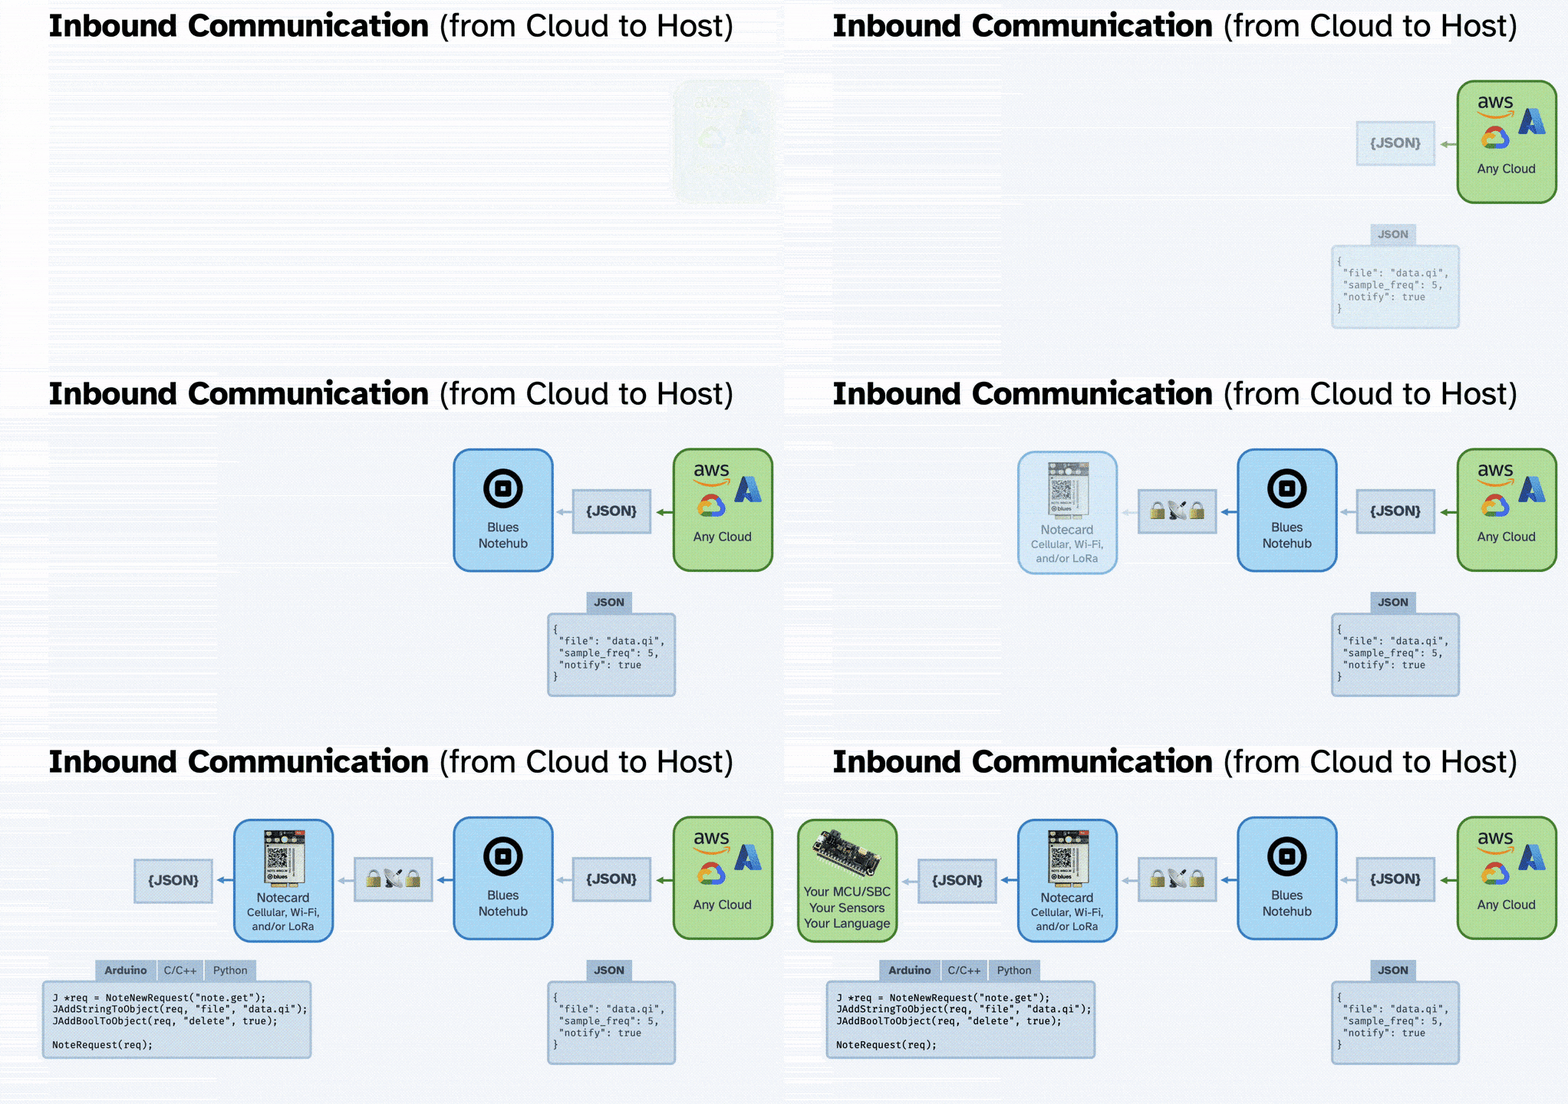
Notecard and Notehub work together to provide bidirectional wireless communication capabilities, both outbound (from your microcontroller or single-board computer to the cloud):
And inbound(from the cloud to your microcontroller or single-board computer):
For this project, we will be using the Notecarrier A. The Notecarrier A includes two u.FL cables for cellular and GPS with one side connected to the Notecarrier and one side free.

First, Remove the screw from the mounting receptacle on the Notecarrier and rotate the U.FL cables away from the M.2 socket.
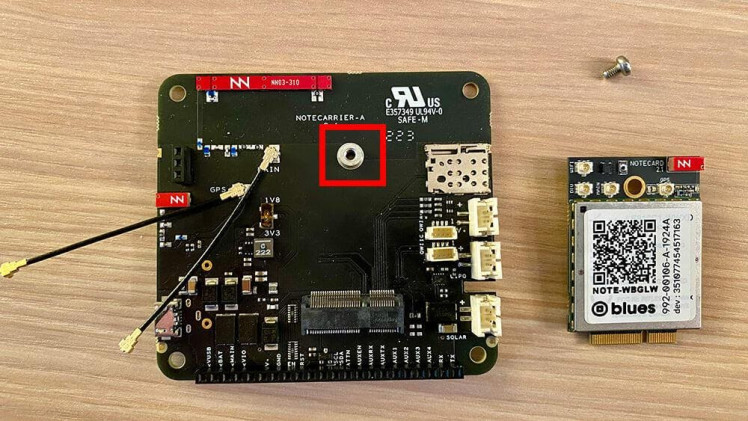
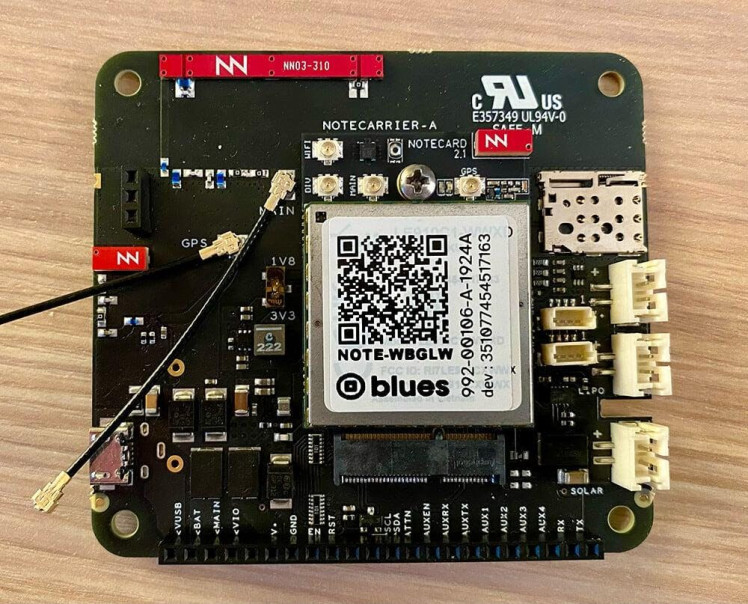
Place the Notecard into the M.2 slot on the Notecarrier. Once inserted, press gently until the Notecard is inserted and the screw receptacle hole is completely visible.
Re-insert the screw into the mounting receptacle and tighten to secure the Notecard to the Notecarrier. Be sure to not overtighten the screw.
Secure the free end of the u.FL cable connected to the socket labelled MAIN on the Notecarrier to the MAIN socket on the Notecard.
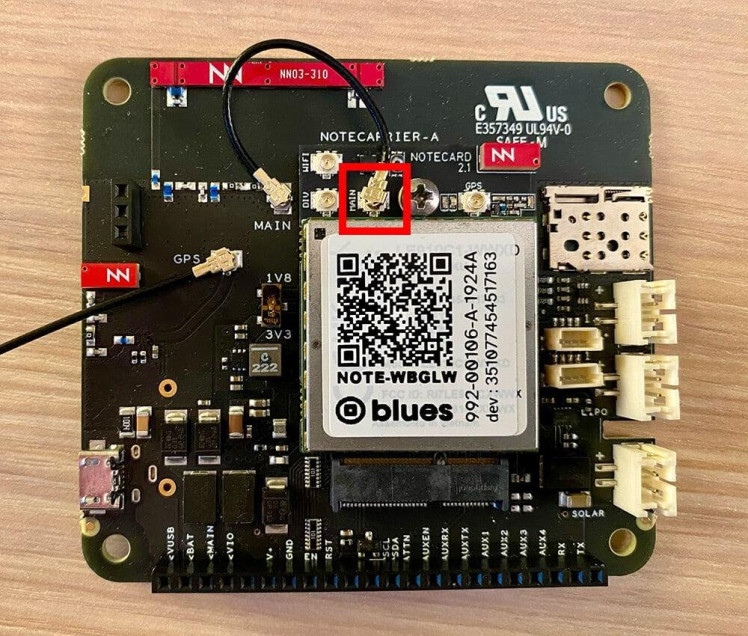
Now your Notecard is ready.
Blynk SetupTo be able to visualise our energy reading we will be using Blynk. Blynk is a platform that allows you to build IoT (Internet of Things) applications quickly and easily. It provides tools for controlling and monitoring IoT devices via a smartphone or web dashboard.
To use Blynk head to blynk.io and create an account if you don’t have or otherwise log in.
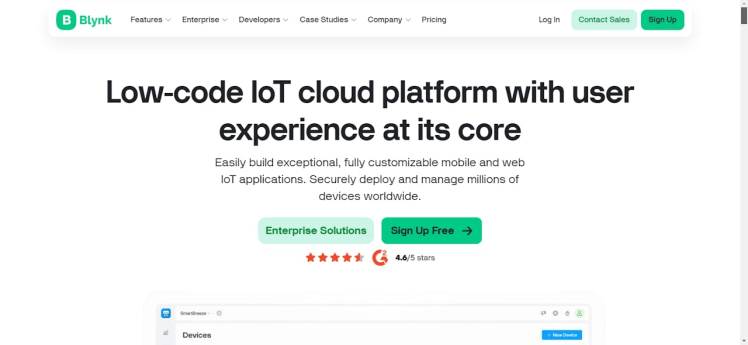
When you are in, you should be directed to the Blynk Console.
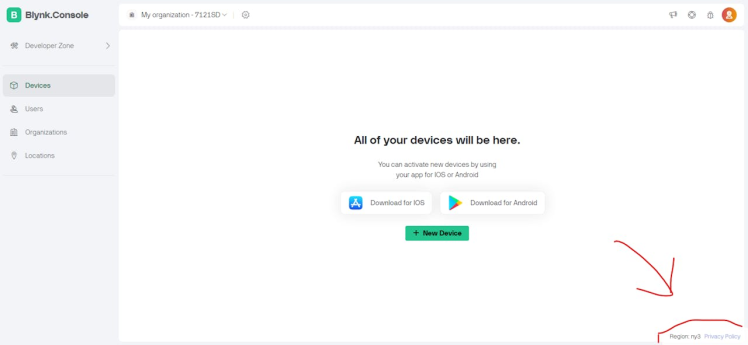
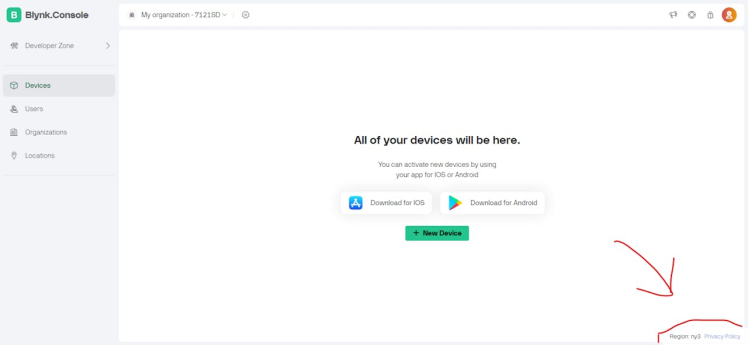
Take note of the region code we will need it in Notehub. Let’s leave Blynk Console for now and move to Notehub
NotehubOn the Notehub page click on Create Project
A form should pop up. The form should look like this:
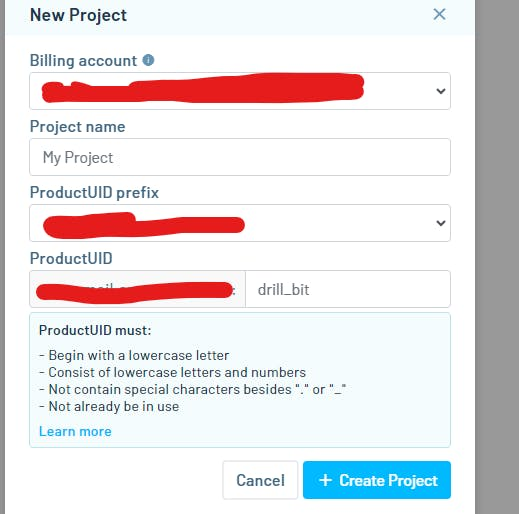
Type in your project name, any name of your choice, and click Create Project. You should see the following screen below.
“I have already connected a device to my project, which is why you can see a device there, but for you, your device list should be empty. Your device will be automatically added when you upload the code to the board, which we will do in the next section.”

Next, we need to create a route to Blynk. A Route is an external API, or server location, where Notes can be forwarded upon receipt.
For our project, we will create a Blynk route on Blues to route a note containing our energy readings to Blynk’s server.
On the left side of Notehub, click on Routes. Then click on + Create Route. Find Blynk and click on Select.
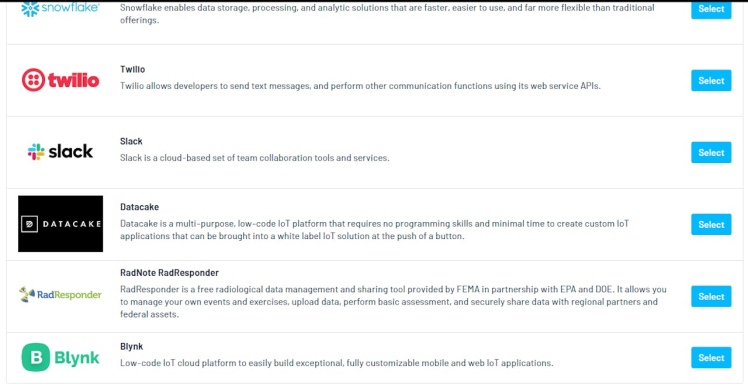
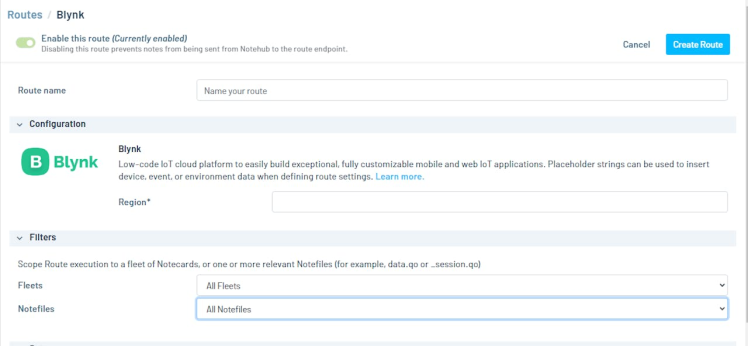
Give your Route any name of your choice and type in the region code I asked you to take note of earlier. If you have forgotten it, it is at the bottom of your Blynk console.
Now, click on the Notefiles drop-down and select Selected Notefiles. In the IncludeOtherNotefiles textbox type energy_readings.qo.
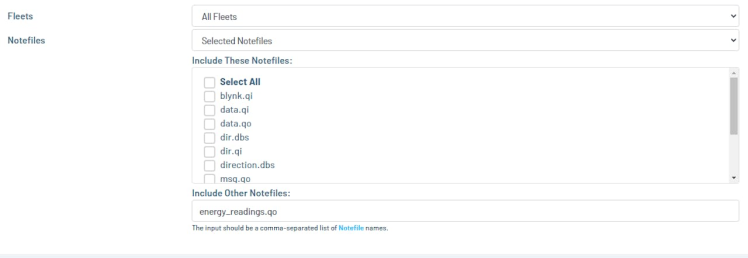
. Finally, click Create Route to create the Blynk route.
Let’s leave Notehub for now and get to the actual devices.
The HardwareBelow is the circuit diagram of the energy Meter
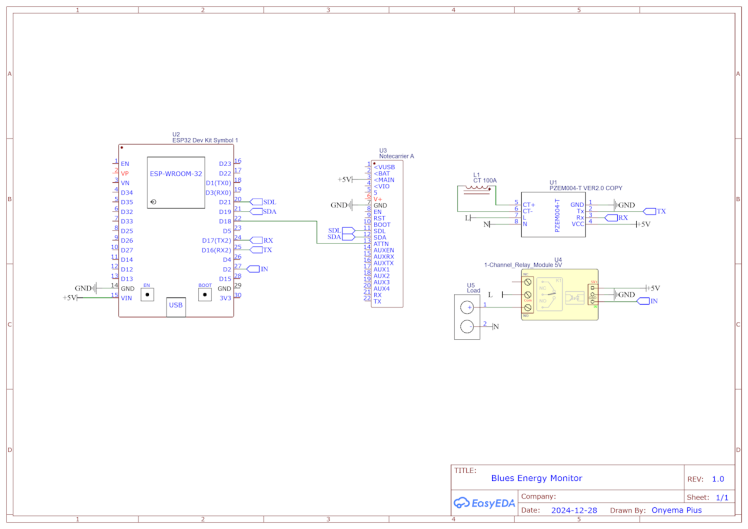
The code can be found in the GitHub repository attached at the bottom of this article. Before you upload the code, change the following:

You can find your productUID in Notehub under settings.

The cellular Notecard has an embedded SIM which it uses by default; however, If you are using an external SIM card, like me there are some variables you need to change in the code.
leave the macro below as true if you are using an external SIM card.

change the APN name from "web.gprs.mtnnigeria.net" to your cellular carrier’s APN.
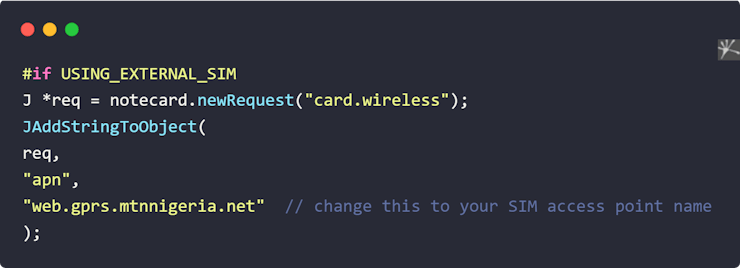
After uploading the codes to the devices, go to Notehub you should see your device in the Devices section.

Your device must show up on the Notehub before you move on to the next step, skipping this could cause some communications problems with Blynk. If you are having an issue with this check the debugging section at the end of this article.
How the Code WorksThe ESP32 requests the energy readings from the PZEM-004T and sends them to the notecard. The notecard takes these readings and pushes them to Notehub, Notehub then takes this data and routes it to Blynk.
For the notification feature, an energy threshold is set in Blynk. When this threshold is reached or exceeded, Blynk triggers an in-app push notification on the Blynk mobile application. This notification alerts the user about the energy usage and prompts them to decide whether to turn off the device.
There is a button on the Blynk web dashboard and in the mobile app to turn off the device. The ESP32 uses its EEPROM to always remember the state of the load switch, even if the power goes off.
Creating your Blynk TemplateClick here to log in to Blynk Console. In the upper left corner of the screen, click on Developer Zone.
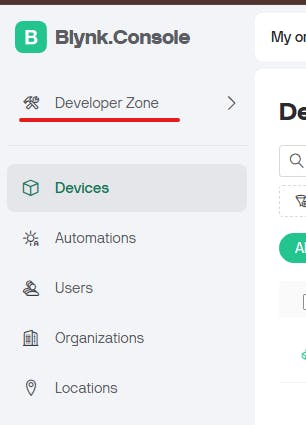
Under the templates section click + New Template at the top right corner of the screen
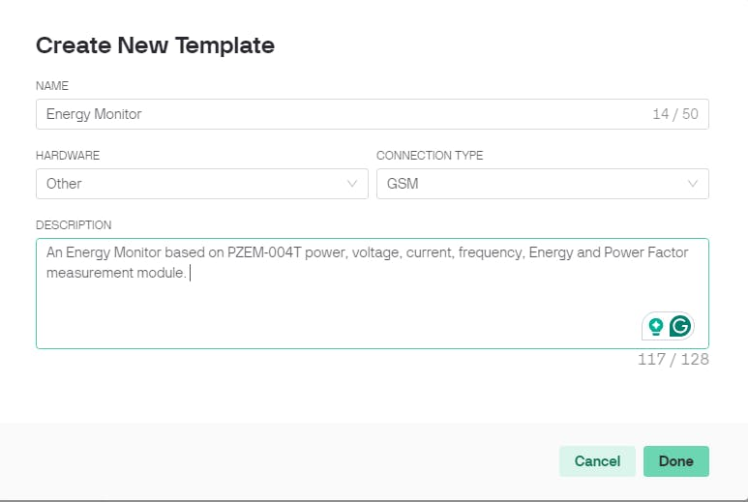
Fill in the form that pops up as seen in the image above. You can give your template any Name and Description you wish. Then click Done.
Creating DatastreamsDatastream allows data to flow from external sources, in our case Blues, to Blynk and from Blynk to other destinations.
To create a datastream click on datastreams on the left side panel on blynk console.
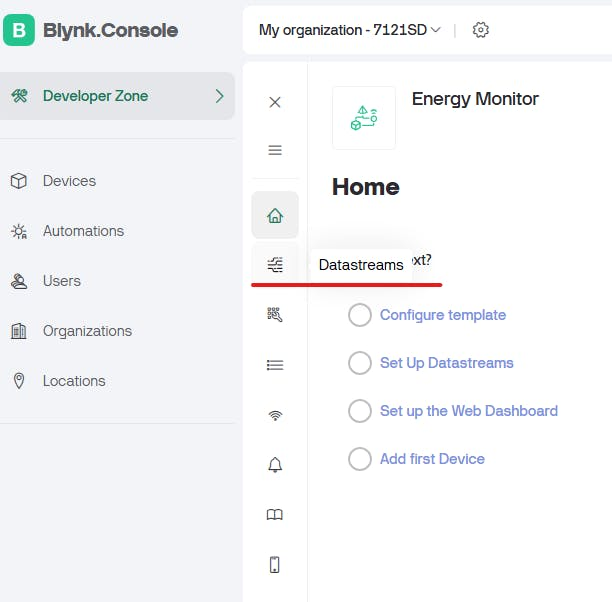
Click on + New Datastream and select Virtual Pin
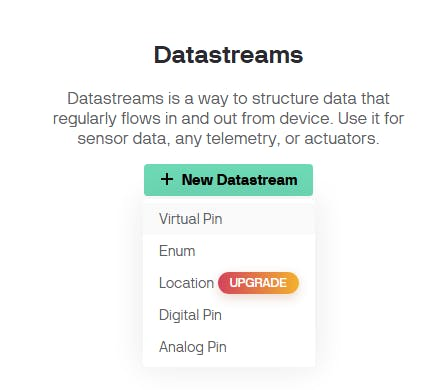
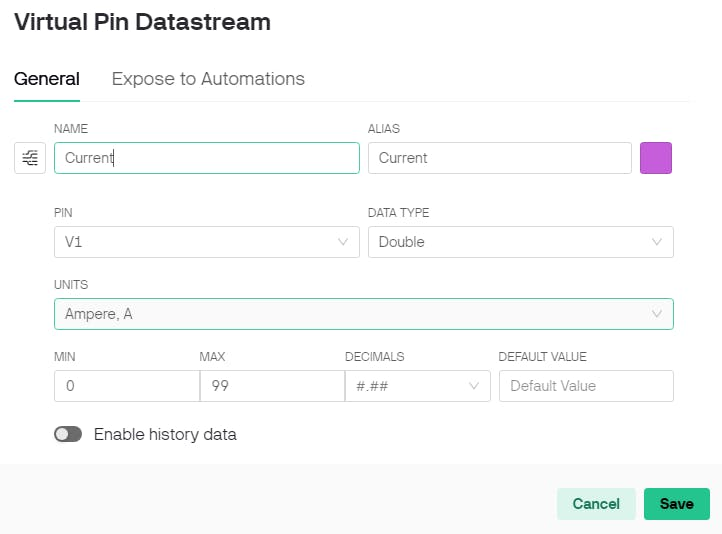
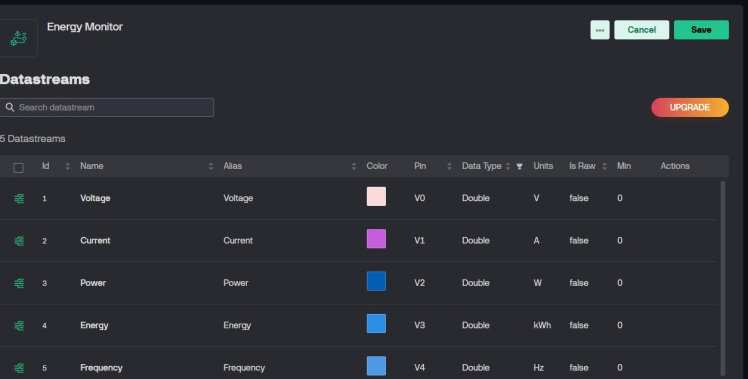
We will be creating five datastreams: Voltage, Current, Power, Energy and a switch for the load.
For Voltage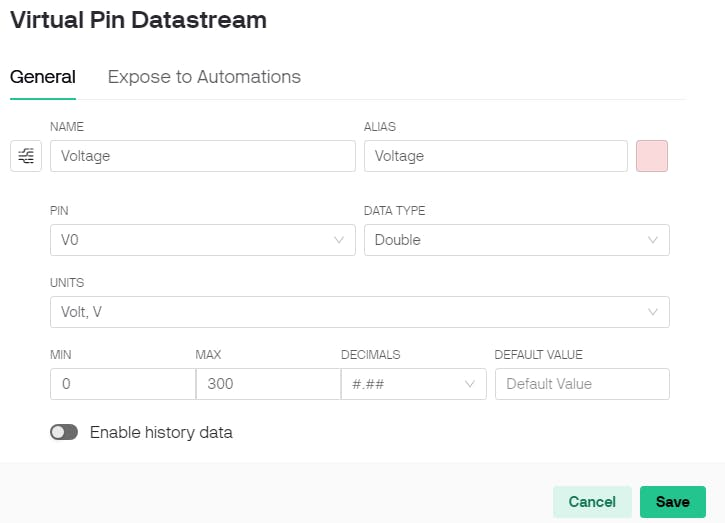
For Current
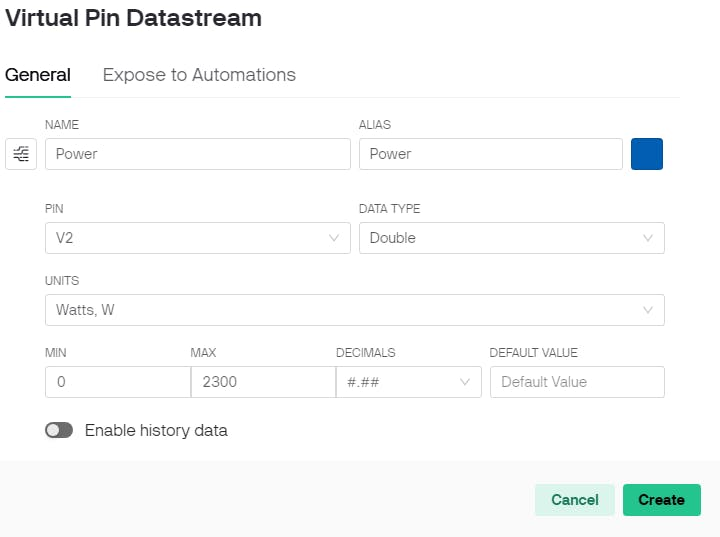
I set the max power to 2300 because that is the max power rating of the pzem-004T.
For Energy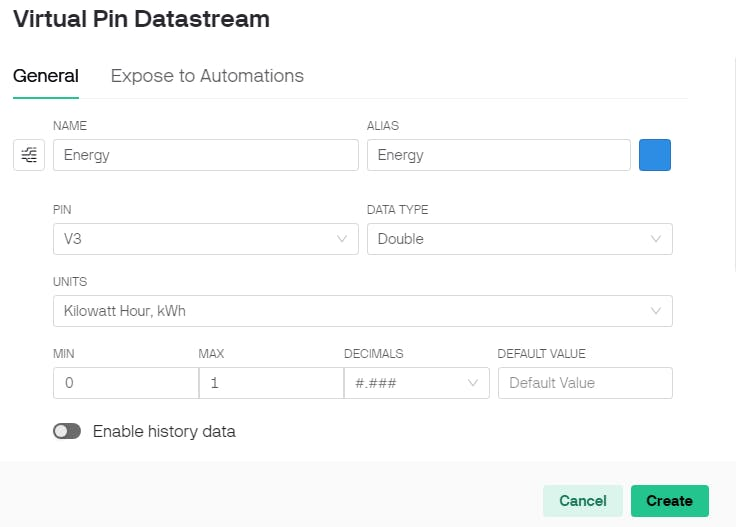

Yeah, I switched to dark mode. I just found out while I was writing this article😂
When you are done, click Save at the screen's top right corner. Your screen should look like the image below:
On the left side panel of the Blynk console click on Web Dashboard.

After clicking you should now have a screen like the one below
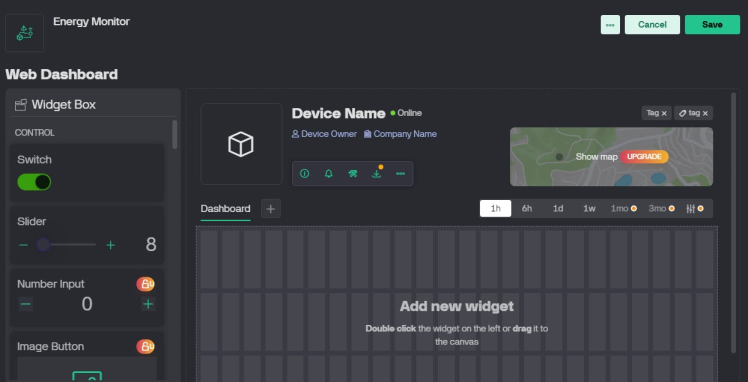
If you do not see this screen, click edit at the top right corner.
Now, in the Widget Boxsearch for Label and double-click on it to include it in the dashboard. Hover over the Label widget and click on the gear icon.
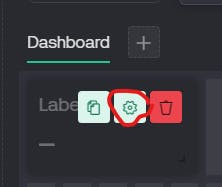
You should now see a screen like the image below, fill accordingly. Make sure the datastream chosen matches the value you want to display on the label. For instance, in the Label below I want to display the voltage readings; hence, I choose the Voltage datastream we created earlier.
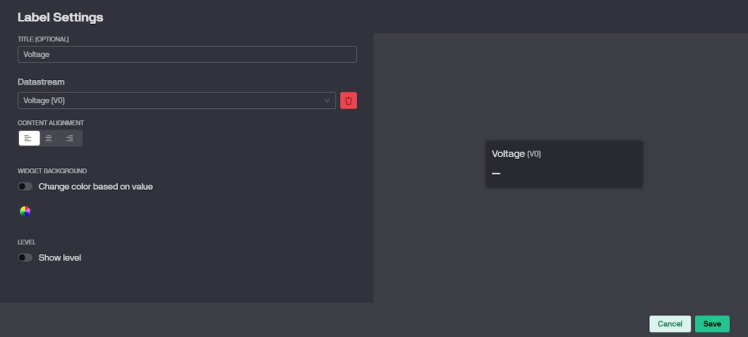
Repeat the same thing for current, power and energy.
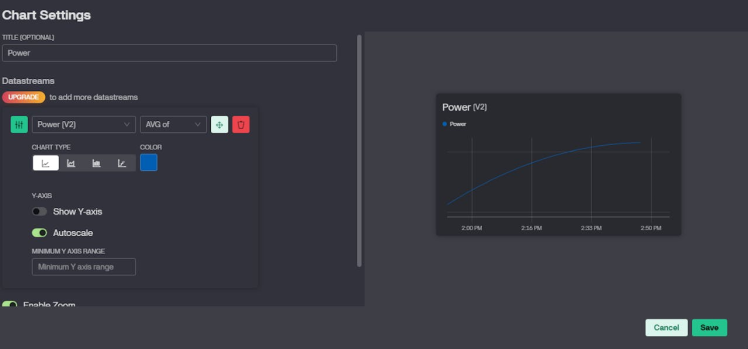
Next, add a chart from the widget box to the dashboard. The chart will allow us to see power consumption trends. Hover over the chart, click on the gear icon and configure the chart widget as in the image below:
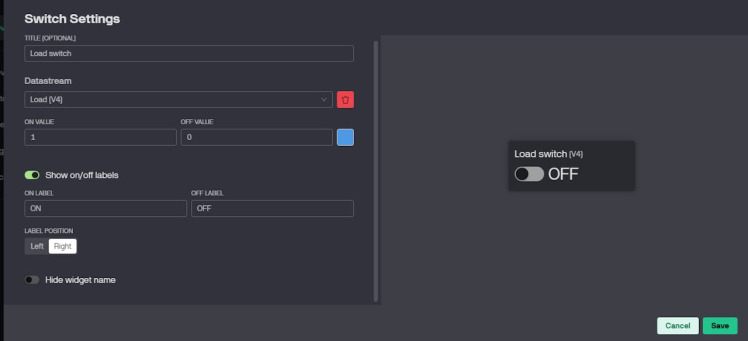
Next, add a switch widget from the widget box. We will use this to turn off the load when our set energy consumption threshold has been attained. Configure the Switch according to the image below and click Save.
In the Blynk console click on Developer Zone and select Integrations.

The next dialog will ask for a Client ID and Client Secret. To get them, return to your Notehub project, go to the Settings screen, scroll down, and then click the Generate programmatic access button.
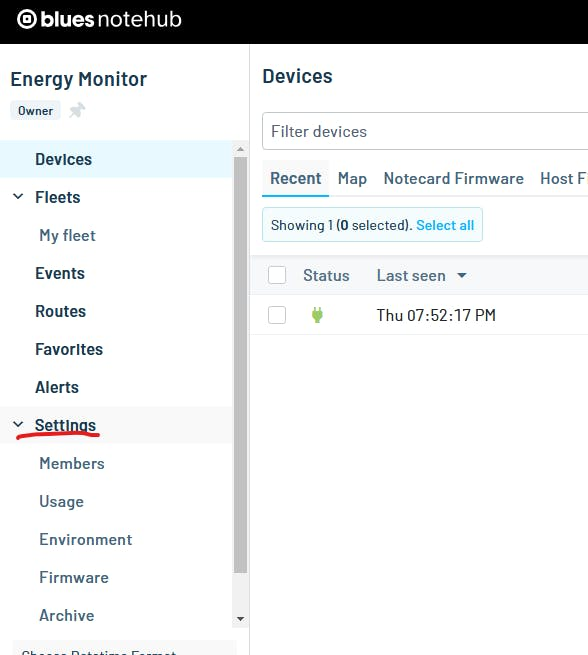
I know it looks like a drop-down but it is clickable, so click on it and scroll down till you find Programmatic API Access

The next screen will display your Notehub Client ID and Client Secret. Copy those values into the corresponding inputs back in Blynk Console, and then click Connect.
After connecting, scroll down in the dialogue and find your Blues ProductUID. On this section's dropdown select the template you created earlier, and then click the Add button.

Click Import Devices. If everything worked correctly, Blynk will detect your device and import it successfully. You can view your device by navigating to the Devices section in the Blynk Console.

If not, don't worry—we can add devices manually. On the left side of the screen, click on Developer Zone under templates and click on the template we created earlier. Then, click on Metadata.
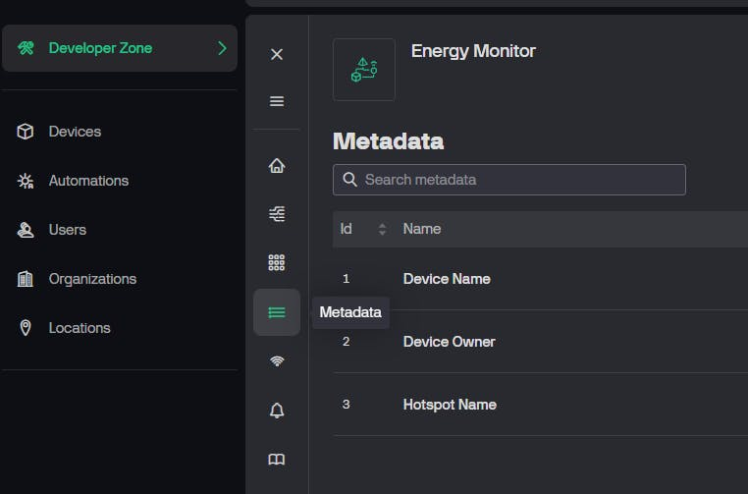
click on edit and click on the Blues Device ID metadata

add your Blues Device ID and save. You can find your Blues Device ID in Notehub under the Devices section

Now click SaveandApplyin the Blynk Console to save your changes. Next, we create a device; In the Blynk Console click on Devices.
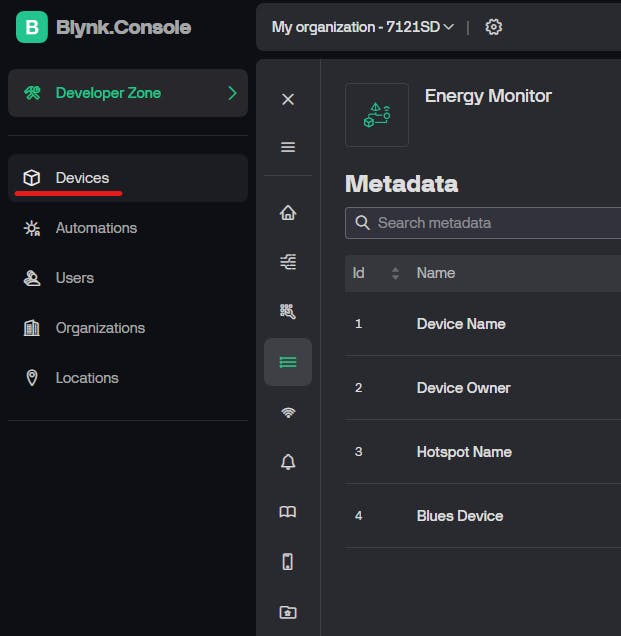
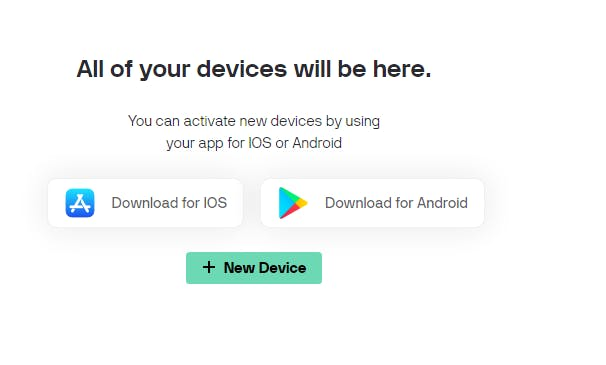
Then click on + New Device
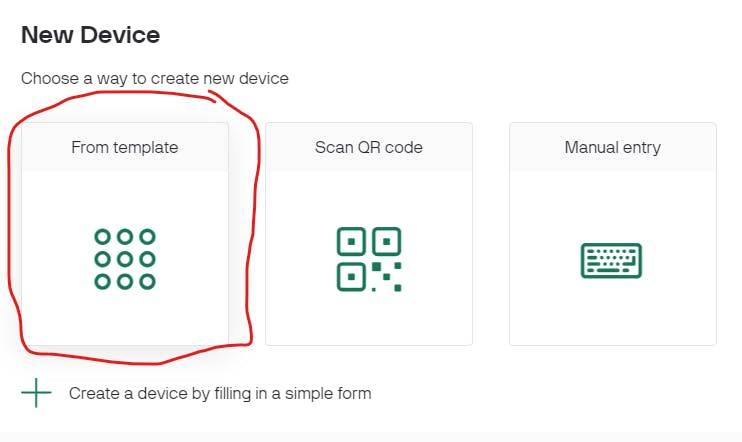
From the pop-up that appears select From template
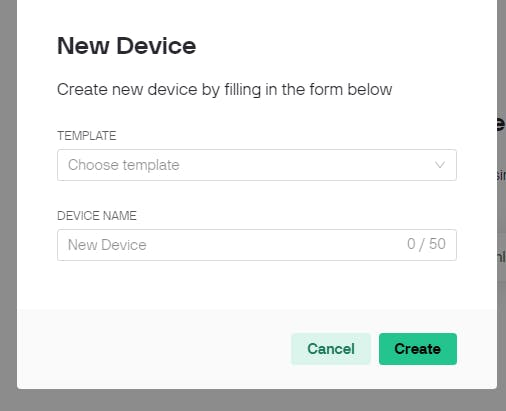
Select your Template and type a device name of your choice
Your screen should be like the one below with your device name in bold:
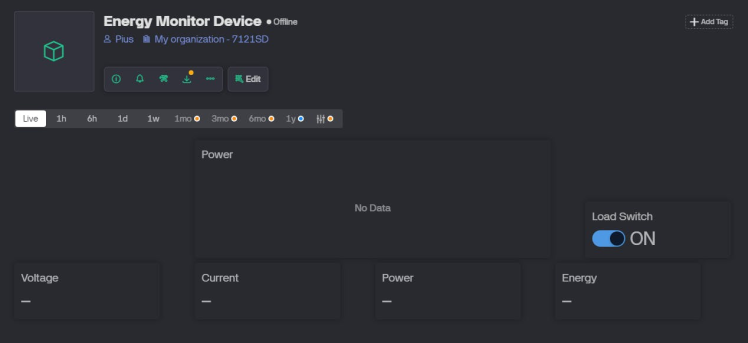
Note: Your device must already exist in Notehub before you try to create a device on Blynk.
A Dashboard for Your PhoneThe dashboard we created on the web is only for the web console, we need to create another one on our mobile phone.
Open the Blynk mobile application and you should your created device there.
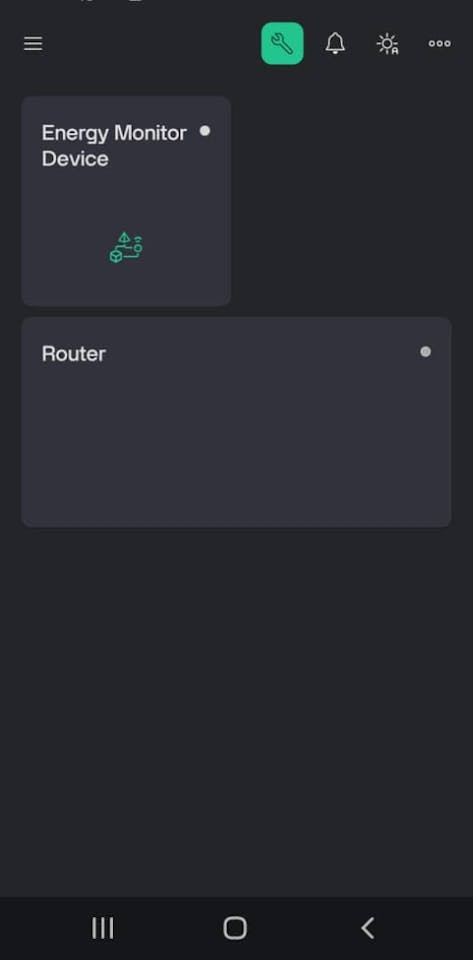
Click on your device and select the spanner icon at the top of the screen
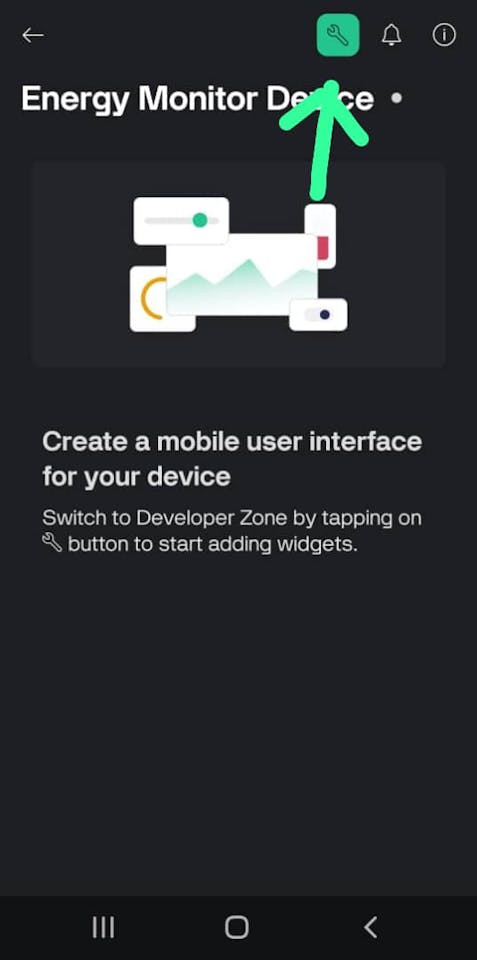
To add the label widget click on the plus icon at the bottom of the screen
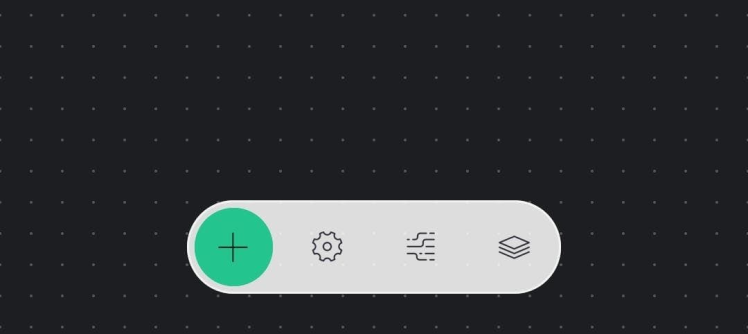
Scroll down, under Display select Value Display. Tap the Value Display widget to edit its properties
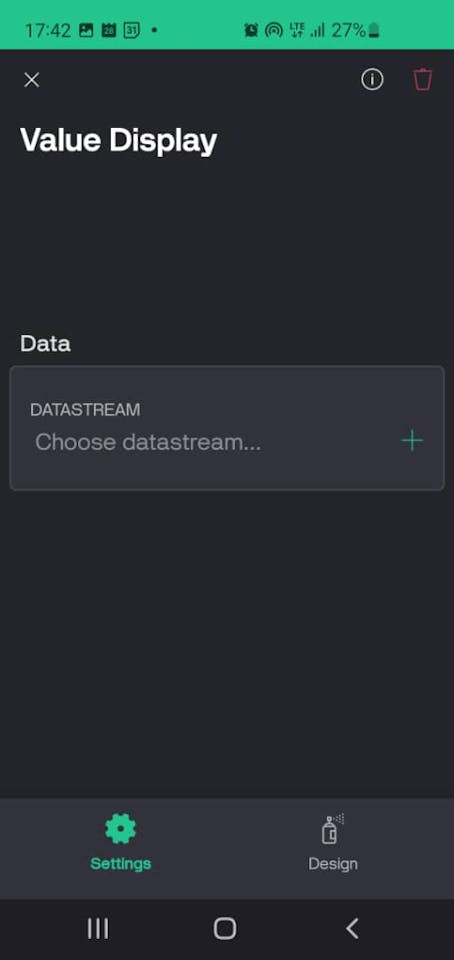
Tap DATASTREAM and choose the datastream for that label.
Next, click on design at the bottom of the screen and give the label a title.
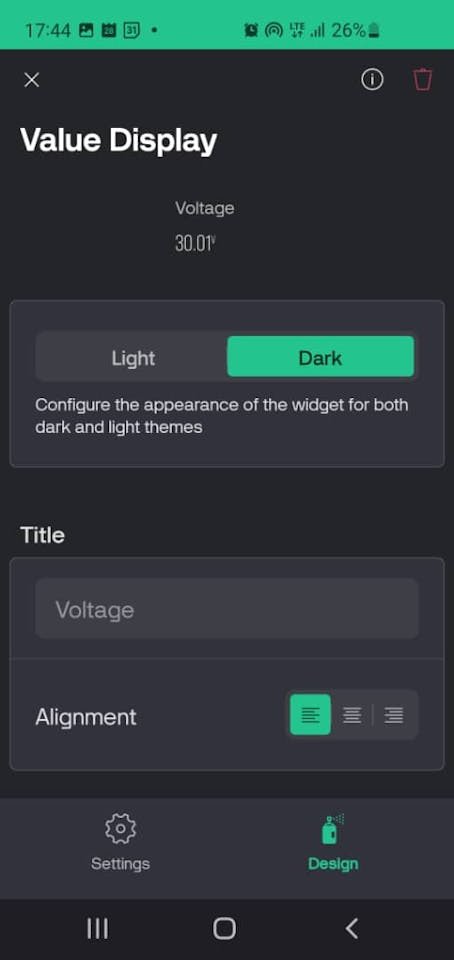
Click the X icon at the top of the screen when done. Repeat this process for the other datastreams, just as we did on the web dashboard.
Next, add a chart. Select the SuperChart widget from the list of widgets
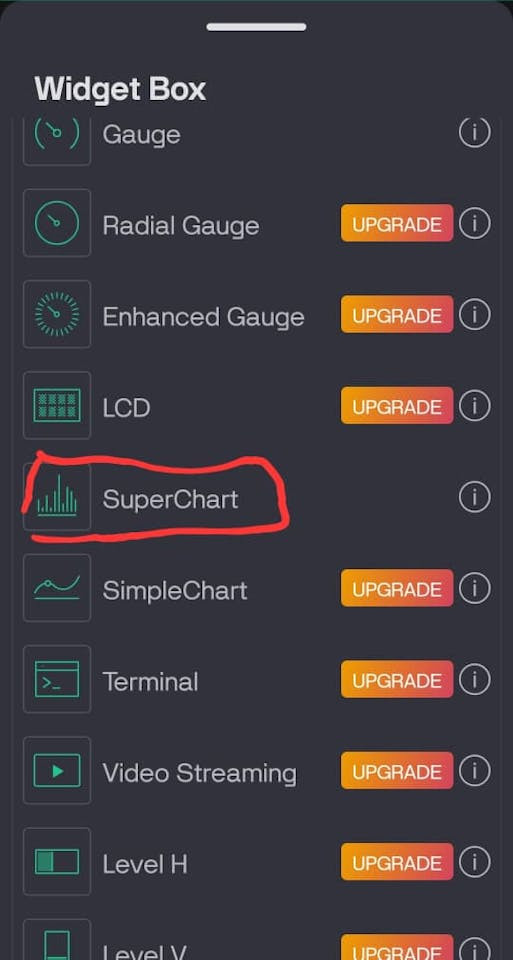
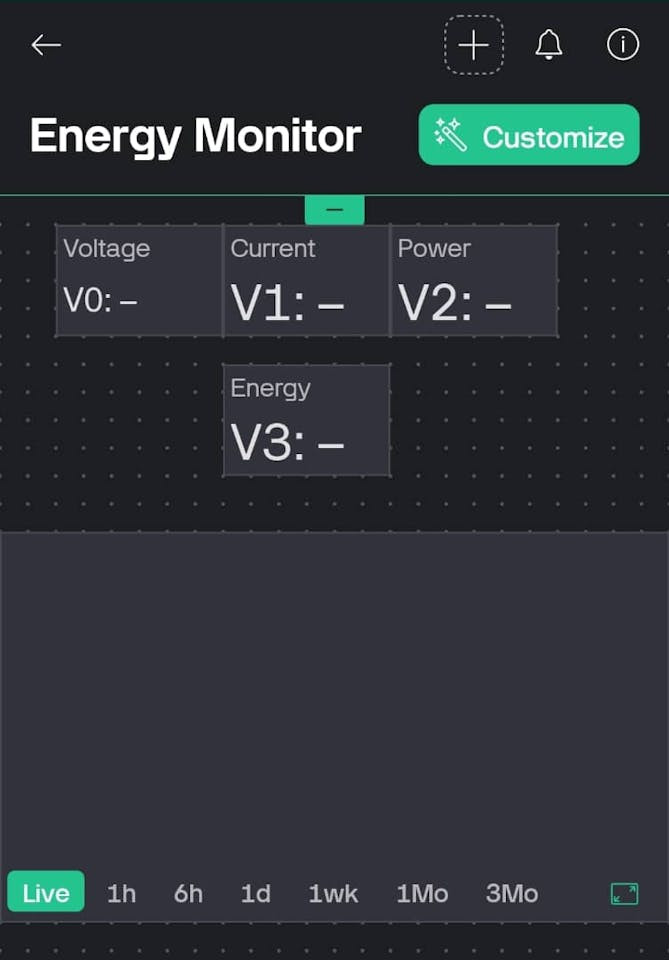
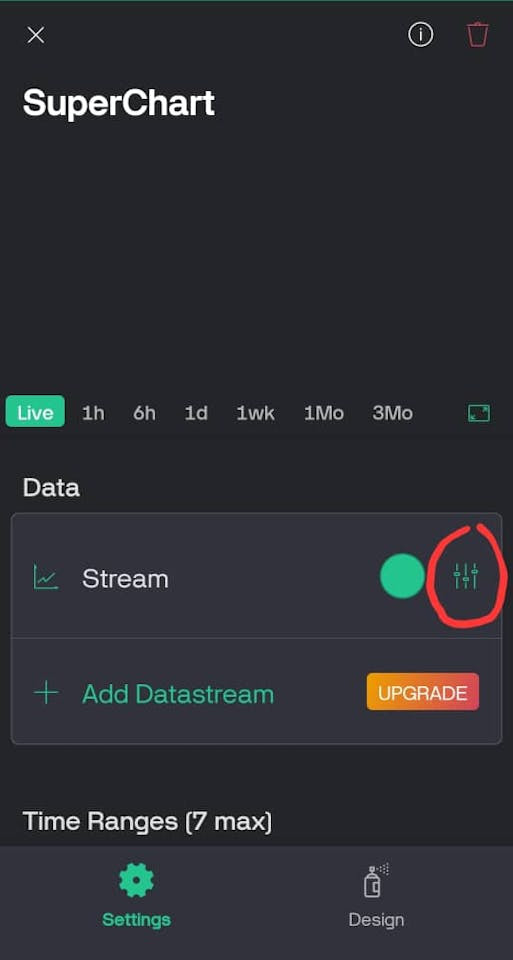
Tap on the chart and then tap again on the icon circled in the image below to link the chart to a datastream.
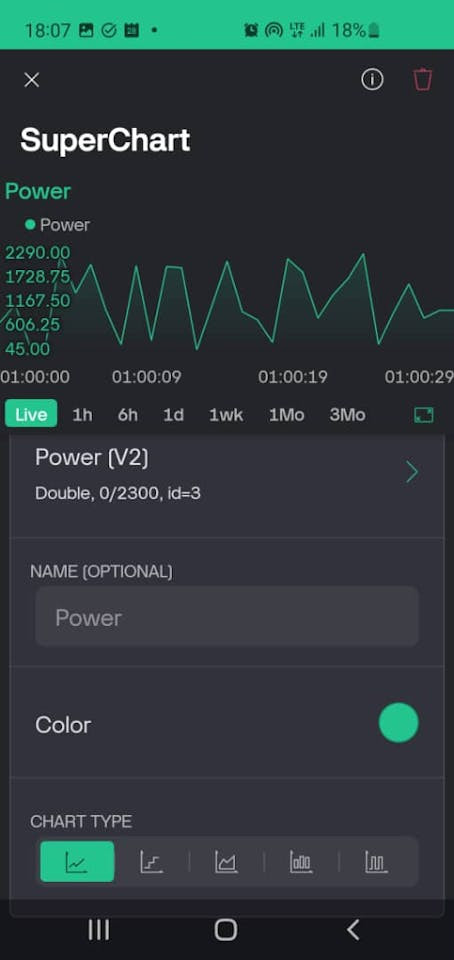
Choose the power datastream, type in a name for the chart and choose a chart type.
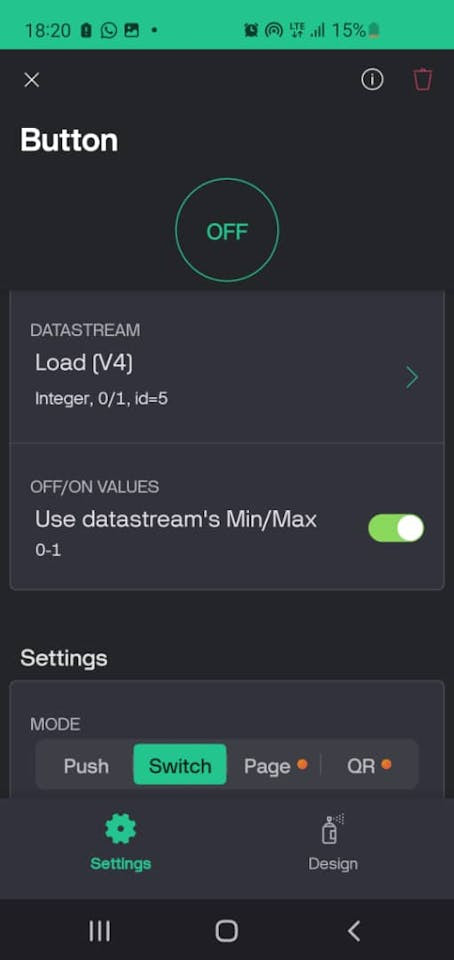
Finally, a button to control the load. Select the Button widget, attach the Load datastream and choose Switch as its mode.
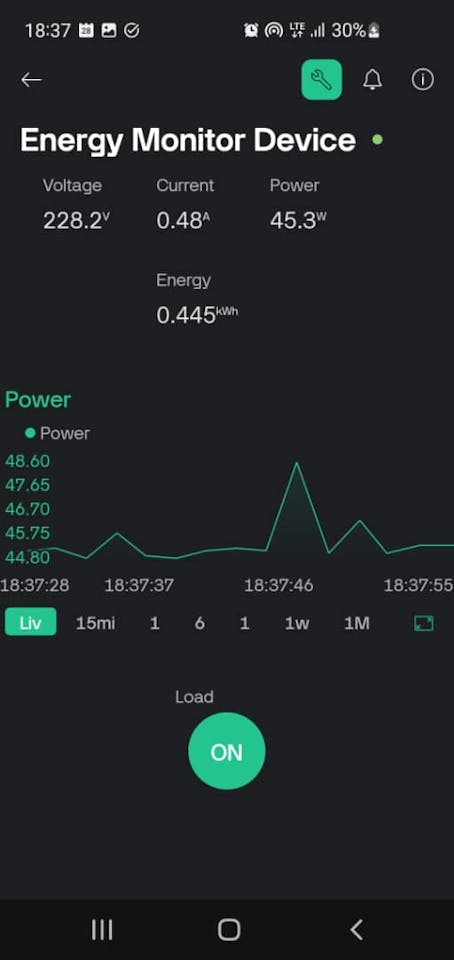
My Final Result
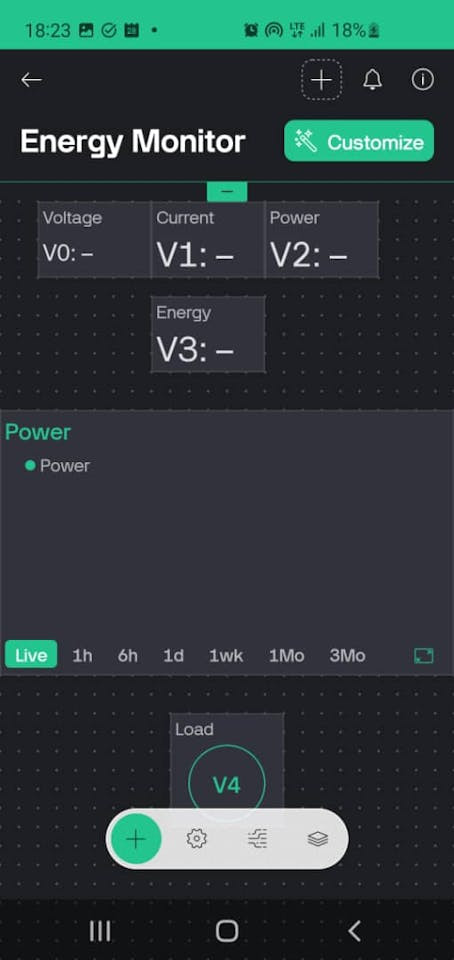
My Final Result
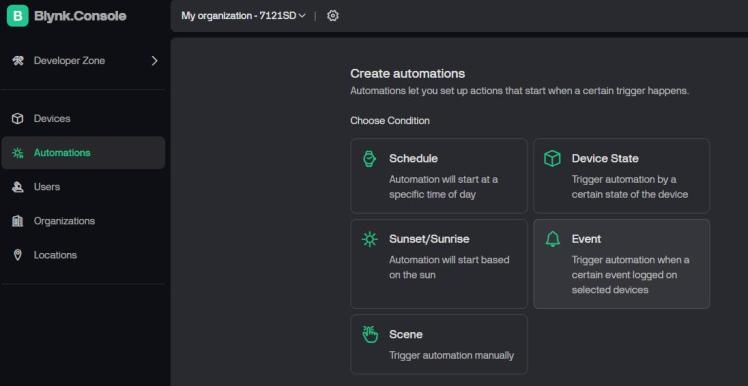
We want our device to alert us when a specific energy threshold is reached or has been surpassed. To do this we will use the Automations feature in Blynk to send a push notification to the Blynk mobile application.
Before we can create an alert based on the value of energy, we have to expose the energy datastream to automation. To do this head back to the datastream section, click the energy datastream, and then click Expose to Automations.
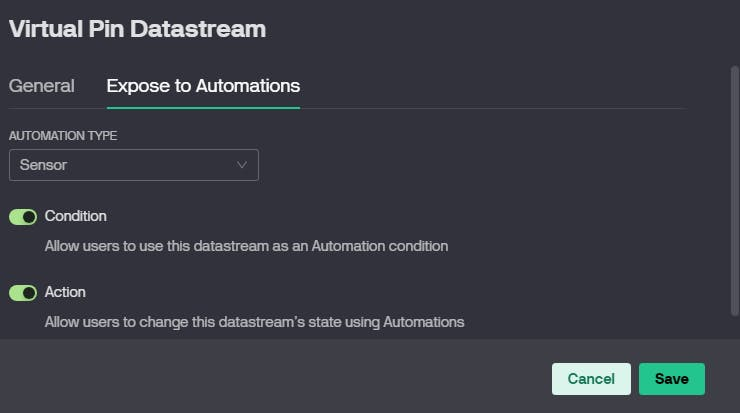
edit as seen in the image above and click Save.
Go back to Automations and select Device State.
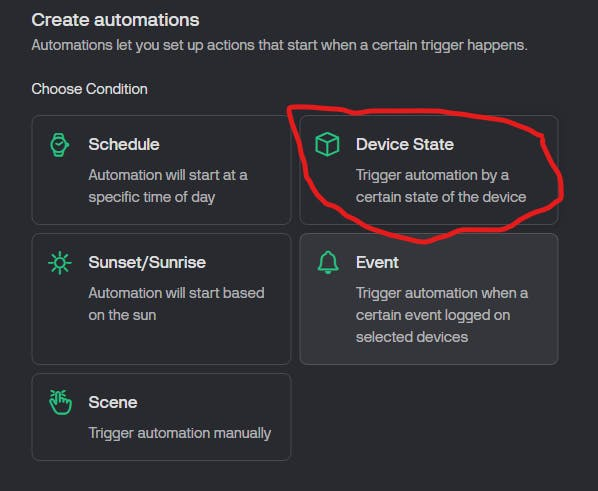
Click on New Automation and name your automation.
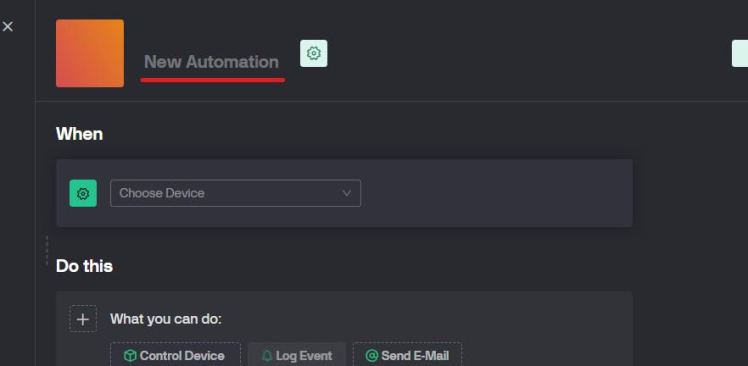

Click on Choose Device, select your device and fill in the boxes that appear.

The first box represents your device, the second box specifies the datastream that will trigger the automation, the third box defines the condition for triggering, and the fourth box sets the threshold value.
Next, you need to select an action that will be executed whenever the automation is triggered.

Click on SendIn-AppNotifications, fill in the text boxes as seen below:

click Save. Now whenever the energy consumed by the load exceeds the set threshold you will receive an alert on your phone.
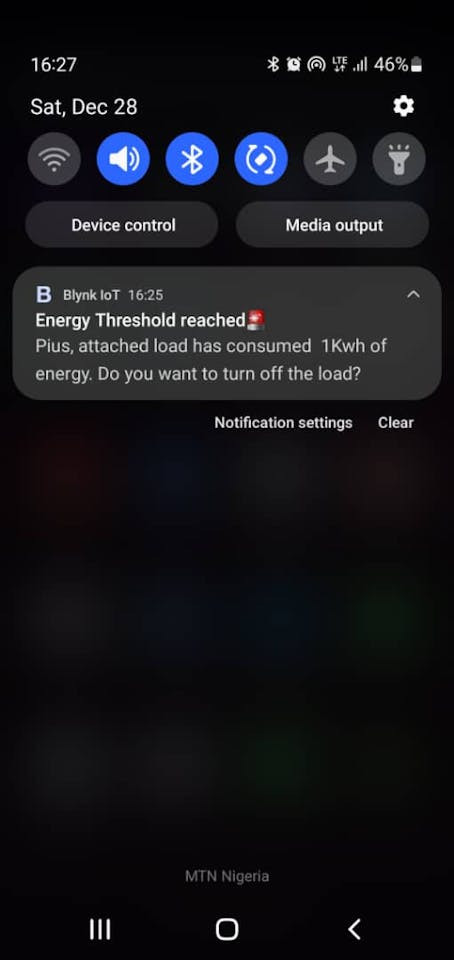
That's it we are done. If you did everything right your device should be working and ready. If you are having an issue check the debugging section below or drop a comment.
DebuggingCan’t Communicate with Blynk
If you are having any issues communicating with Blynk it means you did not follow the order stipulated above when building this project. The order is as follows:
- Create your template
- Make your Notecard is available on Notehub
- Add your Blues Device ID to your template’s metadata
- Create a device on Blynk based on that template.
If it was successful you should see your Blynk device token in the Environmental variables of your device.

Blynk device token not found
It means you did not follow the order above. Although you can add the token manually, in my experience inbound communication from Blynk won't work; Blynk has to be one to add the token to Notehub.
The device is not showing up on Notehub
This could be due to the following:
- incorrect project UID
- No internet connection, it could be your Cellular Notecard can’t connect to the internet which could be due to poor connectivity or you have run out of your Cellular data plan.
- You are using the Blue Notecard embedded SIM and didn't change the USING_EXTERNAL_SIM macro to false.

Schematics, diagrams and documents
Code
Credits

Pius4109
Let’s see… I’ll skip to the best parts. I am an aspiring embedded software engineer passionate about creating a sustainable embedded system ecosystem in Nigeria. I have been tinkering with embedded systems since my high school days until the present. My fascination with robotics brought about my interest in embedded systems. I have always wondered how GOD made humans walk, and it still fascinates me when I sit and watch people walking. So, I decided to delve into robots and stumbled upon a video on YouTube on how to make a robot with Arduino. That was it; I have been writing codes since then. However, now, my interest is in becoming an embedded software engineer rather than focusing on robots. Robots just served as a means to introduce me to embedded systems.




Leave your feedback...