Connect Mpu 6050 To Raspberry Pi Pico W
About the project
In this tutorial, I quickly demonstrate how to get started using the MPU6050 in conjunction with MicroPython and the Raspberry Pi Pico.
Project info
Difficulty: Easy
Platforms: Raspberry Pi, MicroPython
Estimated time: 1 hour
License: GNU General Public License, version 3 or later (GPL3+)
Items used in this project
Hardware components
Story
The MPU6050 is arguably the most popular MEMS accelerometer used for the Raspberry Pi and Arduino. It has a 6-axis sense with a temperature sensor on board. It is valued for its low power, simplicity, and surprising accuracy for such a low-cost sensor. If you want to know how this thing operates at a high level I also have a video on that.
If you do find this useful please like comment and subscribe:Step 1: Physical Setup
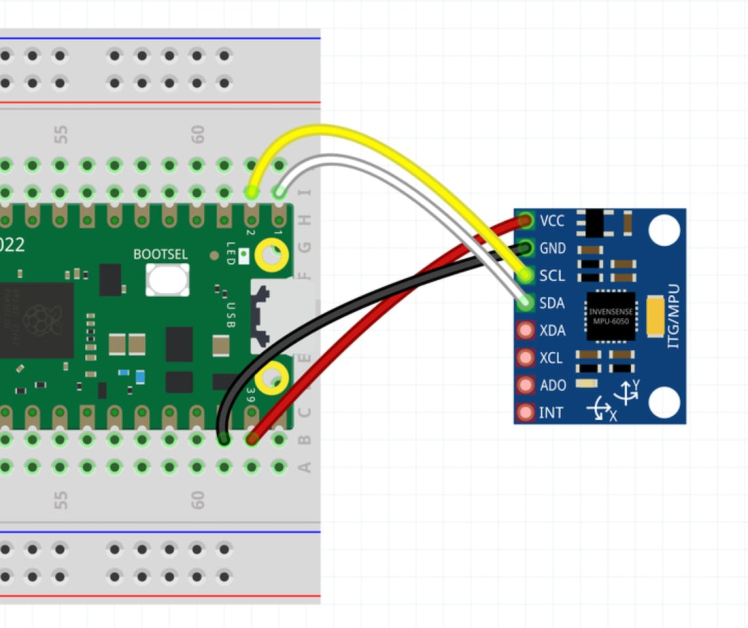
You only have to make four connections as shown in the photo:
- Red: Connects to VSYS on the Pico to power the MPU6050
- Black: Ground Pin
- Yellow and White: We connect to GPIO pins on the Pico to establish communication via the I2C protocol. Note that there are multiple GPIOs on the device; I just happen to choose 0 and 1. It does not have to be that way.
What is I2C?
- I2C (Inter-Integrated Circuit) is a communication protocol that allows multiple devices to communicate with one another over a two-wire bus. It is commonly used in electronic devices to communicate between integrated circuits (ICs) on the same board.
- The two wires in an I2C bus are the SDA (serial data) and SCL (serial clock) lines. The SDA line carries the data, while the SCL line is used to synchronize the data transfer.
- In I2C, one device acts as the master and controls the clock, while the other devices act as slaves. The master device initiates communication and generates the clock signal, while the slave devices respond to the master's requests.
- I2C is widely used due to its simplicity, low pin count, and multi-master capability. It's used in many applications such as temperature sensors, RTC, EEPROM, ADCs, and LCDs.
- I2C is a widely used communication protocol and it's supported by most microcontrollers and microprocessors, including the Raspberry Pi Pico.
Save these libraries into the lib directory on the pico:
- https://github.com/shillehbean/youtube-channel/blob/main/vector3d.py
- https://github.com/shillehbean/youtube-channel/blob/main/imu.py
Save the following code in any script on your device:
#Shows Pi is on by turning on LED when plugged in
	LED = machine.Pin("LED", machine.Pin.OUT)
	LED.on()


	from imu import MPU6050
	from time import sleep
	from machine import Pin, I2C


	i2c = I2C(0, sda=Pin(0), scl=Pin(1), freq=400000)
	imu = MPU6050(i2c)


	while True:
	    ax=round(imu.accel.x,2)
	    ay=round(imu.accel.y,2)
	    az=round(imu.accel.z,2)
	    gx=round(imu.gyro.x)
	    gy=round(imu.gyro.y)
	    gz=round(imu.gyro.z)
	    tem=round(imu.temperature,2)
	    print("ax",ax,"t","ay",ay,"t","az",az,"t","gx",gx,"t","gy",gy,"t","gz",gz,"t","Temperature",tem,"        ",end="r")
	    sleep(0.2)
This is the main script you will be running.
- It established an i2c object used in the MPU6050 library, this is what you need to start getting connections
- It pulls the values in a while loop with no exit condition. You would need to manually hit stop in the program for this code to exit
- I do some rounding for display purposes
- I use a sleep value of 0.2 seconds to not overwhelm the user by seeing too many values, you can change this.
That is pretty much it, it is that simple to get started. You can watch other videos of the MPU6050 on my channel, which you can also, like, comment, and subscribe to!
Credits

mahmood-m-shilleh
Mechanical and Software Engineering Background. University at Buffalo 2019 Texas A&M 2021 I make data pipelines for my day job. Outside of work, I participate in online communities regarding Full Stack Engineering, Microelectronics, and more. You can find more details about me on my Youtube Channel. https://www.youtube.com/@mmshilleh Feel free to reach out!


Leave your feedback...