


How To Make An X86 Cluster With Zimablade Sbc

Made by RichElliot / Home Automation / IoT
About the project
This project provides a step-by-step guide on how to build an x86 cluster using the ZimaBlade single-board computer (SBC). This setup is ideal for home labs, small-scale server environments, and as an alternative to traditional server hardware.
Project info
Difficulty: Moderate
Estimated time: 7 hours
License: GNU General Public License, version 3 or later (GPL3+)
Items used in this project
Hardware components

Story
In this project, you will learn how to build a powerful and low-power x86 cluster using the ZimaBlade SBCs. The cluster will be configured with Proxmox, a popular open-source server management platform. The project focuses on the hardware setup and initial configuration of the cluster, making it an excellent alternative to Raspberry Pi clusters or enterprise-grade hardware.
What You Will Learn
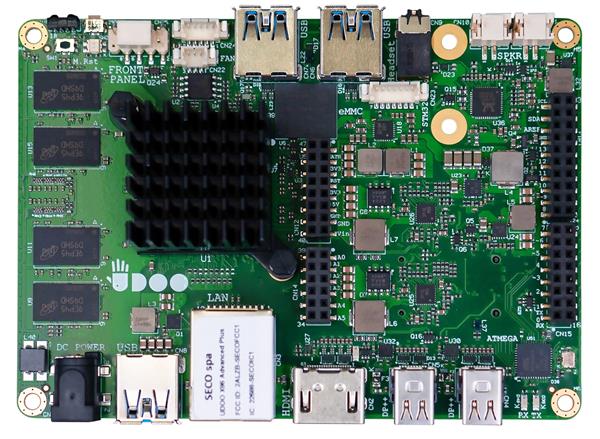
1. Setting up the ZimaBlade SBC Hardware
Objective: You will learn how to unbox and assemble the ZimaBlade SBCs, install additional hardware components like RAM and network cards, connect storage drives, and set up a managed network infrastructure. This foundational knowledge is crucial for ensuring that your hardware is properly prepared for the subsequent steps in building your x86 cluster.
2. Installing Proxmox on the ZimaBlade SBCs
Objective: This section will guide you through the process of installing Proxmox, an open-source virtualization platform, on your ZimaBlade SBCs. You will learn how to prepare installation media, configure BIOS/UEFI settings, and complete the Proxmox installation. By the end of this section, you will have a fully functional Proxmox environment ready to manage your cluster.
3. Configuring the Cluster for Various Server Applications
Objective: Once Proxmox is installed, you will learn how to configure your ZimaBlade SBCs to function as a cohesive cluster. This includes setting up shared storage, optimizing network settings, and deploying server applications using Proxmox’s container and virtual machine management tools. You’ll gain practical skills in setting up and managing a scalable server environment.
4. Understanding the Benefits of x86 Architecture Over ARM-based Alternatives Like Raspberry Pi
Objective: This section will explore the advantages of using x86 architecture, as found in ZimaBlade SBCs, over ARM-based alternatives like the Raspberry Pi. You will learn about the enhanced performance, broader software compatibility, superior virtualization capabilities, and greater data privacy and security that x86 systems offer. This understanding will help you make informed decisions when choosing hardware for your projects.
Step-by-Step Instructions
1. Setting Up the Hardware
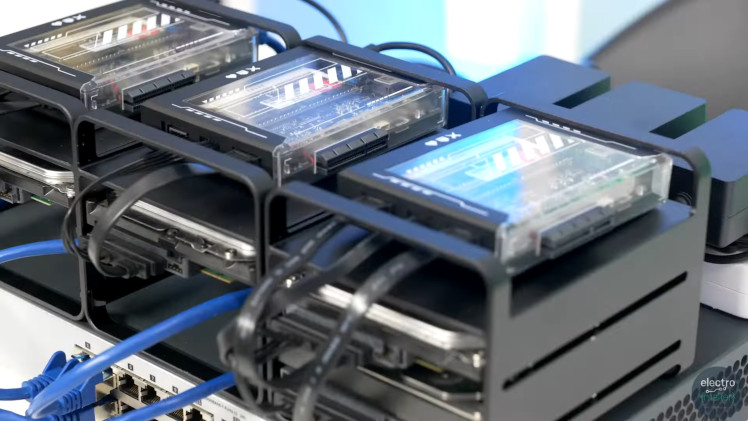
Carefully unbox each ZimaBlade SBC, handling them by the edges to avoid any static discharge damage. Lay out all the included components, such as power supplies, cables, and accessories.
Inspect the Components:
Visually inspect each ZimaBlade SBC for any signs of damage or missing parts. Ensure that all ports, connectors, and components are intact.
Assemble the Components:
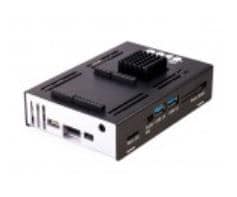
Attach any provided heatsinks or other cooling solutions to the ZimaBlade SBCs as per the instructions. If your setup includes a case, place each SBC inside the case and secure it using the provided screws.
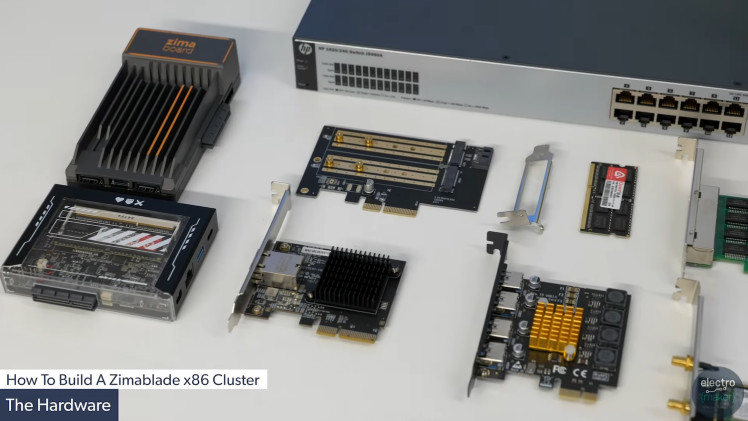
 All hardware including the Zimablades
1.2 Install Additional RAM and Network Cards
RAM Installation:
If your ZimaBlade SBCs require additional RAM, locate the RAM slots on the board. Align the RAM module with the slot and gently press down until it clicks into place. Ensure both retention clips are securely latched.
Network Card Installation:
Insert any additional network cards into the PCIe slots on the ZimaBlade SBCs. Make sure the cards are fully seated and secured with screws if necessary. Ensure the network ports are accessible for connecting cables later.
1.3 Connect the Hard Drives to Each ZimaBlade
Prepare the Drives:
Choose the appropriate hard drives (SATA or NVMe) for each ZimaBlade SBC. If using SATA drives, you will need SATA cables; for NVMe drives, ensure you have the correct M.2 connectors.
Connecting SATA Drives:
Attach the SATA data cable to each hard drive and connect the other end to the corresponding SATA port on the ZimaBlade SBC. Plug in the power cable to the drive as well. Secure the drive inside the case or drive bay.
Connecting NVMe Drives:
Insert the NVMe drive into the M.2 slot at an angle, then press it down and secure it with the mounting screw. Ensure the drive is securely attached to the board.
Verify Connections:
Double-check all connections to ensure that the drives are properly connected to both power and data ports.
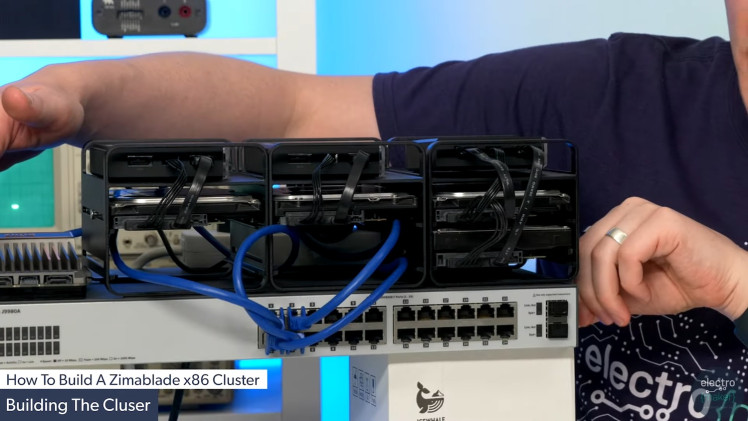
1.4 Set Up the Network Infrastructure with a Managed Switch
Select a Managed Switch:
Choose a managed switch that meets the networking requirements of your ZimaBlade cluster. The switch should support high-speed connections, such as 10 GB Ethernet, and have enough ports for all your SBCs.
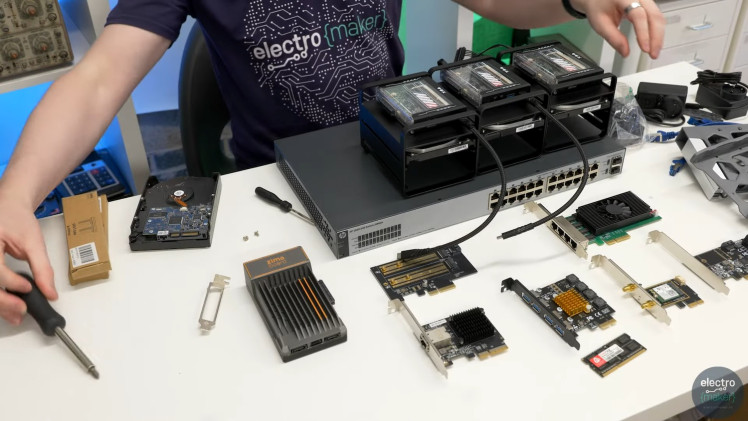
Connect the ZimaBlade SBCs:
Use high-quality Ethernet cables to connect each ZimaBlade SBC to the managed switch. Ensure that each connection is secure, and label the cables if necessary to keep track of which SBC is connected to which port.
Configure the Managed Switch:
Access the managed switch’s web interface or command-line console to configure its settings. Set up VLANs, prioritize traffic with Quality of Service (QoS) settings, and assign IP addresses to each ZimaBlade SBC for consistent network performance.
Final Network Check:
Power on the managed switch and verify that each ZimaBlade SBC is properly connected and communicating with the network. Use network tools like ping to ensure all devices are accessible and connected as intended.
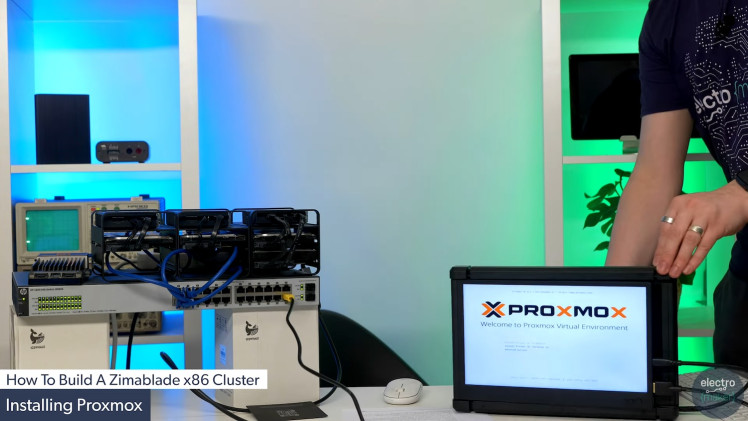
2. Installing Proxmox
2.1 Prepare the ZimaBlade SBCs for Proxmox Installation
Power On the ZimaBlade SBCs:
Connect the power supply to each ZimaBlade SBC and power them on. Connect a monitor and keyboard to the SBC to access the BIOS/UEFI settings.
Access the BIOS/UEFI:
During startup, press the designated key (usually DEL or F2) to enter the BIOS/UEFI settings. This is where you'll configure the system to prepare for the Proxmox installation.
BIOS/UEFI Configuration:
In the BIOS/UEFI, set the boot priority to ensure the system will boot from the USB drive that will contain the Proxmox installation image. Additionally, enable any necessary virtualization support (e.g., Intel VT-x or AMD-V) to allow Proxmox to manage virtual machines effectively.
Save and Exit:
Once you have made the necessary changes, save the BIOS/UEFI settings and exit. The ZimaBlade SBC will reboot and should now be ready to boot from the installation media.
2.2 Download and Flash Proxmox onto Each ZimaBlade
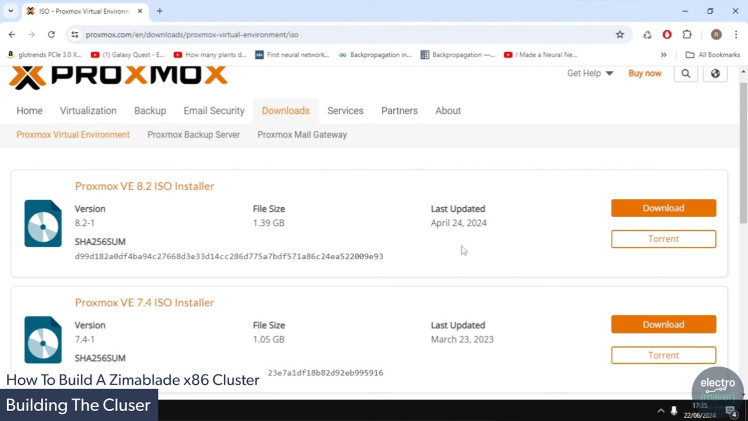
Download the Proxmox VE ISO:
Visit the official Proxmox website and download the latest Proxmox VE (Virtual Environment) ISO file. Ensure you download the correct version for your hardware architecture.
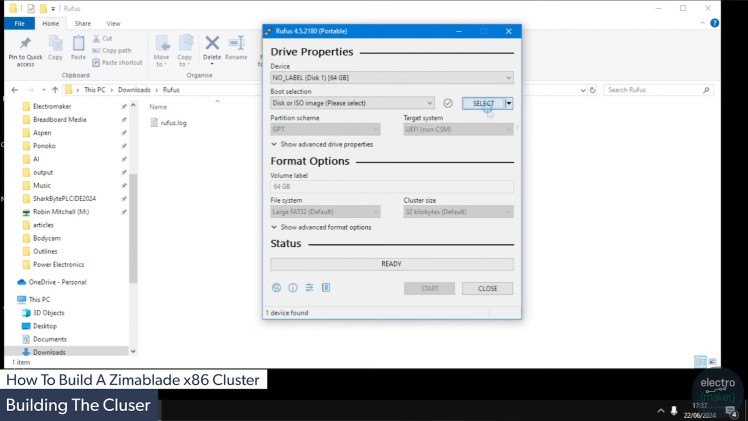
Create a Bootable USB Drive:
Use a tool like Rufus (for Windows) or Etcher (for macOS/Linux) to create a bootable USB drive. Select the Proxmox ISO file and choose the USB drive as the destination. Start the process and wait for it to complete.
Insert the USB Drive:
Insert the bootable USB drive into one of the ZimaBlade SBCs. Ensure that the SBC is powered off before inserting the USB drive to avoid any issues during the boot process.
Boot from USB:
Power on the ZimaBlade SBC. If the BIOS/UEFI settings were configured correctly, the system should boot from the USB drive, launching the Proxmox installer.
2.3 Configure the Initial Setup, Including Network Settings and User Accounts
Begin the Proxmox Installation:
Follow the on-screen instructions to start the Proxmox installation. Select the target drive where Proxmox will be installed (this is typically the internal SSD or hard drive you connected earlier).
Disk Partitioning:
The installer will prompt you to partition the disk. You can either use the default partitioning scheme or customize it according to your needs. Ensure there is enough space allocated for Proxmox and its virtual machines.
Network Configuration:
Configure the network settings during installation. Assign a static IP address to each ZimaBlade SBC to ensure stable and consistent network communication within the cluster. You may also need to set up DNS servers and a gateway address.
Set Up User Accounts:
Create a root password and an email address for the Proxmox administration account. This account will have full access to the Proxmox interface and will be used to manage the cluster.
Finalize the Installation:
Once all the settings are configured, proceed with the installation. The process may take a few minutes. After completion, remove the USB drive and reboot the ZimaBlade SBC.
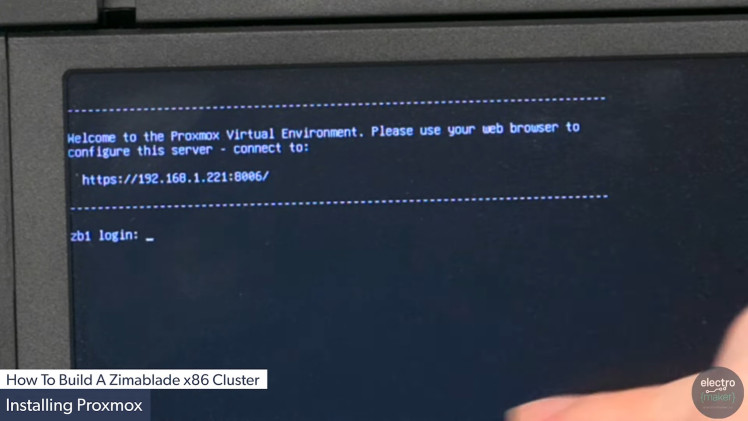
Access the Proxmox Web Interface:
After the reboot, access the Proxmox web interface by entering the IP address you assigned during installation into a web browser on another device. Log in using the root account credentials you created earlier.
Repeat for Each ZimaBlade SBC:
Repeat the installation process for each ZimaBlade SBC in your cluster, ensuring each one is correctly configured and accessible via the Proxmox web interface.
3. Cluster Configuration
3.1 Connect the ZimaBlade SBCs to Form a Cluster
Access the Proxmox Web Interface:
Start by logging into the Proxmox web interface on one of your ZimaBlade SBCs using the IP address you configured during installation. Use the root credentials you set up earlier.
Create a New Cluster:
Navigate to the Datacenter section in the Proxmox web interface. Here, you will find an option to create a new cluster. Click on Create Cluster and enter a name for your cluster. Make sure the name is unique and descriptive, as this will be used to identify the cluster within the Proxmox environment.
Configure Cluster Settings:
Set up the necessary cluster settings, including the network configuration for cluster communication. Ensure that the correct network interface is selected for cluster traffic, typically the one connected to your managed switch.
Generate Cluster Join Information:
Once the cluster is created, Proxmox will provide a command that you can use to join other ZimaBlade SBCs to this cluster. Copy this command, as you will need it for the next steps.
Join Additional Nodes:
Log into the Proxmox web interface on the other ZimaBlade SBCs. Navigate to the Datacenter section, and instead of creating a new cluster, select Join Cluster. Paste the command you copied from the first node and execute it. This will connect the SBC to the existing cluster.
Verify Cluster Formation:
After joining all nodes, return to the original Proxmox interface and verify that all ZimaBlade SBCs are listed as part of the cluster. You should see each node listed under the Cluster tab in the Datacenter section.
3.2 Configure Proxmox to Manage the Cluster
Cluster Management Overview:
With your ZimaBlade SBCs connected into a cluster, you can now manage them collectively through the Proxmox interface. This centralized management system allows you to control all nodes from a single interface, simplifying maintenance and resource allocation.
Resource Allocation:
Within the Proxmox web interface, navigate to each node and allocate resources such as CPU cores, memory, and storage. You can also configure specific roles for each node, depending on your cluste's workload requirements.
High Availability (HA) Setup:
To ensure that your cluster remains operational even if one node fails, you can configure High Availability (HA) for critical virtual machines (VMs) and containers. Navigate to the High Availability section, select the VMs or containers you want to make HA, and set the HA parameters. This will allow the cluster to automatically restart the services on another node if a failure occurs.
Network Configuration:
Configure network settings to optimize traffic across the cluster. This may involve setting up additional VLANs for different types of traffic (e.g., management, storage, and VM traffic) to prevent bottlenecks and ensure smooth operation.
3.3 Set Up Shared Storage and Network Settings for Efficient Resource Management
Shared Storage Configuration:
Setting up shared storage allows all nodes in the cluster to access the same data, which is essential for running VMs and containers across different nodes. Go to the Storage section in the Proxmox web interface and add a shared storage solution, such as NFS, Ceph, or iSCSI.
Adding Shared Storage:
Choose the type of shared storage you want to implement (e.g., NFS for simplicity or Ceph for scalability and redundancy). Enter the necessary details, such as the storage serve's IP address and export path. Once configured, the shared storage will be available to all nodes in the cluster.
Network Bonding and VLAN Configuration:
For enhanced performance and redundancy, you can configure network bonding on your ZimaBlade SBCs. This combines multiple network interfaces into a single bonded interface, providing higher throughput and failover capabilities.
Additionally, configure VLANs to separate different types of network traffic. For example, you might have one VLAN for management traffic, another for storage traffic, and a third for VM traffic. This helps in organizing network traffic and avoiding congestion.
Testing and Optimization:
After configuring shared storage and network settings, test the setup by migrating VMs or containers between nodes to ensure everything is functioning correctly. Monitor network performance and make adjustments to settings like QoS or bandwidth allocation as needed to optimize cluster performance.
Final Checks:
Once the cluster configuration is complete, review all settings and perform a few test scenarios, such as node failover or live migration of VMs, to confirm that the cluster is operating smoothly and efficiently.
4. Final Setup and Testing - Optimize the Cluster for Performance and Stability
Performance Tuning:
Begin by reviewing the resource allocation across the cluster. Ensure that each ZimaBlade SBC is optimally configured with appropriate CPU cores, memory, and storage for the workloads you intend to run. Adjust these allocations as needed based on the performance characteristics of your applications.
Enable Performance Features:
In the Proxmox web interface, explore advanced performance features such as CPU pinning, which allows you to dedicate specific CPU cores to certain VMs or containers. This can enhance performance for CPU-intensive tasks.
Another optimization technique is to enable ballooning for memory management. This allows Proxmox to dynamically adjust the memory usage of VMs based on demand, helping to avoid memory shortages while optimizing overall performance.
Stability Enhancements:
Configure watchdog timers for your critical VMs. This ensures that if a VM becomes unresponsive, the cluster can automatically restart it. Navigate to the VM's hardware settings in Proxmox and add a watchdog device, configuring it to reboot the VM on failure.
Implement redundancy measures by ensuring that critical services are spread across multiple nodes and are not all reliant on a single point of failure. Consider setting up replication or mirroring for essential data within your shared storage solution.
System Monitoring:
Set up monitoring tools within Proxmox to keep track of system health, resource utilization, and performance metrics. Tools like Grafana and Prometheus can be integrated for more detailed analysis and alerting.
Regularly review logs and system reports to identify potential issues before they impact the performance or stability of your cluster.
4.2 Test the Cluster by Running Basic Server Applications
Deploy Test Applications:
Start by deploying a few basic server applications within your Proxmox cluster. Examples include a simple web server (e.g., Apache or Nginx), a database server (e.g., MySQL or PostgreSQL), or a file server (e.g., Samba).
Create a new VM or container for each application and allocate appropriate resources. Install the necessary software and configure it as you would in a production environment.
Functional Testing:
After deployment, perform basic functional tests on each server application to ensure they are operating correctly. For a web server, this might involve accessing a sample webpage from a client machine. For a database server, you might execute basic queries to verify database functionality.
Additionally, test the interaction between different applications, such as connecting your web server to the database server, to ensure that network communication and data exchange are functioning properly.
Load Testing:
Simulate typical or peak load conditions on the server applications to evaluate how the cluster handles increased traffic or processing demands. Tools like Apache JMeter or Locust can be used to generate load and measure performance.
Monitor resource usage during load testing to identify any bottlenecks or areas where performance might degrade. Adjust resource allocations, optimize configurations, or scale out additional nodes if necessary.
4.3 Troubleshoot Any Issues and Make Necessary Adjustments
Identify Issues:
If you encounter any problems during testing, such as performance bottlenecks, network issues, or application failures, use Proxmox’s built-in diagnostic tools to identify the root cause. Check system logs, monitor network traffic, and review resource usage statistics.
Common Troubleshooting Steps:
Network Issues: Verify that all network cables are securely connected and that the managed switch is properly configured. Ensure that VLANs and QoS settings are correctly applied. If VMs cannot communicate, check IP configurations and firewall rules.
Performance Bottlenecks: If certain VMs or applications are slow, consider reallocating more CPU, memory, or disk I/O resources. You may also need to optimize the applications themselves or reduce the number of running services.
Application Failures: Check the application logs within the VM or container for errors. Ensure that all dependencies are correctly installed and configured. If a VM or container repeatedly crashes, investigate whether it's running out of memory or CPU resources and adjust as needed.
Implement Solutions:
Once issues are identified, implement solutions based on your findings. This could involve adjusting resource allocations, reconfiguring network settings, or fine-tuning application configurations.
For persistent issues, consider seeking help from online forums, the Proxmox community, or vendor support, especially if the problem is complex or hardware-specific.
Final Validation:
After making adjustments, rerun the tests to confirm that the issues have been resolved. Ensure that the cluster is now stable, performs well under load, and all applications function as expected.
Document Configuration:
Finally, document your final cluster configuration, including any custom settings, optimizations, and troubleshooting steps taken. This will be invaluable for future maintenance and any required scaling or modifications.
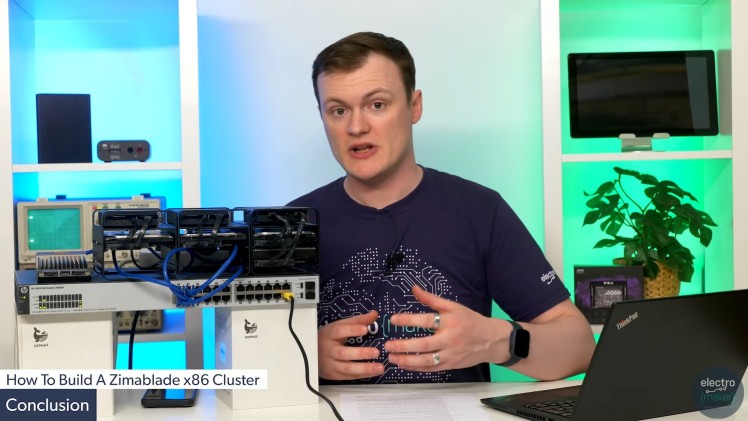
Conclusion
With your x86 cluster up and running, you now have a powerful, low-cost, and flexible server environment. This setup can be used for various applications, including hosting websites, running AI systems, or managing personal data. The ZimaBlade SBCs offer a robust alternative to cloud services and traditional server hardware, making them perfect for home labs.
Credits
Related products


Leave your feedback...