Build Your Own Memory Game With Meadow
About the project
Learn how to build a memory game with an OLED display and a 4x4 push button keypad using Meadow. Foundation and DisplayGraphics Library.
Project info
Difficulty: Easy
Platforms: Microsoft, Meadow, Wilderness Labs
Estimated time: 1 hour
License: MIT license (MIT)
Items used in this project
Hardware components
Story
What you'll be building in this project is a memory style game, where each button on a 4 x 4 keypad will correspond to an alphabetic character going from 'A' to 'H', and pressing each button will reveal the character associated to it in the OLED display. You win the game when you find all the pair of characters on the keypad. You'll create the logic using Meadow.Foundation.
Memory Game Project
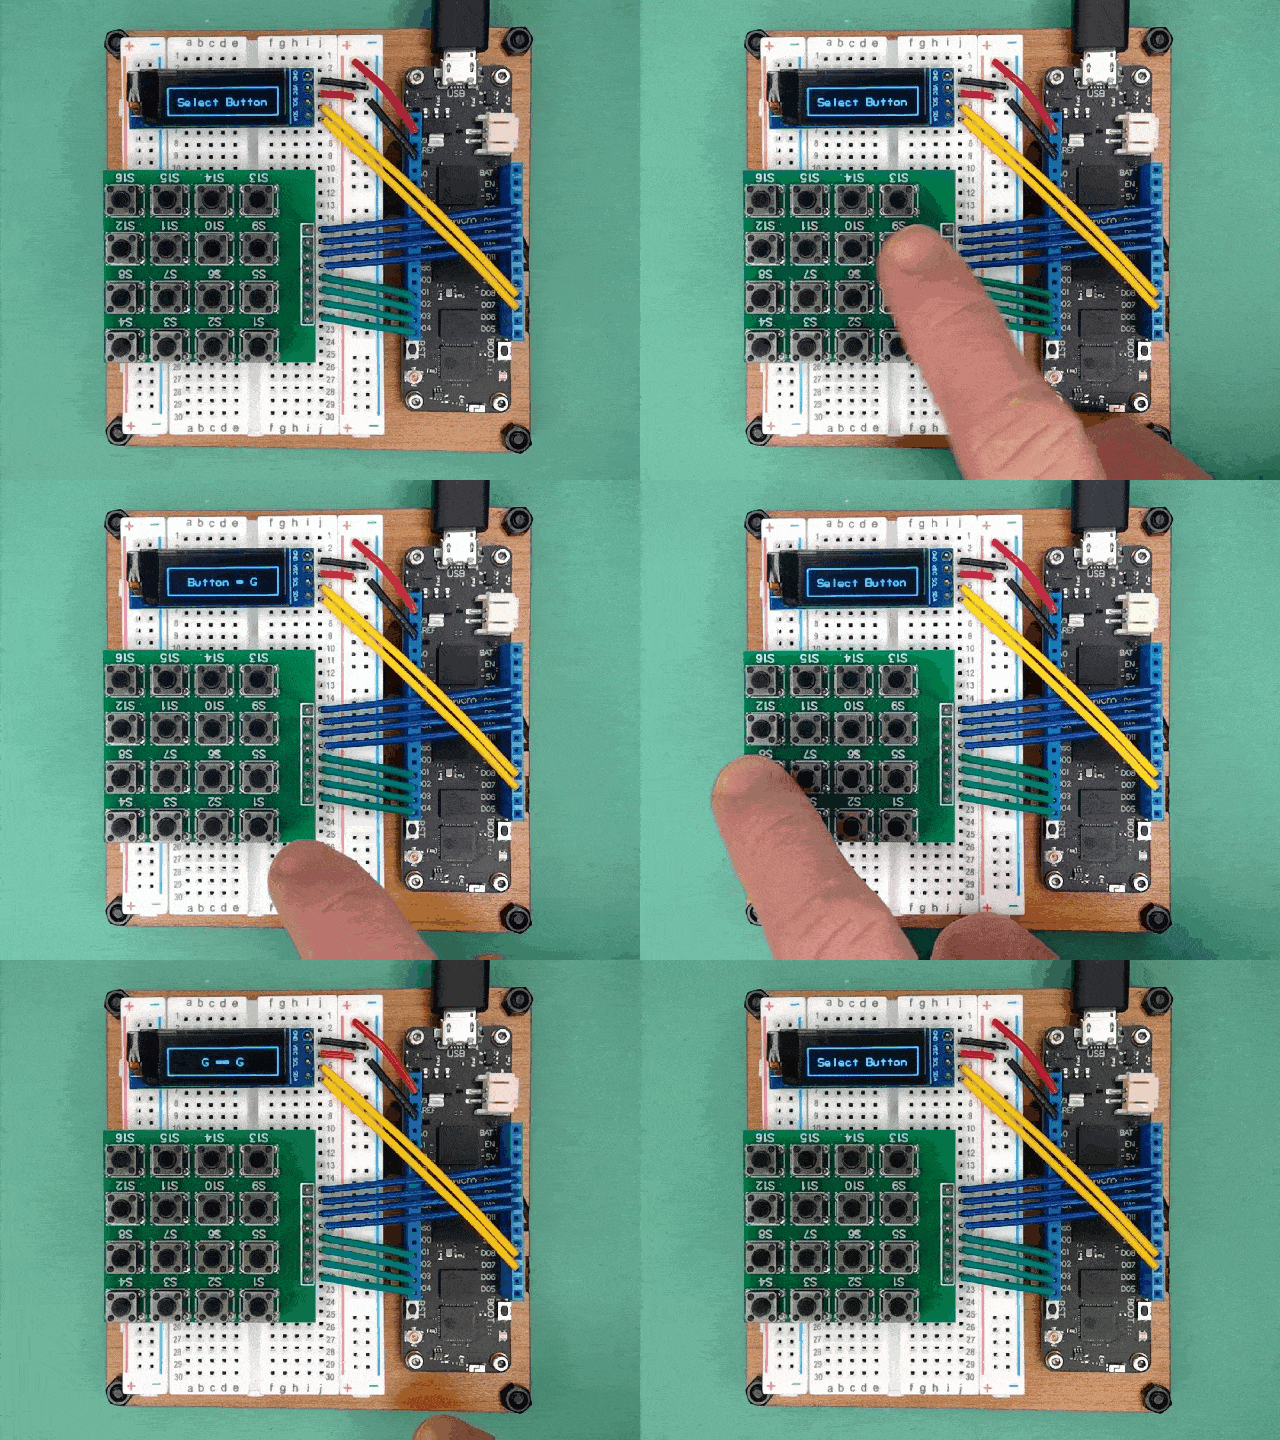
Memory Game Project
The 4x4 Keypad is a matrix of Push Buttons, where four pins corresponds to four columns and the other four corresponds to the four rows. The way to determine which button is pressed is by setting the column output pins HIGH one at a time at high speed, and when pressing a button and the corresponding column is HIGH, you can detect which row of the matrix completes the circuit and it will emit a signal to the row input pins. You can see a small video tutorial here.
For displaying the UI on the 128 x 32 I2C OLED display, you can connect to it using Meadow.Foundation, and for displaying texts and shapes you will use DisplayGraphics, an extended Library of Meadow.Foundation.
Meadow.Foundationa platform for quickly and easily building connected things using.NET on Meadow. Created by Wilderness Labs, it's completely open source and maintained by the Wilderness Labs community.
If you're new working with Meadow, I suggest you go to the Getting Started w/ Meadow by Controlling the Onboard RGB LEDproject to properly set up your development environment.
Step 1 - Assemble the circuitFor this project, wire up your breadboard and Meadow as shown in the Fritzing diagram:
Circuit diagram of the OLED display with the 16 button keypad
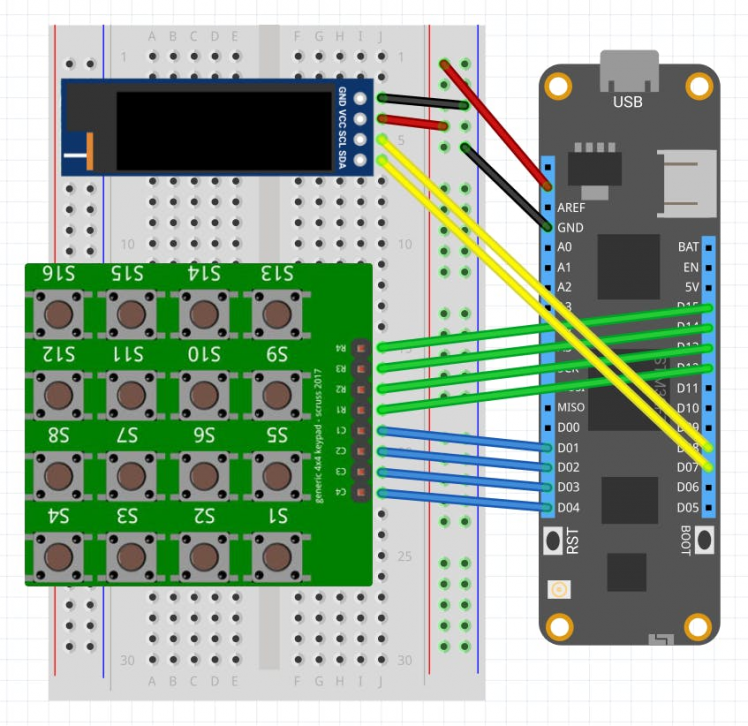
Circuit diagram of the OLED display with the 16 button keypad
Step 2 - Create a Meadow Application projectCreate a new Meadow Application project in Visual Studio 2019 for Windows or macOS and name it MemoryGame.
Step 3 - Add the required NuGet packagesWindows
Right-click on your MemoryGame project and click Manage NuGet Packages. In the Browse tab, search for Meadow.Foundation.Displays.SSD1306 and click Install to add it to your project.
macOS
Alt-click on your MemoryGame project in the Solution Explorer, and click Add => Add NuGet Package to open the NuGet Package window. Search for Meadow.Foundation.Displays.SSD1306 and click Install to add it to your project.
Step 4 - Write the code for MemoryGameCopy the following code below:
public class MeadowApp : App<F7Micro, MeadowApp>{ Ssd1306 display; GraphicsLibrary graphics; int currentColumn; IDigitalInputPort[] rowPorts = new IDigitalInputPort[4]; IDigitalOutputPort[] columnPorts = new IDigitalOutputPort[4]; protected char[] options; protected bool[] optionsSolved; protected char[] optionsPossible; protected int option1, option2; public MeadowApp() { options = new char[16]; optionsSolved = new bool[16]; optionsPossible = new char[8] { 'A', 'B', 'C', 'D', 'E', 'F', 'G', 'H' }; option1 = option2 = -1; InitializePeripherals(); LoadMemoryBoard(); StartGameAnimation(); CyclingColumnVDD(); } bool IsLevelComplete() { bool isComplete = true; for (int i = 0; i < 16; i++) { if (!optionsSolved[i]) { isComplete = false; break; } } return isComplete; } void InitializePeripherals() { var i2CBus = Device.CreateI2cBus(); display = new Ssd1306(i2CBus, 60, Ssd1306.DisplayType.OLED128x32); graphics = new GraphicsLibrary(display); graphics.Rotation = GraphicsLibrary.RotationType._180Degrees; rowPorts[0] = Device.CreateDigitalInputPort(Device.Pins.D15, InterruptMode.EdgeRising, ResistorMode.PullDown, 0, 50); rowPorts[1] = Device.CreateDigitalInputPort(Device.Pins.D14, InterruptMode.EdgeRising, ResistorMode.PullDown, 0, 50); rowPorts[2] = Device.CreateDigitalInputPort(Device.Pins.D13, InterruptMode.EdgeRising, ResistorMode.PullDown, 0, 50); rowPorts[3] = Device.CreateDigitalInputPort(Device.Pins.D12, InterruptMode.EdgeRising, ResistorMode.PullDown, 0, 50); columnPorts[0] = Device.CreateDigitalOutputPort(Device.Pins.D01); columnPorts[1] = Device.CreateDigitalOutputPort(Device.Pins.D02); columnPorts[2] = Device.CreateDigitalOutputPort(Device.Pins.D03); columnPorts[3] = Device.CreateDigitalOutputPort(Device.Pins.D04); currentColumn = 0; } void LoadMemoryBoard() { for (int i = 0; i < 16; i++) { options[i] = ' '; } for (int i = 0; i < 8; i++) { PlaceCharacter(i); PlaceCharacter(i); } // Uncomment to print all board values for (int i = 0; i < 16; i++) { Console.Write($"{(i + 1).ToString()} {options[i].ToString()} "); } } void PlaceCharacter(int i) { var r = new Random(); bool isPlaced = false; while (!isPlaced) { int index = r.Next(16); if (options[index] == ' ') { options[index] = optionsPossible[i]; isPlaced = true; } } } void StartGameAnimation() { DisplayText("MEMORY GAME", 20); Thread.Sleep(2000); DisplayText("Ready?", 40); Thread.Sleep(2000); DisplayText("Start!", 40); Thread.Sleep(2000); DisplayText("Select Button"); } void CyclingColumnVDD() { Thread thread = new Thread(() => { int lastButton = -1; while (true) { Thread.Sleep(50); int currentButton = -1; switch (currentColumn) { case 0: columnPorts[0].State = true; columnPorts[1].State = false; columnPorts[2].State = false; columnPorts[3].State = false; if (rowPorts[0].State) currentButton = 13; if (rowPorts[1].State) currentButton = 9; if (rowPorts[2].State) currentButton = 5; if (rowPorts[3].State) currentButton = 1; break; case 1: columnPorts[0].State = false; columnPorts[1].State = true; columnPorts[2].State = false; columnPorts[3].State = false; if (rowPorts[0].State) currentButton = 14; if (rowPorts[1].State) currentButton = 10; if (rowPorts[2].State) currentButton = 6; if (rowPorts[3].State) currentButton = 2; break; case 2: columnPorts[0].State = false; columnPorts[1].State = false; columnPorts[2].State = true; columnPorts[3].State = false; if (rowPorts[0].State) currentButton = 15; if (rowPorts[1].State) currentButton = 11; if (rowPorts[2].State) currentButton = 7; if (rowPorts[3].State) currentButton = 3; break; case 3: columnPorts[0].State = false; columnPorts[1].State = false; columnPorts[2].State = false; columnPorts[3].State = true; if (rowPorts[0].State) currentButton = 16; if (rowPorts[1].State) currentButton = 12; if (rowPorts[2].State) currentButton = 8; if (rowPorts[3].State) currentButton = 4; break; } currentColumn = (currentColumn == 3) ? 0 : currentColumn + 1; if (currentButton != lastButton) { if (currentButton != -1) { if (optionsSolved[currentButton - 1]) { DisplayText($"Button {options[currentButton - 1]} Found", 8); Thread.Sleep(1000); } else { if (option1 == -1) option1 = currentButton - 1; else option2 = currentButton - 1; DisplayText($"Button = {options[currentButton - 1]}", 24); Thread.Sleep(1000); if (option2 != -1 && option1 != option2) { if (options[option1] == options[option2]) { DisplayText($"{options[option1]} == {options[option2]}", 40); optionsSolved[option1] = optionsSolved[option2] = true; } else { DisplayText($"{options[option1]} != {options[option2]}", 40); } Thread.Sleep(1000); option1 = option2 = -1; } } } else { if (IsLevelComplete()) { DisplayText("You Win!", 32); Thread.Sleep(1000); LoadMemoryBoard(); StartGameAnimation(); } else { DisplayText("Select Button"); } } } lastButton = currentButton; } }); thread.Start(); } void DisplayText(string text, int x = 12) { graphics.Clear(); graphics.CurrentFont = new Font8x12(); graphics.DrawRectangle(0, 0, 128, 32); graphics.DrawText(x, 12, text); graphics.Show(); }}There are several things happening in this class, so lets brake it down:
Initialization
In the App constructor, we're initializing an array of 16 characters options, which will basically be the board that associate each character to the keypad. The InitializePeripherals() method is used to group all the hardware initialization part.
Notice we're initializing the OLED display, specifying the resolution, the speed and the address, and right after, we pass in the display object to GraphicsLibrary, so we can easily draw text and shapes onto it.
LoadMemoryBoard() method is called after initializing the app, and what it does is iterate through the optionsPossible char array, and on each iteration calls PlaceCharacter() method twice, so that same letter is placed twice in the board randomly.
Output
What the StartGameAnimation() method do is call DisplayText() method which uses the GraphicsLibrary to first clear the entire screen, calls DrawRectangle() to draw a non-filled rectangle around the entire screen, and calls DrawText() to display text at a 8x12 font size with the specified x and y coordinates.
GameLoop
In the GameLoop() method is the logic to capture button presses on the Keypad. currentColumn iterates from 0 to 3, and on each iteration, it powers the corresponding column, and also reads all 4 rows, and when one of them reads a true value, depending on the row, we can determine which button is pressed. This happens every 50ms. Too fast could lead to several presses, too slow could not detect any button presses unless you push and hold.
We also save lastButton value at the end of each cycle, so we can compare a change with the currentButton, and update the display when there's a change of the button states.
In each iteration, we also call IsLevelComplete() to check if all the option values are found to display a You Win! message and start the game all over again.
Step 5 - Run the projectClick the Run button in Visual Studio. It should look like to the following GIF:
MemoryGame project running...
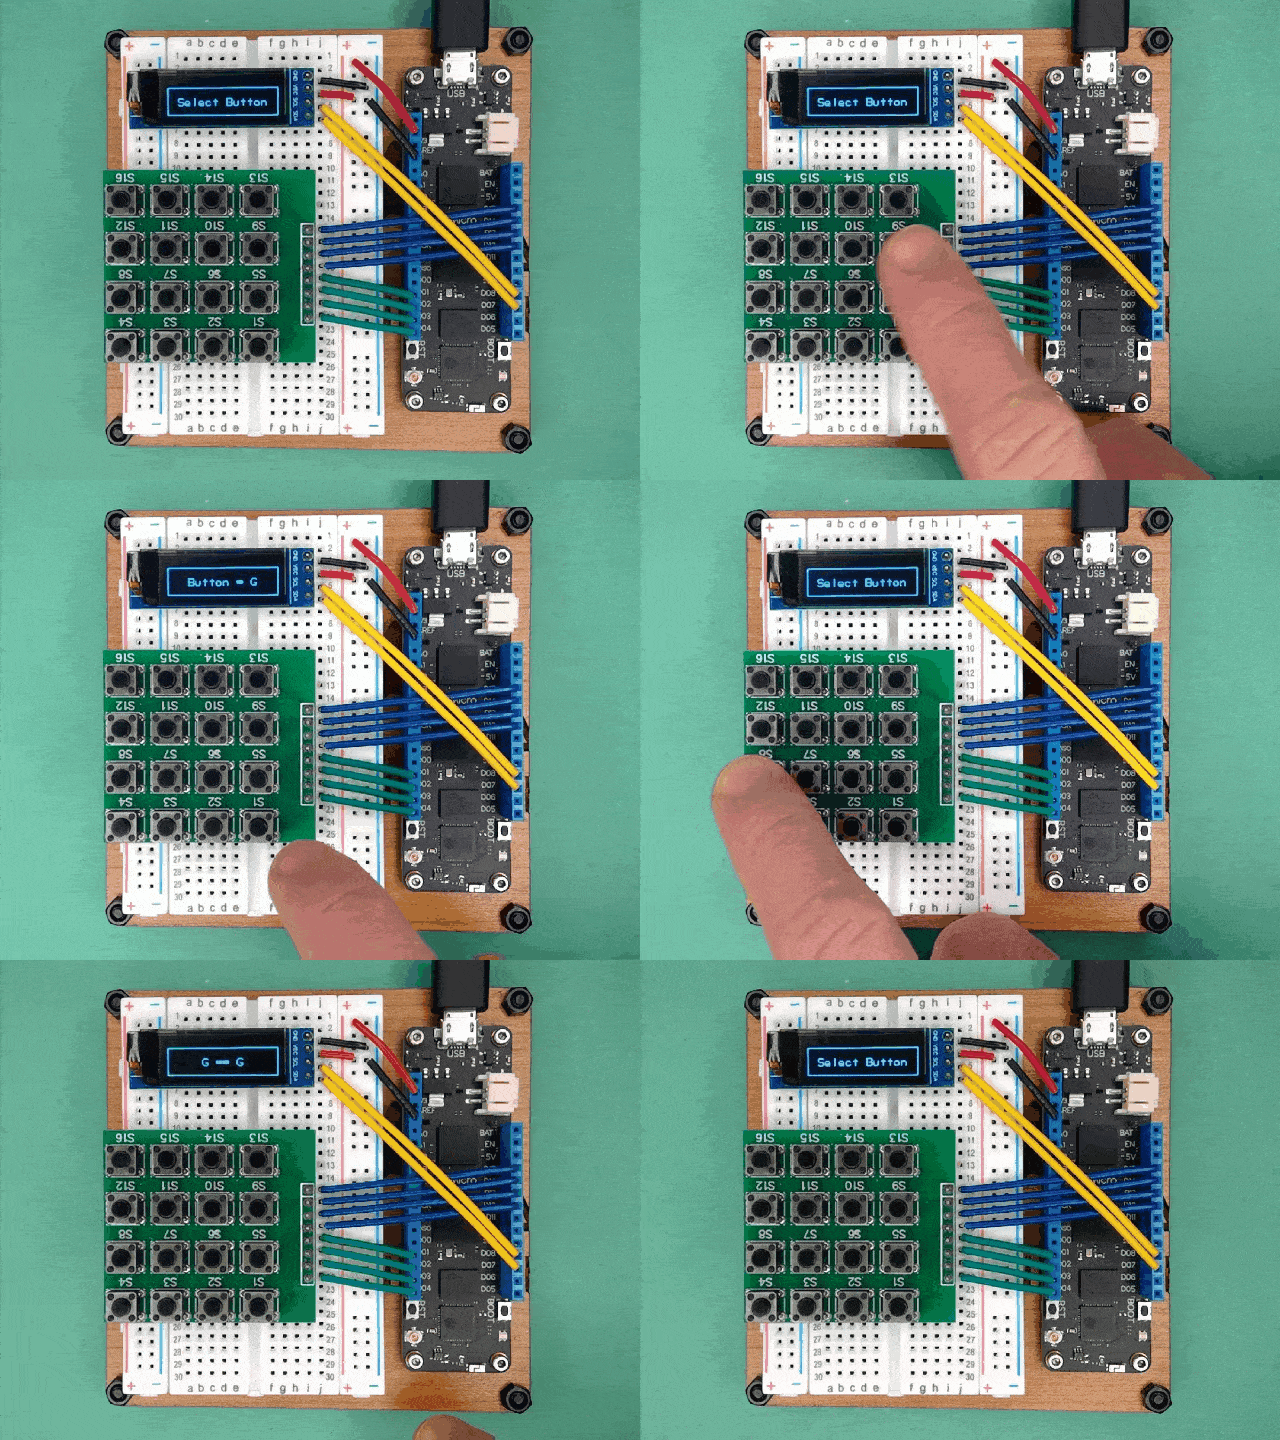
MemoryGame project running...
Check out Meadow.Foundation!This project is only the tip of the iceberg in terms of the extensive exciting things you can do with Meadow.Foundation.
- It comes with a huge peripheral driver library with drivers for the most common sensors and peripherals.
- The peripheral drivers encapsulate the core logic and expose a simple, clean, modern API.
- This project is backed by a growing community that is constantly working on building cool connected things and are always excited to help new-comers and discuss new projects.





Leave your feedback...