

Bird Detection With Tinyml And A Blues Notecard
About the project
I built a project to identify birds at a bird feeder using Machine Learning (TinyML) and transmit data to the cloud with a Blues Notecard
Project info
Items used in this project
Hardware components

View all
Story
This project's main goal is to detect and report on bird species found from running TinyML hardware. The idea here is that a TinyML based device is used to detect birds which are then sent as events on a Blues Notecard from Blues. Once those events are received the Blues service routes the events to an endpoint that accepts this data and posts an image of the bird in question.
This project will discuss the components, walk through the hardware setup, the setup of the Grove AI V2 model, the setup of the Blues device, the software for the Xiao ESP32C3, and then the software and deployment of the custom Rust server.
Would like to thank Blues for agreeing to sponsor this article as part of their "Most Valuable Hackster Program".
ComponentsAs such this project consists of several main components:
- Seeed's Grove Vision AI Module V2
- Blues Notecarrier & Notecard
- Rust app for accepting the request and displaying the birds
- Customized bird feeder
- Level-Up Board
Seeed's Grove Vision AI Module V2
The Vision AI Module V2 from Seeed Studio is a powerful device for TinyML. It is extremely powerful for running otherwise heavy models on small hardware and has a reasonable price relative to what it delivers. Their documentation states it can run Mobilenet V1, V2, Efficientnet-lite, Yolo v5 & v8, TensorFlow and PyTorch frameworks.
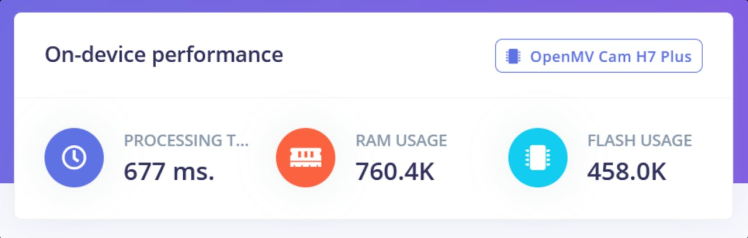
For an example of how nice it really is compare these Edge Impulse calculated statistics between the OpenMV H7 Plus and the Vision AI Module V2.

OpenMV H7 Plus running the bird model

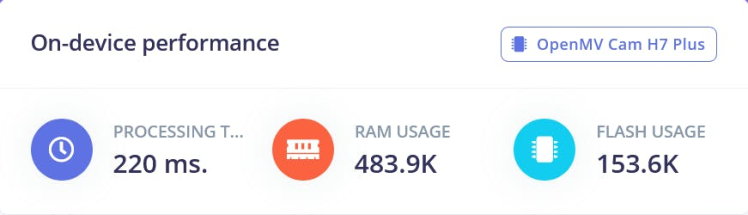
Vision AI Module V2 running the bird model
Both devices can handle the model but given the Ethos-U NPU the Seeed device handles it much more efficiently. One thing to note though is some model operations are not supported by the Seeed hardware it seems as my shrunk EfficientNetB4 model would not run on the device but did run on the OpenMV H7 Plus. Once I converted the model to the EfficientNetLite base model though it worked perfectly without issue.
Blues Notecarrier & Notecard
The Notecarrier from Blues is a great piece of technology as it allows for deployments across various communication mechanisms with a simple change to the onboard Notecard. For example in this case I setup the device using the WiFi Notecard but I could switch it to the Cellular one without having to change any related code. In this way it's easy to customize the deployment options based upon the user's needs for a given setting.
You have the option of making the device more power efficient by controlling how often it syncs both from an inbound and outbound perspective. The devices also report their battery state, location, and other useful data which can allow for effective control of a fleet.
Rust app for accepting the request and displaying the birds
For this project I wrote a quick Rust app for use as the server. I used shuttle.rs for the server which provides free hosting for small Rust apps. I prefer working in Rust as a personal preference but you could easily use a different language.
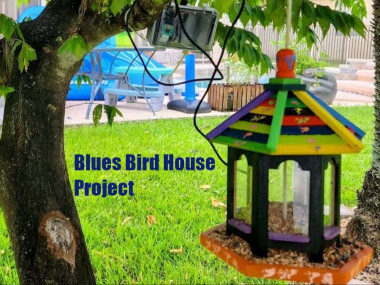
Customized bird feeder
Bird feeder creation videoThis bird feeder was customized by Kerin Lovett. If you'd like to customize it in a similar way she posted a blog entry showing the process she took. She used a cricut machine to create stencils to then paint on the device. I think she did a great job with the coloring as it really stands out.
Level-Up Board
My previous video showing the level-up boardThis project uses my Level-Up Board which I described previously on my site. The board has jumpers to select the logic level for the i2c and uart pins for a Xiao footprint. Below is a partial schematic for the Grove AI V2 Module. You can see via the i2c connector on the right the schematic expects a value greater than 3V3. This then is used with a SY80004DQD which is a step down regulator. As such the board needs more than the 3V3 available from the onboard i2c. I'm utilizing the VMAIN output from the Blues Notecarrier to power the board and level shifting up to that level. The VMAIN output here is the lithium ion battery voltage provided by the attached lipo battery so it works well for this need.

Grove input expecting 5V with power going toward step down regulator to 3V3

Level shifting to 3V3
This board is not required if you have a level shifter of your own as long as you make sure to level shift the i2c output to the VMAIN voltage. The board just makes the process a lot easier.
Hardware Setup")
Fritzing representation (with various components swapped for demonstration purposes)
I've included the above Fritzing diagram showing the general setup. One thing to note is I used the Notecarrier A versus the F used in the diagram. In addition I used a different tilt switch and used my level shifting board to make the setup process easier. This diagram should help visualize the general idea though of the current setup.
For the enclosure it's just a matter of getting the components in place. First you'll need to drill a hole big enough for the PG-7 cable gland. With that in position you can insert the wire for the tilt sensor. For the components I used VHB tape to keep them from moving. I installed the Level-Up Board with the wires attached for the Vision AI V2 Module, the module itself, attached the solar panel to the visible window, the Blues Notecard, positioned the battery between the Level-Up board and the Notecarrier, and then attached the camera.

Inserted tilt sensor via PG-7 cable gland

Level-Up board in place

Vision AI V2 Module

Blues Notecard installed

Battery installed

Device running with battery in place

Camera prior to installation
A couple of notes:
- When powering via the 5V pin on the Xiao ESP32C3 you should use a diode between the power source and device. The reason for this is that otherwise if you mistakenly plugin the USB cord bad things may happen.
- When in development and testing you can simply connect the Notecarrier's SCL and SDA and rely on your computer for powering via the USB cords of each device. After you have the code up and running you can then disconnect, use the VMAIN and GND connections of the Notecarrier to the 5V and GND of the Xiao ESP32C3. I did this and then connected the battery last such that I didn't have to modify cables once it was powered.
This process took the bulk of time for this project but luckily you don't have to do most of the work I did here as I have the output model. You're stuck with my bird selection though but you could retrain the model. If you'd like to use my existing model I've gone ahead and included both the tflite and vela files here attached to this article.
Steps Taken:
- Train model based on birds and compress using my shrinking techniques
- OpenMV H7 Plus working with EfficientNetB4 shrunken model
- Model surgery converting the model to EfficientNetLite
- Vela conversion
- Success deploying to Seeed Vision AI V2 mod
Note:
- There are a few shrinking techniques I haven't documented. I plan on writing a paper in the future documenting all of my steps if interest in the subject ever materializes.
- I did document some of the shrinking process so you could get most of the way using those techniques.
- I'd suggest starting from EfficientNetLite, ignoring my note about ACoS regularization as I didn't need it, and relying on L2 regularization on your dense layers to reduce false positives.
- My linked models in that article also suffer from a bug with my notebook where I removed the softmax activation to show the heat map prior to converting to TFLite. I'll circle back to fix the output model there in the future.
- Seeed's UI has bugs in it that display "Nothing" for the index 0 found category, "Birds" (in my case) for the index 1, and then no labels for all of the others despite them being provided in the UI.
- Seeed's UI is not designed around large outputs as you need to manually insert each item versus a comma separated list like the Edge Impulse UI. As such I didn't want to try the 411 birds model I earlier designed as it would take me quite a bit of time to get all of the outputs on the device (I also need to fix the model given those above issues I mentioned).
Train model based on birds and compress using my shrinking techniques
To begin this process I utilized the 524 Birds Dataset from Kaggle. One thing to keep in mind is there is some joke category in there with people called "Looney Birds." Given how important dataset quality is to an end model it's important to filter out any garbage data. In my case I opted to trim the list down to birds seen in Florida to make the shrinking process more doable.
Initially I had 40 birds selected. This was later reduced to 38 birds as 2 of the birds did not survive my conversion process to EfficientNetLite. That process was a bit destructive in nature and required significant effort so I'd suggest just starting with EfficientNetLite versus following my footsteps exactly.
For my own setup though:
- Trained the model on the 40 outputs for EfficientNetB4
- Shrunk the input size of the trained model down from 224x224 to 96x96 while maintaining an acceptable level of accuracy (95% or so IIRC when it was done)
- Further shrunk the model bulk of the model from the initial full sized EfficientNetB4 to the much smaller size it is now
- Converted the model's swish activation layers to relu6 (swish is terrible with int8 quantization while relu6 is constrained so the model can represent it better when quantized)
- Shrunk the dense layers to further reduce the model size
In the end I had a 225, 625 parameter 93.5% accuracy test (prior to int8 quantization), 92.5% accuracy test int8 quantized model that used 760K RAM, took up 458K flash, and had a little under 1 FPS inference speed on an OpenMV camera.
The below shows the classification_report for the model at this point in time.
precision recall f1-score support
AMERICAN AVOCET 1.00 0.97 0.99 36
AMERICAN BITTERN 0.83 1.00 0.91 34
AMERICAN COOT 1.00 0.94 0.97 32
AMERICAN FLAMINGO 1.00 0.94 0.97 33
AMERICAN GOLDFINCH 0.96 0.89 0.92 27
AMERICAN KESTREL 0.91 1.00 0.95 31
AMERICAN PIPIT 0.97 0.94 0.96 36
AMERICAN REDSTART 0.96 0.86 0.91 28
AMERICAN ROBIN 0.89 0.86 0.88 29
AMERICAN WIGEON 1.00 0.92 0.96 37
BALD EAGLE 0.94 0.94 0.94 32
BELTED KINGFISHER 0.97 0.94 0.95 31
BLACK SKIMMER 0.94 0.97 0.95 31
BOBOLINK 0.93 0.90 0.92 31
BROWN HEADED COWBIRD 1.00 0.87 0.93 38
BROWN THRASHER 0.89 0.94 0.91 33
CEDAR WAXWING 1.00 0.94 0.97 36
CHIPPING SPARROW 0.97 0.97 0.97 32
COMMON GRACKLE 0.92 0.94 0.93 35
CROW 0.85 0.88 0.87 33
DOUBLE BRESTED CORMARANT 0.88 1.00 0.94 37
DUNLIN 0.90 0.92 0.91 38
EASTERN BLUEBIRD 1.00 0.94 0.97 31
EASTERN MEADOWLARK 0.97 0.95 0.96 38
EASTERN TOWEE 0.82 0.90 0.86 31
MOURNING DOVE 0.94 0.94 0.94 31
NORTHERN CARDINAL 0.89 1.00 0.94 31
NORTHERN FLICKER 0.89 0.89 0.89 28
NORTHERN MOCKINGBIRD 0.93 1.00 0.97 28
PAINTED BUNTING 0.94 1.00 0.97 33
RED HEADED WOODPECKER 0.96 0.89 0.92 27
RED SHOULDERED HAWK 0.72 0.97 0.82 34
RED TAILED HAWK 0.93 0.62 0.75 40
RUBY CROWNED KINGLET 1.00 0.95 0.97 37
RUBY THROATED HUMMINGBIRD 0.93 0.93 0.93 27
SCARLET CROWNED FRUIT DOVE 1.00 0.97 0.98 31
SCARLET TANAGER 0.92 0.92 0.92 26
SNOWY EGRET 1.00 1.00 1.00 26
VICTORIA CROWNED PIGEON 0.97 1.00 0.98 30
WOOD DUCK 0.98 0.98 0.98 43
accuracy 0.93 1302
macro avg 0.94 0.93 0.93 1302
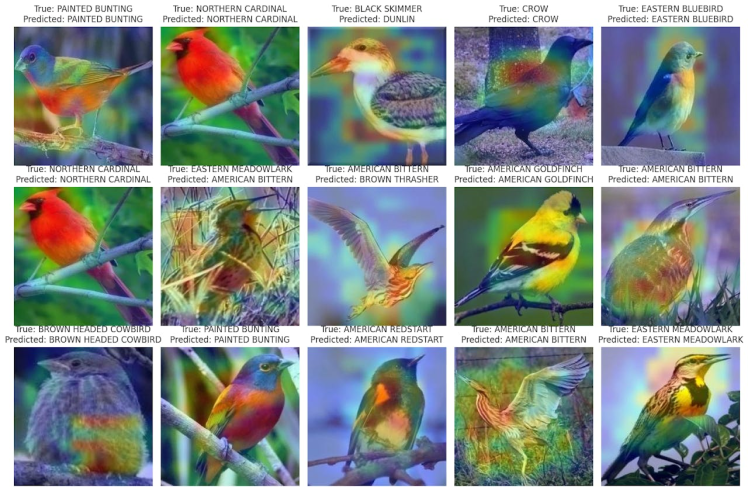
weighted avg 0.94 0.93 0.93 1302A heat map was created for the model to test it further.

heat map of birds shrunken EfficientNetB4
The process to convert the model to an int8 quantized model is fairly simple:
converter = tf.lite.TFLiteConverter.from_keras_model(model)
converter.optimizations = [tf.lite.Optimize.DEFAULT]
converter.target_spec.supported_ops = [tf.lite.OpsSet.TFLITE_BUILTINS_INT8]
converter.inference_input_type = tf.int8
converter.inference_output_type = tf.int8
converter.representative_dataset = representative_dataset
# Convert the model
tflite_model_int8 = converter.convert()
# Save the converted INT8 quantized model
with open(tflite_model_path, 'wb') as f:
    f.write(tflite_model_int8)
You'll need a representative dataset for int8 quantization but otherwise it's just a matter of running the model against that and saving it. With EfficientNetLite the activations are fairly constrained so I found the end accuracy to be similar to the test accuracy prior to quantization.
After int8 quantization I tested the segregated test set against the int8 quantized model to determine how well it performed.
Found 1302 images belonging to 40 classes.

Iteration  0 :  100.0  - Running Average:  100.0

Iteration  1 :  96.875  - Running Average:  98.4375

Iteration  2 :  93.75  - Running Average:  96.875

Iteration  3 :  93.75  - Running Average:  96.09375

Iteration  4 :  93.75  - Running Average:  95.625

Iteration  5 :  100.0  - Running Average:  96.35416666666667

Iteration  6 :  87.5  - Running Average:  95.08928571428571

Iteration  7 :  84.375  - Running Average:  93.75

Iteration  8 :  84.375  - Running Average:  92.70833333333333

Iteration  9 :  96.875  - Running Average:  93.125

Iteration  10 :  93.75  - Running Average:  93.18181818181819

Iteration  11 :  93.75  - Running Average:  93.22916666666667

Iteration  12 :  93.75  - Running Average:  93.26923076923077

Iteration  13 :  90.625  - Running Average:  93.08035714285714

Iteration  14 :  87.5  - Running Average:  92.70833333333333

Iteration  15 :  93.75  - Running Average:  92.7734375

Iteration  16 :  90.625  - Running Average:  92.6470588235294

Iteration  17 :  96.875  - Running Average:  92.88194444444444

Iteration  18 :  93.75  - Running Average:  92.92763157894737

Iteration  19 :  90.625  - Running Average:  92.8125

Iteration  20 :  90.625  - Running Average:  92.70833333333333

Iteration  21 :  93.75  - Running Average:  92.75568181818181

Iteration  22 :  93.75  - Running Average:  92.79891304347827

Iteration  23 :  93.75  - Running Average:  92.83854166666667

Iteration  24 :  93.75  - Running Average:  92.875

Iteration  25 :  90.625  - Running Average:  92.78846153846153

Iteration  26 :  96.875  - Running Average:  92.93981481481481

Iteration  27 :  96.875  - Running Average:  93.08035714285714

Iteration  28 :  93.75  - Running Average:  93.10344827586206

Iteration  29 :  96.875  - Running Average:  93.22916666666667

Iteration  30 :  93.75  - Running Average:  93.24596774193549

Iteration  31 :  93.75  - Running Average:  93.26171875

Iteration  32 :  84.375  - Running Average:  92.99242424242425

Iteration  33 :  75.0  - Running Average:  92.46323529411765

Iteration  34 :  90.625  - Running Average:  92.41071428571429

Iteration  35 :  93.75  - Running Average:  92.44791666666667

Iteration  36 :  100.0  - Running Average:  92.65202702702703

Iteration  37 :  93.75  - Running Average:  92.68092105263158

Iteration  38 :  100.0  - Running Average:  92.86858974358974

Iteration  39 :  100.0  - Running Average:  93.046875

End Average: 93.046875OpenMV H7 Plus working with EfficientNetB4 shrunken model
At this in the process I tested the model with OpenMV. You can see the test video below with it processing rather slowly albeit doing a good job at detection. The OpenMV IDE is really nice and it makes it super simple to experiment with a model. It is, unfortunately, an expensive device and given the RAM usage of my model it was not a really good fit for running it.
I had hoped to get the model working on the Seeed hardware but I struggled to debug its issues. The UI simply told me that the inferencing failed. As such I decided I'd take a leap of faith and attempt to convert the model to EfficientNetLite (I didn't know I could convert the model like this prior).
Model surgery converting the model to EfficientNetLite
So yeah the next step in my process was to convert the model to EfficientNetLite. This process was a very destructive one that required a lot of retraining so in the process lots of accuracy was lost. I went from 92.5% to 88% accuracy after conversion. Upon further review of my data I realized two of the birds were significantly worse than the others giving only 50% accuracy. To avoid issues with these birds causing the model to perform inefficiently I trimmed them from the output list and retrained the model bringing it back up to 90%. I believe if I had started with EfficientNetLite there is a good chance I could have done better here in terms of post shrinking accuracy but given the efforts made to this point retraining and reshrinking the model from scratch seemed inefficient.
The end model size ended up shrinking significantly at this point because the EfficientNetLite model I converted it to was a shrunken variety.
At this point the model only required 484K of RAM (still quite a bit for TinyML) and a flash usage of 154K. The total number of parameters dropped to 78, 134 from the previous 225, 625 for the EfficientNetB4 shrunken model. On the OpenMV H7 Plus the device now was nearly 5 FPS which is better.
Like in the above EfficientNetB4 based model I opted to run the model's classification_report to get an idea on performance.
precision    recall  f1-score   support

           AMERICAN AVOCET       1.00      0.86      0.93        36
          AMERICAN BITTERN       0.70      0.91      0.79        34
             AMERICAN COOT       0.93      0.84      0.89        32
         AMERICAN FLAMINGO       0.97      0.94      0.95        33
        AMERICAN GOLDFINCH       1.00      0.89      0.94        27
          AMERICAN KESTREL       0.92      0.77      0.84        31
            AMERICAN PIPIT       0.91      0.81      0.85        36
         AMERICAN REDSTART       1.00      0.93      0.96        28
            AMERICAN ROBIN       0.92      0.76      0.83        29
           AMERICAN WIGEON       0.91      0.84      0.87        37
                BALD EAGLE       0.91      0.94      0.92        32
         BELTED KINGFISHER       0.90      0.87      0.89        31
             BLACK SKIMMER       0.94      0.94      0.94        31
                  BOBOLINK       0.96      0.81      0.88        31
      BROWN HEADED COWBIRD       0.76      0.76      0.76        38
            BROWN THRASHER       0.78      0.97      0.86        33
             CEDAR WAXWING       0.97      0.94      0.96        36
          CHIPPING SPARROW       1.00      0.88      0.93        32
            COMMON GRACKLE       1.00      0.91      0.96        35
                      CROW       0.79      0.94      0.86        33
  DOUBLE BRESTED CORMARANT       0.94      0.92      0.93        37
                    DUNLIN       0.69      0.95      0.80        38
          EASTERN BLUEBIRD       1.00      0.97      0.98        31
        EASTERN MEADOWLARK       0.90      0.97      0.94        38
             EASTERN TOWEE       0.88      0.74      0.81        31
             MOURNING DOVE       1.00      0.94      0.97        31
         NORTHERN CARDINAL       0.88      0.97      0.92        31
      NORTHERN MOCKINGBIRD       0.84      0.93      0.88        28
           PAINTED BUNTING       0.97      0.94      0.95        33
     RED HEADED WOODPECKER       1.00      0.89      0.94        27
       RED SHOULDERED HAWK       0.81      0.88      0.85        34
      RUBY CROWNED KINGLET       0.92      0.97      0.95        37
 RUBY THROATED HUMMINGBIRD       0.92      0.85      0.88        27
SCARLET CROWNED FRUIT DOVE       0.91      1.00      0.95        31
           SCARLET TANAGER       0.92      0.92      0.92        26
               SNOWY EGRET       0.89      0.96      0.93        26
   VICTORIA CROWNED PIGEON       0.97      1.00      0.98        30
                 WOOD DUCK       0.95      0.98      0.97        43

                  accuracy                           0.90      1234
                 macro avg       0.91      0.90      0.90      1234
              weighted avg       0.91      0.90      0.90      1234
I also ran the heat map logic:
And ran the int8 quantized model's logic against the test set:
Found 1234 images belonging to 38 classes.

Iteration  0 :  90.625  - Running Average:  90.625

Iteration  1 :  87.5  - Running Average:  89.0625

Iteration  2 :  84.375  - Running Average:  87.5

Iteration  3 :  93.75  - Running Average:  89.0625

Iteration  4 :  90.625  - Running Average:  89.375

Iteration  5 :  81.25  - Running Average:  88.02083333333333

Iteration  6 :  84.375  - Running Average:  87.5

Iteration  7 :  84.375  - Running Average:  87.109375

Iteration  8 :  78.125  - Running Average:  86.11111111111111

Iteration  9 :  93.75  - Running Average:  86.875

Iteration  10 :  93.75  - Running Average:  87.5

Iteration  11 :  87.5  - Running Average:  87.5

Iteration  12 :  90.625  - Running Average:  87.74038461538461

Iteration  13 :  87.5  - Running Average:  87.72321428571429

Iteration  14 :  75.0  - Running Average:  86.875

Iteration  15 :  93.75  - Running Average:  87.3046875

Iteration  16 :  93.75  - Running Average:  87.68382352941177

Iteration  17 :  84.375  - Running Average:  87.5

Iteration  18 :  87.5  - Running Average:  87.5

Iteration  19 :  90.625  - Running Average:  87.65625

Iteration  20 :  90.625  - Running Average:  87.79761904761905

Iteration  21 :  90.625  - Running Average:  87.92613636363636

Iteration  22 :  96.875  - Running Average:  88.31521739130434

Iteration  23 :  96.875  - Running Average:  88.671875

Iteration  24 :  96.875  - Running Average:  89.0

Iteration  25 :  71.875  - Running Average:  88.34134615384616

Iteration  26 :  93.75  - Running Average:  88.54166666666667

Iteration  27 :  96.875  - Running Average:  88.83928571428571

Iteration  28 :  90.625  - Running Average:  88.90086206896552

Iteration  29 :  93.75  - Running Average:  89.0625

Iteration  30 :  84.375  - Running Average:  88.91129032258064

Iteration  31 :  90.625  - Running Average:  88.96484375

Iteration  32 :  90.625  - Running Average:  89.01515151515152

Iteration  33 :  90.625  - Running Average:  89.0625

Iteration  34 :  96.875  - Running Average:  89.28571428571429

Iteration  35 :  93.75  - Running Average:  89.40972222222223

Iteration  36 :  100.0  - Running Average:  89.69594594594595

Iteration  37 :  100.0  - Running Average:  89.96710526315789

End Average:  89.96710526315789
Vela conversion and success deploying to Seeed Vision AI V2 model
The vela conversion process is actually rather simple.
First you'll need the library which can be installed via pip:
pip install ethos-u-velaAfter this it's simply a command you run against the model:
!vela --accelerator-config ethos-u55-64 /home/cosmic/birds/bird_classifier_96x96_38.tflite --output-dir /home/cosmic/birds/output

Warning: Using internal-default values for system configuration
Warning: Using internal-default values for memory mode

Network summary for bird_classifier_96x96_38
Accelerator configuration                Ethos_U55_64
System configuration                 internal-default
Memory mode                          internal-default
Accelerator clock                                 500 MHz
Design peak SRAM bandwidth                       4.00 GB/s
Design peak Off-chip Flash bandwidth             0.50 GB/s

Total SRAM used                                274.25 KiB
Total Off-chip Flash used                      128.09 KiB

CPU operators = 0 (0.0%)
NPU operators = 52 (100.0%)

Average SRAM bandwidth                           1.14 GB/s
Input   SRAM bandwidth                           1.49 MB/batch
Weight  SRAM bandwidth                           0.81 MB/batch
Output  SRAM bandwidth                           0.91 MB/batch
Total   SRAM bandwidth                           3.23 MB/batch
Total   SRAM bandwidth            per input      3.23 MB/inference (batch size 1)

Average Off-chip Flash bandwidth                 0.04 GB/s
Input   Off-chip Flash bandwidth                 0.00 MB/batch
Weight  Off-chip Flash bandwidth                 0.10 MB/batch
Output  Off-chip Flash bandwidth                 0.00 MB/batch
Total   Off-chip Flash bandwidth                 0.11 MB/batch
Total   Off-chip Flash bandwidth  per input      0.11 MB/inference (batch size 1)

Neural network macs                          22318828 MACs/batch
Network Tops/s                                   0.02 Tops/s

NPU cycles                                    1402246 cycles/batch
SRAM Access cycles                             323380 cycles/batch
DRAM Access cycles                                  0 cycles/batch
On-chip Flash Access cycles                         0 cycles/batch
Off-chip Flash Access cycles                    11600 cycles/batch
Total cycles                                  1412083 cycles/batch

Batch Inference time                 2.82 ms,  354.09 inferences/s (batch size 1)
It handles figuring out the best way to convert the model. Unlike in the EfficientNetB4 case it returned no errors here which was a very positive sign.
From here I simply grabbed the vela file from the output and used that with the Seeed tooling.
Success deploying to Seeed Vision AI V2 mod
As seen in the below video I succeeded at this point with getting it on the device.
Seeed Vision AI V2 running shrunken bird modelThey have two websites for interfacing with the device. I believe I had some issues with their main website so I stuck with the older UI. It's possible they have improved things on that main UI though related to the issues I did see around labeling.
On the UI I used you can add a new custom AI model. This has an input for the model name, uploading the file, and listing the labels (which doesn't appear to work).
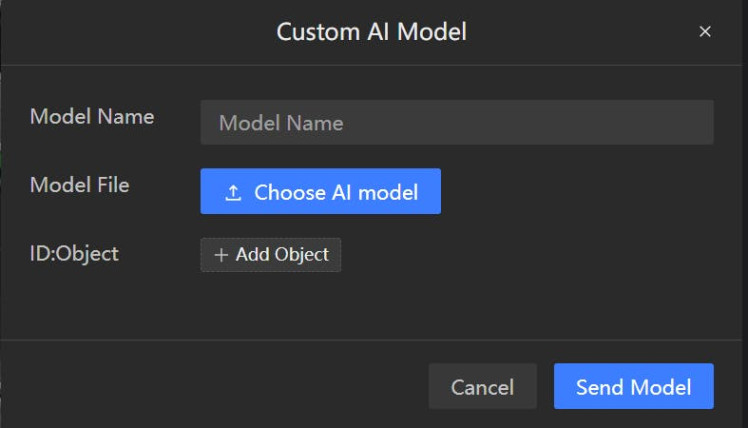
I'm not sure what happens if you don't provide the labels but I went through the process at this point adding each of mine. Given it doesn't actually use the labels though for the tooling you may be safe just not including them but I didn't try as it was already working in some sense for me at this point so didn't think to do such.
Once it finishes flashing you'll see the preview in the right hand box. This makes it fairly easy to see things working. In the case of the birds model it has a bug where it lists label 0 as "nothing", label 1 as the model name provided, and then all of the other labels as their number.
With this completed you can now use i2c with the SSCMA library from Seeed to get back inferencing results. I'll continue with that further when we reach the Xiao ESP32C3 related setup.
Setup of the Blues deviceThe Blues device setup isn't too difficult.
The main elements here are:
- Getting the Notecard setup
- Configuring a route for a test API
- Configuring JSONata Expression to adjust the payload
- Updating the route once the finalized site is ready and adding an authentication header
Getting the Notecard setup
For this step it's probably best to refer to the Blues getting started documentation in case updates are made to any process. In addition if you're setting up the WiFi notecard you'll need to set your WiFi network while other notecards require different initialization.
During development you should avoid using the VMAIN to 5V connection on the Xiao. You can use your computer's USB ports to connect to each device along with cables to connect between SDA and SCL on both devices. Powering the device via the VMAIN in addition to USB may damage the Xiao without a diode.
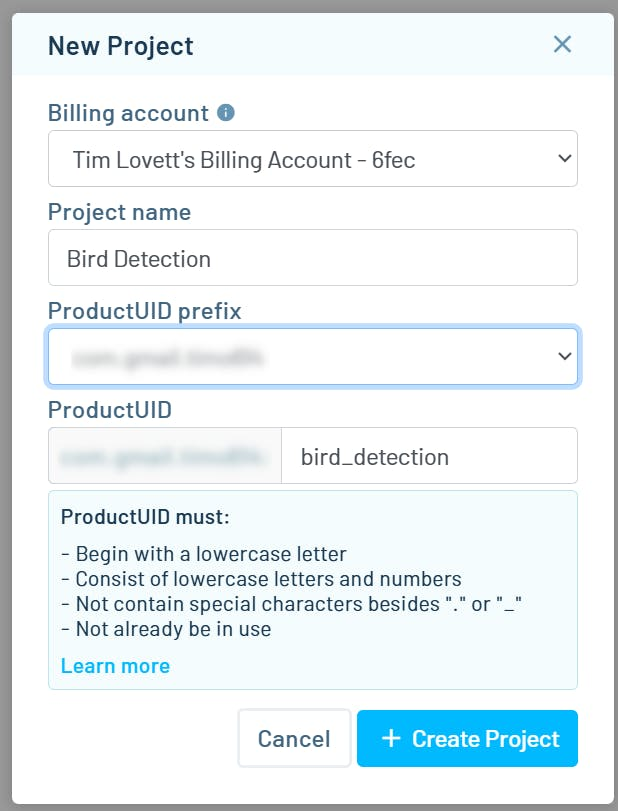
You'll want to create a new Notehub | Create Project
Once created you'll want to create a new route for the project. Select "Routes" from the left hand side of the menu and click the "Create Route" button.
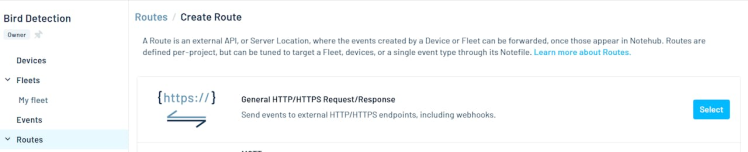
From here you'll want to select the "General HTTP/HTTPS Request/Response" type.
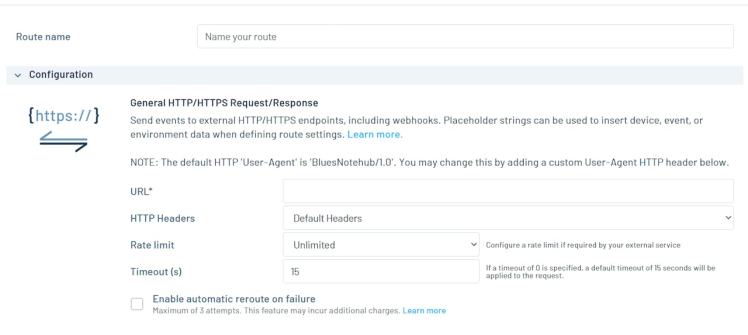
For the URL one of the best options when developing is to rely on a service called webhook.site which provides a temporary location to post data allowing you to see the state of the payload.
Configuring a route for a test API
Once you visit the webhook.site address you're given a temporary URL to use.
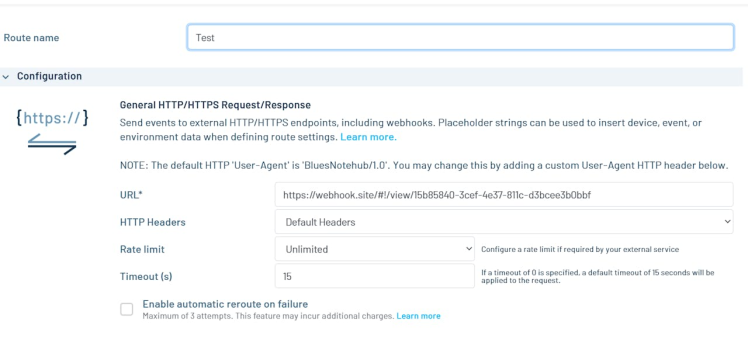
You can set that value here as the URL along with a name for the route and save.
Once saved you can open up and existing event and route to that event.
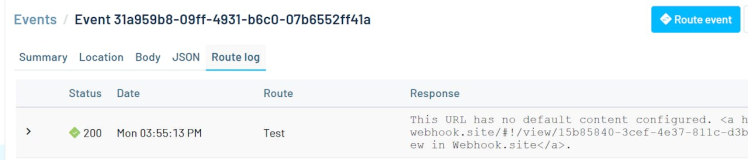
You'll see by returning to the webhook.site page you were on you now have an event with a payload:
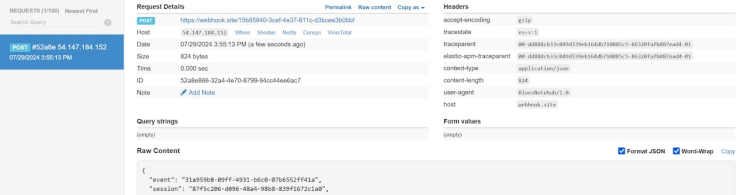
From here you can take this payload and copy it via the "Copy as" option in the menu as shown above.
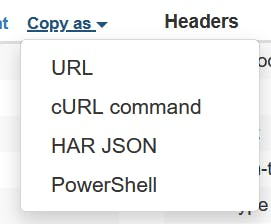
Saving it as a cURL command allows you to modify it further and send to your own local server very easily.
Configuring JSONata Expression to adjust the payload
At this point in time it may be worth adjusting the returning payload such that it focuses on your needs versus having it send all the associated Blues data.
Back in your route there is a "Data" section for this purpose. You can use JSONata to trim the results to your needs.
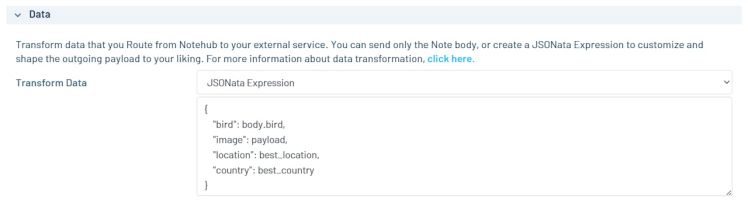
I found the JSONata experimenter to be very helpful in creating the JSON needed here as it gave me a chance to quickly see the behavior with the provided payload.
I used the following JSONata:
{
    "bird": body.bird,
    "image": payload,
    "location": best_location,
    "country": best_country
}
After you have saved the route with the new data transform you can return to an older event and submit it to the route once more to confirm the behavior on webhook.site
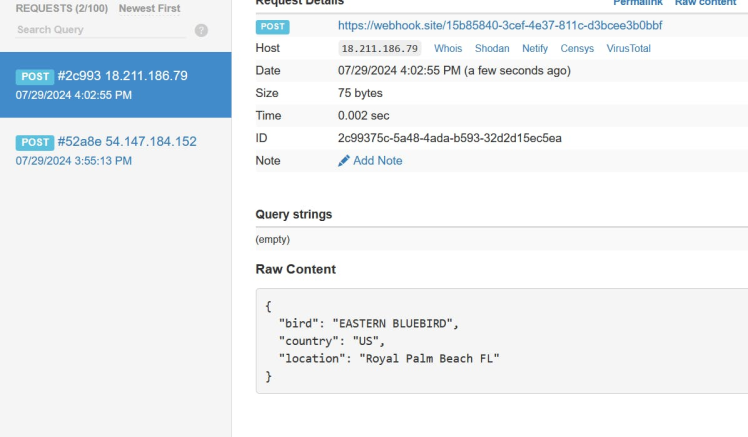
- You'll notice the bird payload is not here. I'm not sure but the payload sent does not appear to be persisted on the Blues tooling at this time when provided but it does work as it consistently sent it with my events for the bird images.
Updating the route once the finalized site is ready and adding an authentication header
Once the application is finished you'll want to change from the webhook.site address to your own server. To do this simply open up the route again and adjust the HTTPS request logic to point to your endpoint. You'll want to add an "Authorization" header if using an API key in that way as I did for my project.

You'll need the rust server up and running if following this guide prior to this step so keep reading if trying to do something similar to my own project.
Software for the Xiao ESP32C3For this step we'll be using Arduino. I'll go through the associated code used here explaining the purpose.
- Add board URL for Xiao related boards
- Install esp32 board from Espressif and select XIAO_ESP32C3
- Install associated libraries
- Build and deploy the code
Add board URL for Xiao related boards
To get the board available for installation you'll want to add the board URL. For full instructions the Seeed Getting Started With ESP32C3 wiki is a good resource.
https://raw.githubusercontent.com/espressif/arduino-esp32/gh-pages/package_esp32_index.jsonI've included the board URL above.
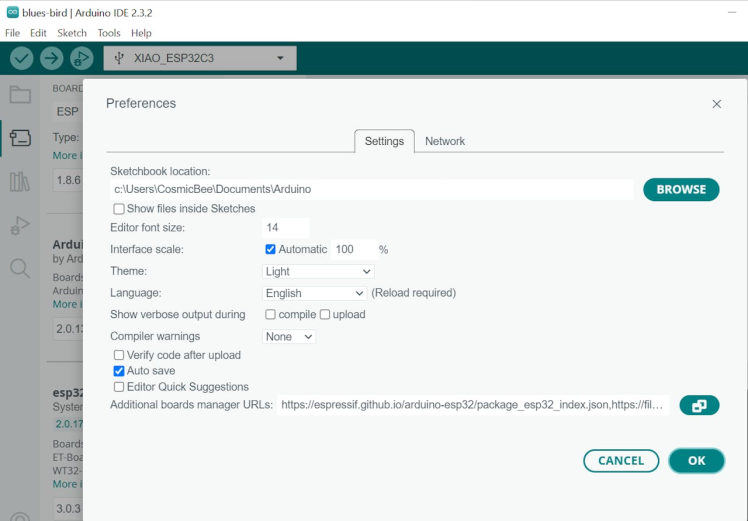
Click File > Preferences from the menu. You'll want to put it in the "Additional boards manager URLs" section near the bottom of the Preferences in Arduino.
Once you click "Ok" wait for the board file to be fetched.
Install esp32 board from Espressif and select XIAO_ESP32C3
Now go to the boards submenu on the left hand side of the Arduino IDE.
Searching for ESP32 will return the correct board for you to use.
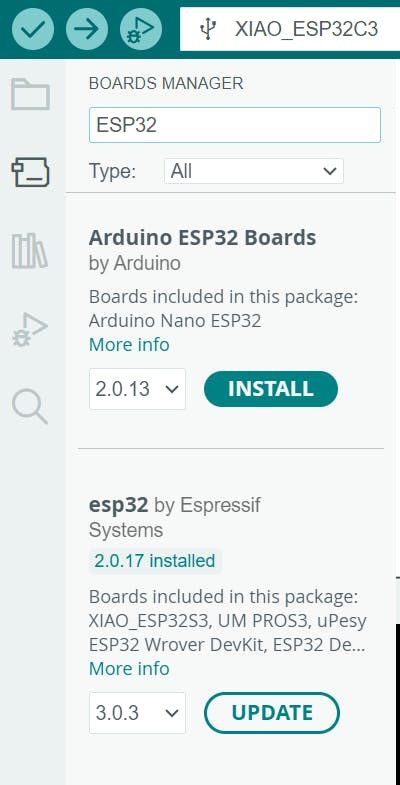
From there you can now select the XIAO_ESP32C3 from the menu of boards above.

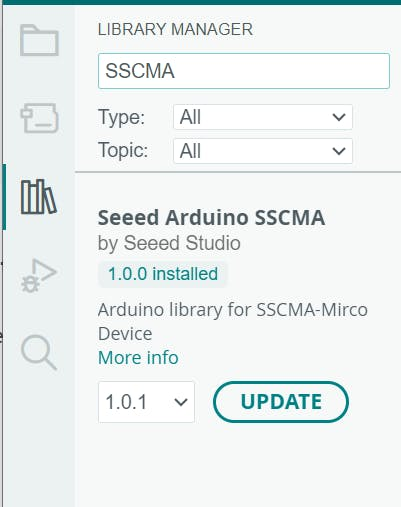
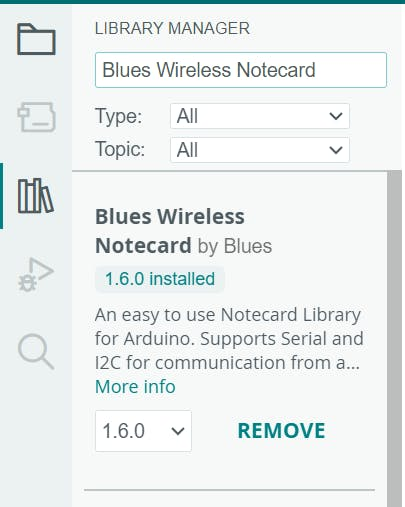
Install associated libraries
Next you'll need to install the SSCMA and Blues Notecard libraries used by the example.
Click the left library section of the submenu in Arduino and search for each as shown below installing them for use.
Build and deploy the code
The associated code can be found in the attached ino file. With the libraries in place it should be able to build for the Xiao ESP32C3. I'll describe some of the code blow.
#include <Seeed_Arduino_SSCMA.h>
#include <Notecard.h>
SSCMA AI;
Notecard notecard;
The first part of the logic sets the includes needed and creates the objects.
#define accuracyThreshold 95
#define tiltPin D7
#define productUID "PRODUCT_UID_HERE"
Next three defines are used. The first allows you to select an accuracy threshold in this case I'm using 95% to determine whether to trust the data. You'll see in my above video no bird was detected when I first entered the Sensecraft page with the preview. This was because it was setup to use a high confidence for display in a similar way. After this the pin used for the tilt pin is selected (I'm using D7 here) and following that is the Blues product UID. This should be updated to your own value.
Seeed provides this pinout image for the ESP32C3 via their Getting Started wiki page:
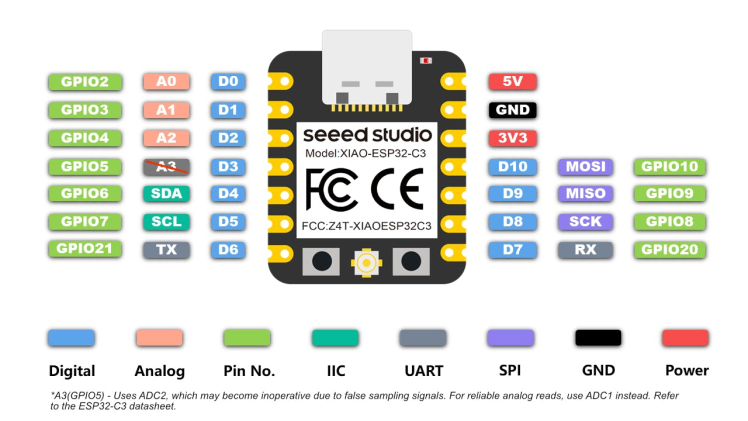
You can see the D7 here is the pin I used for my connection. On my Level-Up board the Grove connector is setup primarily for UART so it has D6 and D7 connected. I'm using the pins not UART in this case on my board but it effectively was just a fancy way to connect to that pin.
String birdNames[] = {
    "AMERICAN AVOCET",
    ...
}
I'm using this array to store the labels such that when detected I can return the bird name for the Blues event.
void setup()
{
    Serial.begin(9600);

    // Set tiltPin as an input pin
    pinMode(tiltPin, INPUT);

    // Initialize Seeed Grove Vision AI V2 via SSCMA
    AI.begin();

    // Initialize notecard
    notecard.begin();

    J *req = notecard.newRequest("hub.set");
    if (req) {
        JAddStringToObject(req, "product", productUID);
        JAddStringToObject(req, "mode", "periodic");
        JAddNumberToObject(req, "outbound", 5);
        JAddNumberToObject(req, "inbound", 60);
        if (!notecard.sendRequest(req)) {
            notecard.logDebug("FATAL: Failed to configure Notecard!n");
            while(1);
        }
    }
}
For the setup the logic starts Serial connection for debugging. It then starts the Grove Vision AI V2, initializes the notecard, and sends a hub.set message to the notecard. I have it setup for 5 minutes outbound and 60 minutes inbound for periodic syncing. In this way it reduces the battery usage but I could have set it to a larger outbound value here to reduce it further. During development instead of the periodic mode you can use continuous which sends the events immediately allowing you to promptly confirm everything is working.
void loop()
{
    // If the tilt pin reads 0 (in this case indicating movement for this sensor)
    if (digitalRead(tiltPin) == 0) {
        // Invoke SSCMA asking inferencing and returning the image (third parameter true)
        if (!AI.invoke(1, false, true))
        {
            // Debug logic
            Serial.println("invoke success");
            Serial.print("perf: prepocess=");
            Serial.print(AI.perf().prepocess);
            Serial.print(", inference=");
            Serial.print(AI.perf().inference);
            Serial.print(", postpocess=");
            Serial.println(AI.perf().postprocess);

            for (int i = 0; i < AI.classes().size(); i++)
            {
                if (AI.classes()[i].score >= accuracyThreshold) {
                    Serial.print("Class[");
                    Serial.print(i);
                    Serial.print("] target=");
                    Serial.print(AI.classes()[i].target);
                    Serial.print(", score=");
                    Serial.println(AI.classes()[i].score);
                    Serial.print("Image:");
                    Serial.println();

                    J *req = notecard.newRequest("note.add");
                    if (req != NULL)
                    {
                        JAddStringToObject(req, "file", "events.qo");

                        J *body = JAddObjectToObject(req, "body");
                        if (body)
                        {
                            JAddStringToObject(body, "bird", birdNames[AI.classes()[i].target].c_str());
                        }
                        JAddStringToObject(req, "payload", AI.last_image().c_str());
                        notecard.sendRequest(req);
                    }
                }
            }
        }
    }
}
The logic first checks if the tilt sensor has been brought to GND. If it determines it has been it invokes the model once with the option to send the image sample as part of the call. It only sends the data to the Blues notecard if the accuracy threshold is over the set amount per the AI.classes()[i].score >= accuracyThreshold conditional. The notecard event is then constructed with the bird name and the base64 image that can be fetched via the last_image() method. It then sends the request to Blues which is further routed as we setup earlier.
This completes the Arduino code overview. With this built and deployed on the Xiao ESP32C3 most of the setup for this project has been completed. Only the Rust server remains.
Software and deployment of the custom Rust serverFor this part of the project I opted to use Rust. I'll go into the setup of the server and explain the code.
You'll want to install Rust which the following guide goes into further detail demonstrating. Once installed you can then install the shuttle.rs related crate.
cargo install cargo-shuttleFirst you'll need to login to shuttle.rs which uses GitHub for authentication.
Shuttle has a similar API but slightly modified for running applications.
#[tokio::main]
async fn main() {
    let app = Router::new().route("/", get(handler));
    let listener = tokio::net::TcpListener::bind("127.0.0.1:3000")
        .await
        .unwrap();
    axum::serve(listener, app).await.unwrap();
}
You can see the simple Hello World app for Axum here setup for the following route / using the GET HTTP verb. The Shuttle version of Axum is setup in a similar way just specifying the shuttle_runtime versus tokio and expecting the ShuttleAxum return value from the method. There are some other differences you can read about in their documentation but it's fairly straightforward.
#[shuttle_runtime::main]
async fn axum() -> shuttle_axum::ShuttleAxum {
    let router = Router::new().route("/", get(hello_world));
    Ok(router.into())
}
This example also uses Shuttle's shared DB feature. The steps for this can be seen via their wiki documentation to get started.
Run the following to generate an API key:
python3 -c 'import secrets, string; print("API Secret:", "".join(secrets.choice(string.ascii_letters + string.digits + string.punctuation) for _ in range(64)))'Create a file Secrets.toml with the following content:
API_KEY = "YOUR API SECRET HERE"This file is ignored from git via the .gitignore file in the repository.
Once you're mostly setup you can refer to the Shuttle homepage to aid in the setup process and later to check on the status of your running app.
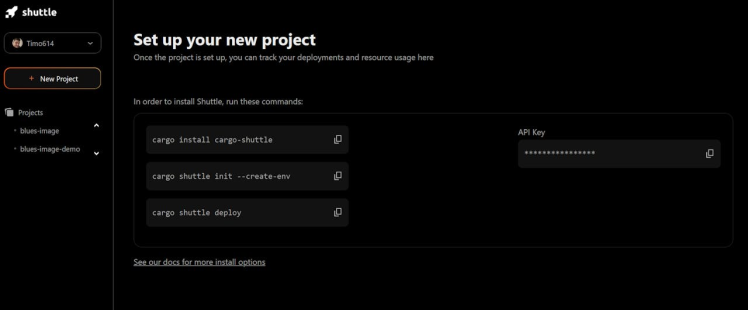
With a running app more details and the log are shown below:
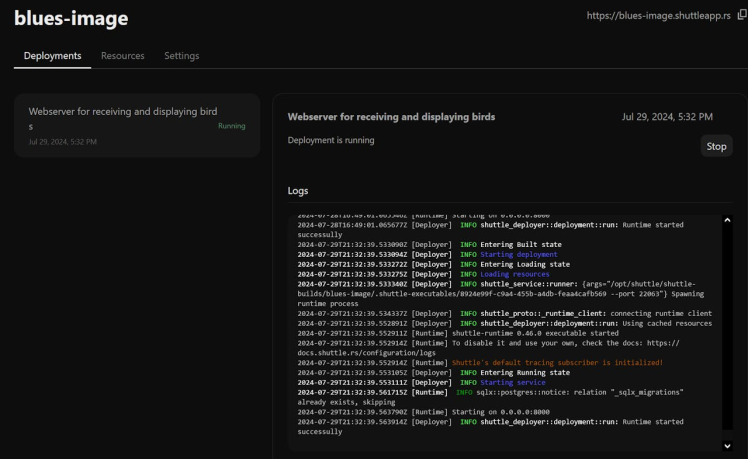
First though you'll need to initialize the shuttle app and deploy it via cargo shuttle deploy after that though it's in a ready state turning off when not used and starting up to handle requests. It takes about 1 second for the app to restart after shutdown so it's fairly quick for handling these requests that come in. You can read more about the idle time on their website.
With the app deployed you should be able to use the /birds with the GET verb for retrieving the birds index. You should also be able to use the /birds endpoint with the POST endpoint for creating new bird records. For the application security I created an API key randomly to use to prevent unauthorized data entry. Additional security mechanisms such as OAuth could be configured but I felt it was overkill for this project.
Website showing birds seen from testing

Website showing birds seen from testing
FileStructure
To better structure my code I utilize modules to better encapsulate their associated code. You could, of course, just shove everything in one file if you so desired but it would quickly become a mess to maintain. In addition by separate the logic pull requests are less likely to conflict as the addition of a new controller wouldn't touch the same files as some other logic and so on. I'm include the primary files below and I'll go into some detail after.
- migrations/20240720185526_create_birds.sql
- src/controllers/birds.rs
- src/middleware/auth.rs
- src/models/birds.rs
- src/db.rs
- src/main.rs
- src/routing.rs
- templates/birds.html
Migrations
The migrations can be found in the /migrations folder. The shuttle.rs wiki information has more detail about getting this all setup but once it is it's fairly easy to add new migrations. For example sqlx migrate add <name> will add a new migration using the timestamp at the moment to avoid conflicts and order the migrations.
In the case my migration I'm simply creating a new table and adding indexes for the fields most likely to be used as part of a lookup.
CREATE TABLE IF NOT EXISTS birds (
    id SERIAL PRIMARY KEY NOT NULL,
    image TEXT NOT NULL,
    bird TEXT NOT NULL,
    country TEXT NOT NULL,
    location TEXT NOT NULL,
    created_at TIMESTAMP WITH TIME ZONE DEFAULT CURRENT_TIMESTAMP
);

CREATE INDEX index_birds_uuid ON birds (id);
CREATE INDEX index_birds_bird ON birds (bird);
CREATE INDEX index_birds_created_at ON birds (created_at);
Controllers
My birds controller is setup to handle the POST and GET requests (more on this in the routing section further).
#[derive(Deserialize)]
pub struct BirdUpload {
    bird: String,
    image: String,
    country: String,
    location: String,
}
This code here uses the serde trait Deserialize. When the request comes in the logic attempts to deserialize the payload for the controller action.
pub async fn create(
    State(state): State<AppState>,
    Json(payload): Json<BirdUpload>,
) -> Result<impl IntoResponse, impl IntoResponse> {
You can see from the create method signature that this struct is used here expecting it as the Json body and populating the payload variable.
In addition the AppState is populated allowing its struct members to be accessible in the method. The DB pool is one of these values allowing the DB to utilized. Ideally I would have moved the insertion logic into the model (perhaps a future update) as it should be further encapsulated there.
#[derive(Template)]
#[template(path = "birds.html")]
struct BirdTemplate {
    birds: Vec<BirdContext>,
}
For the index action a template is used to present an HTML page response. The askama crate is used for rendering the jinja template. BirdContext is a struct I created to help with this rendering process I'll discuss further on in the models section but assume it contains formatted bird context for use with it.
#[template(path = "birds.html")]
This declaration is used alongside the Template derive to select which template should be used during rendering of this struct.
Like the create action this action has some logic I would definitely refactor in a future version such as the list DB call as it really belongs in the model.
pub async fn index(State(state): State<AppState>) -> Result<Html<String>, StatusCode> {Here is the method signature for the index action. It's setup to return the HTML for a successful request and a status code in the event of a failure. Instead of a StatusCode here impl IntoResponse could have been used in a similar manner to the create action. Both are viable with this API so to demonstrate I decided to show both methods here.
Ok(birds) => {
            let bird_html = BirdTemplate { birds: birds.into_iter().map(|b| b.into()).collect() };

            match bird_html.render() {
                Ok(html) => Ok(Html(html)),
                Err(_) => Err(StatusCode::BAD_REQUEST)
            }
        },
I'm going to specifically discuss this part of the code. Most of it is fairly easy to parse but wanted to highlight this. The birds variable contains the Bird DB entry fetched with its associated types. I then take it, turn it into an iterator, map it using the into() method and collect() the converted values. This works as the BirdTemplate above has a Vec containing BirdContext. In the model file below you'll see I've implemented the From trait to convert from the Bird model to the BirdContext. The into() method utilizes the From trait allowing this neat syntax. You can see more information about this here.
After the struct has been constructed render() is called on it. That method was provided by the Template trait which had the derive from askama. See this information for more details on the trait. The HTML is then returned after rendering.
Middleware
For authentication I wanted to keep things very simple and avoid needing a user system or any sort of OAuth setup but still keep things fairly secure. As such I generated a secret API key (as shown earlier) to use with submission of birds. I utilize this secret API key as part of the middleware I've added.
pub async fn auth_middleware(
    State(state): State<AppState>,
    request: Request<Body>,
    next: Next,
) -> Response {
    // Retrieve the API key from the state
    let expected_api_key = &state.api_key;

    // Check the Authorization header
    if let Some(auth_header) = request.headers().get("Authorization") {
        if auth_header == expected_api_key {
            return next.run(request).await;
        }
    }

    (StatusCode::UNAUTHORIZED, "Unauthorized").into_response()
}
The logic here is fairly simple. On actions / routes it is assigned the logic fetches the API key from the state provided to the middleware, it then checks if the authorization header matches this and if not it returns an Unauthorized response. You can see it in action here with this cURL command:
curl https://blues-image.shuttleapp.rs/birds -X POST --header "Content-Type: application/json" --data '{}' -i

HTTP/1.1 401 Unauthorized
content-type: text/plain; charset=utf-8
content-length: 12
date: Mon, 29 Jul 2024 22:46:12 GMT
server: shuttle.rs
Models
For this section I'll be discussing the bird model. As mentioned above I likely should move the SQL from the controller into the model. This could be done in a future refactor but for now I haven't. The model is being used for defining the struct representing the SQL model and for the askama template.
#[derive(Debug, Deserialize, Serialize, FromRow)]
pub struct Bird {
    pub id: i32,
    pub image: String,
    pub bird: String,
    pub country: String,
    pub location: String,
    pub created_at: DateTime<Utc>,
}

pub struct BirdContext {
    pub id: i32,
    pub image: String,
    pub name: String,
    pub location: String,
    pub date: String,
}
You can see the model representing the DB record contains a DateTime<Utc> value while the context used for the template is a String. I also combined the location into one field.
impl From<Bird> for BirdContext {
    fn from(bird: Bird) -> BirdContext {
        BirdContext {
            id: bird.id,
            image: bird.image.clone(),
            name: bird.bird.clone(),
            location: format!("{}, {}", bird.location, bird.country),
            date: format!("{} {}, {}", bird.created_at.format("%b"), bird.created_at.day(), bird.created_at.year())
        }
    }
}
Here the From<Bird> is utilizing the From trait to convert from one type to another. You can see from the format! calls I'm constructing String values that represent the location as a combined value and a date in a text based format. In this way I can alter this format to show the date in different ways fairly easily.
DB
I'm using this file for DB related logic. In this case just a wrapper for running the migrations.
Main
This file is primarily used for running the app as it's the starting point.
#[derive(Clone)]
pub struct AppState {
    pub pool: PgPool,
    pub api_key: String,
}

#[shuttle_runtime::main]
async fn main(
    #[shuttle_shared_db::Postgres] pool: PgPool,
    #[shuttle_runtime::Secrets] secrets: shuttle_runtime::SecretStore,
) -> ShuttleAxum {
    db::run_migrations(&pool).await;
    let api_key = secrets.get("API_KEY").expect("secret not found");
    let state = AppState { pool, api_key };
    Ok(routing::routing(state).await)
}
I have the AppState setup to provide the API key and DB Pool. This is provided to the controller and middleware as seen above. The other logic here just starts the shuttle app in a similar manner to the example.
Routing
This file is just a helper file I added to contain the routing information.
pub(crate) async fn routing(state: AppState) -> AxumService {
    Router::new()
        .route(
            "/birds",
            get(controllers::birds::index))
        .route(
                "/birds",post(controllers::birds::create).route_layer(middleware::from_fn_with_state(
                    state.clone(),
                    crate::middleware::auth_middleware,
                )),
        )
        .with_state(state)
        .into()
}
You can see from the above I routed the /birdsGET request without the additional middleware while for the POST I had the logic associate it. This is the reason why only that request requires the Authorization header.
Templates
This folder contains the jinja templates used by the controller (in this case the bird related one). It's fairly straightforward just looping over the records set in the provided context.
{% for entry in birds %}
    <div >
      <img src="data:image/png;base64, {{ entry.image }}" alt="{{ entry.name }}" />
      <div >
        <h2>{{ entry.name }}</h2>
        <p><strong>Date:</strong> {{ entry.date }}</p>
        <p><strong>Location:</strong> {{ entry.location }}</p>
      </div>
    </div>
{% endfor %}This project utilizes several different elements to build a full pipeline from bird feeder detection to a webserver that hosts the images seen. Blues makes it easy to route data from your microcontroller to an end site.
If I were to restart I'd consider the following:
- Starting from EfficientNetLite
- Doing less of a compression as while the 11ms speed is impressive I likely could handled a larger model on the Seeed hardware and avoided some accuracy loss
- Add an additional no birds category to help reduce false positives (perhaps of the bird feeder without birds)
Schematics, diagrams and documents
CAD, enclosures and custom parts
Code
Credits
Related products


Leave your feedback...