


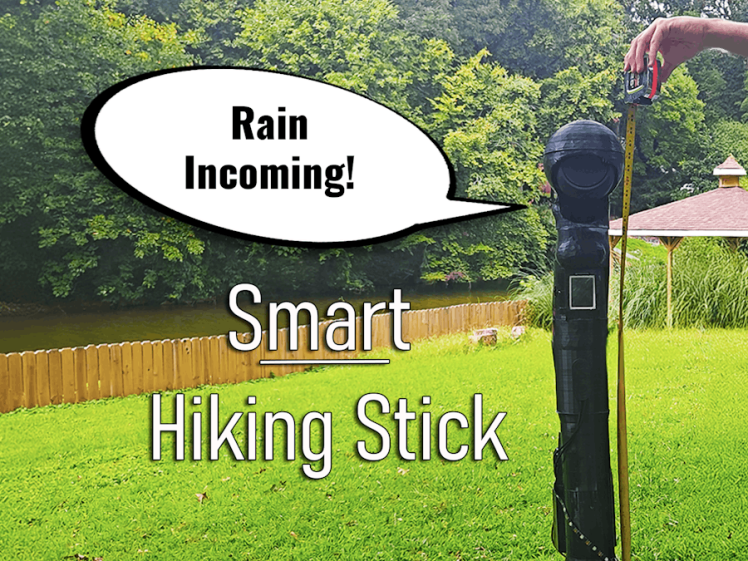
A Smart Hiking Stick For The Visually Impaired

Made by donutsorelse / 3D Printing / Fitness / Health / Sensors / Wearables
About the project
A Smart Hiking Stick that can help the visually impaired navigate and stay safe, that also provides tons of additional utility for any user.
Project info
Difficulty: Expert
Platforms: DFRobot, Digilent, Blues Wireless
Estimated time: 6 weeks
License: GNU General Public License, version 3 or later (GPL3+)
Items used in this project
Hardware components
View all
Story
Introduction
It all begins with the mighty stick. It's already a staple of hiking so, if you're carrying it around anyway, why not increase its usefulness? Similarly, a guiding cane is one of the options those who are visually impaired have for navigation. Why not make it so that the guiding can could also warn you of overhangs above you? Or warn you of incoming bad weather? The answer is - we're all kinds of going to make it so it can do that, and way, way more.
The goal of this project is to not only specifically help those with visual impairments, but also to create a device that's generally useful enough that anyone would be happy to carry it around. It can be used to help visually impaired people navigate with ultrasonic sensors, monitor for falls, monitor walks to ensure the user is ok, and send alerts. And, for more general usefulness, it can tell you how far you are from home, send messages, check the time, check the weather, automatically warn you of bad weather, and more.
That's a lot to unpack, so let's just jump into it step by step, starting with what we're using to make it smart in the first place.
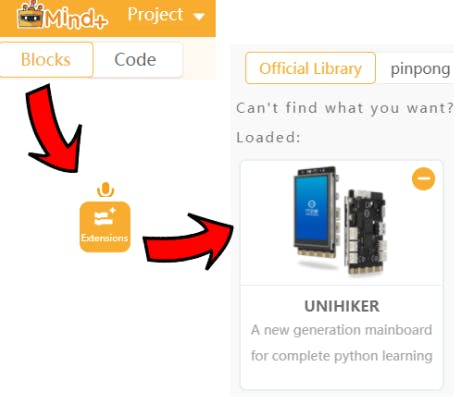
Smart Sticks Need a BrainIf the stick is going to be smart, we need to give it a brain. For this, we're using the UNIHIKER from DFRobot. They have their own documentation for getting started, but I'll provide some quick notes to get you on your way all the same. I used their home grown software Mind+, since it felt like a safe bet that the UNIHIKER would work well with it. After you plug your UNIHIKER into your computer and it goes through its boot process, you'll need to first add the UNIHIKER library within your Mind+ project. Simply click Blocks --> Extensions, and then you'll see UNIHIKER as a option in the Official Library tab.
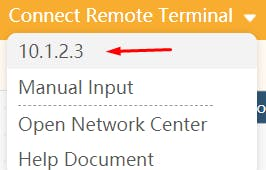
After you do this, you'll see the option to "Connect Remote Terminal". This is how you connect to your UNIHIKER. By default, 10.1.2.3 is your UNIHIKER.
Similarly, if you need to ssh into your UNIHIKER, use root@10.1.2.3 with the password dfrobot. When connected with Mind+, it checks for updates on your libraries, but in my experience it seemed to need connected to the internet for this. To that end, what worked for me was specifically going to the URL 10.1.2.3/pc/network-setting on my computer. It may be that the Network Settings tab will appear for you, but I've used 2 UNIHIKERs now and am fairly confident this little tid bit will save people out there some time and brain power!
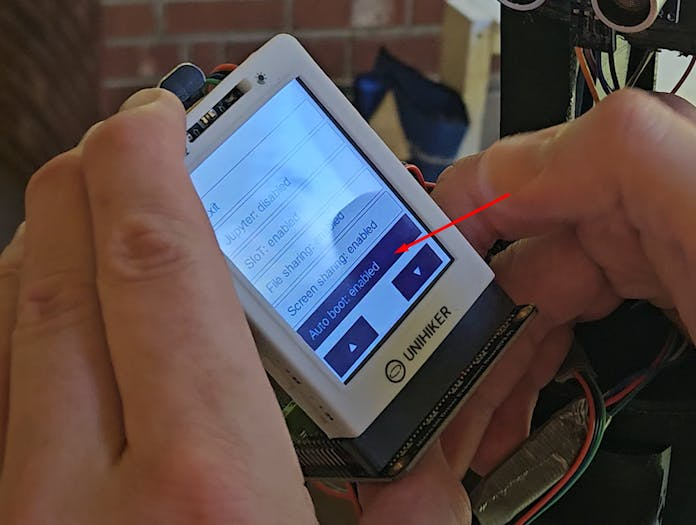
Another note is how to get the program to run on the go. You need to enable Auto Boot, as seen below. Once you do this, it runs the last program you've run. So, just enable Auto boot within the UNIHIKER settings, run your program, and from then on your program will start with every reboot. This is obviously pretty important for programs like the Smart Hiking Stick that need to run automatically when powered on.
The blocks themselves are useful in seeing syntax and such for code you're unfamiliar with, which was super helpful in my case since this is the first time I've tackled a lot of the code involved in this project. You simply drag the blocks in, see how it works, and can make and run simple test code you can reference for as you write your program. One bit of code that was somewhat familiar though was the usage of ultrasonic sensors, which brings us to our next section.
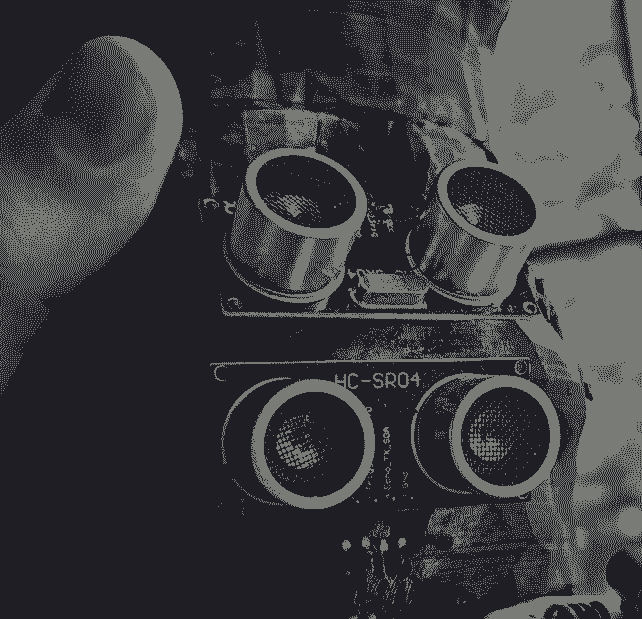
Helping the Vision Impaired NavigateThe Smart Hiking Stick does have the "stick" aspect going for it, so it can inherently act a bit like a guiding cane. However, on a hike there may be hanging obstacles that one wouldn't feel with a guiding cane, and we may as well provide advanced notice for obstacles in front of the user or on the ground so they don't have to bother having the stick bump into anything in the first place.
There are 2 ultrasonic sensors. One faces slightly up, and one faces slightly down. When an object is detected within a certain distance threshold, a sound is played through the UNIHIKER. To provide as much information as possible as simply as possible, there are sound ranges for each ultrasonic sensor. Within those ranges, the pitch will change based on how close or far the distance is from the detected object. By doing this, the user will be able to know where an object is in terms of distance and direction simply by learning the tone frequencies over time. The distance threshold for when we start playing a tone on object detection can be adjusted for the up and down sensor separately. The down sensor would be largely driven by the user height, where most users would likely set it to just under the value where the floor is detected while walking. The up sensor would be moreso based on user preference.
As you'll see in the code, because we're doing so much within the Smart Hiking Stick, there is a lot to process and a lot of multithreading. The initial approach I used was with the buzzer.pitch(pitch, buzz_duration) type logic. However, I found that this causes thread locks that halt the entire application, so eventually I moved to the approach you'll now see within the code. This approach plays a tone, sleeps, then stops the tone. It's a little less concise than I'd prefer, but it works with the multithreading needs the Smart Hiking Stick requires and it forced my hand into having the tones go back and forth between the top and bottom ultrasonic sensor, which is probably a good thing for user clarity.
Voice CommandsIt took me an embarrassingly long time to realize that there was a microphone built into the UNIHIKER. Until this point, I was intending to use the built-in buttons, and use braille to make it user friendly for the vision impaired users, but voice commands were a clear upgrade so I moved that direction immediately. As such, there is some limited functionality for buttons that I left in, since having more capabilities isn't a bad thing. Considering that the project is geared toward those with limited visibility, integrating voice commands into the project was a huge upgrade in usability.
One super important note for setting it up was an install that I had to do through ssh instead of Mind+. As I mentioned in the UNIHIKER section, use root@10.1.2.3 with password dfrobot to ssh in. Then, you can run the following command:
sudo apt-get install flac
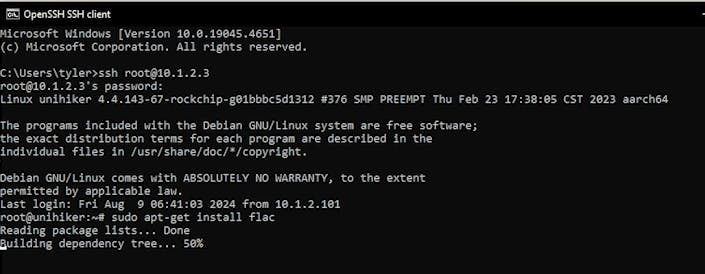
This is important because Google's api for interpreting voices doesn't seem to work without it.
With it, we can control all the various functions on the Smart Hiking Stick with voice commands, which is a night and day improvement for the user experience regardless of whether they have disabilities. Naturally, I've also added text to speech responses for the hiking stick itself and a speaker for audio playback.
Here is a quick run down of what functions I've added:
"Set home.",
"Where am I?",
"Help or SOS for emergencies",
"Extend walk by [duration].",
"Start a [duration] walk.",
"Extend walk.",
"Start walk.",
"End the walk.",
"What time is it?",
"How far am I from home?",
"How fast am I going?",
"What's my elevation?",
"Send a message.",
"Send my location.",
"Disable distance sensor.",
"Enable distance sensor.",
"What is the weather?",
"What is the temperature?",
"What is the chance of rain?",
"What is the wind speed?",
"What is the humidity?",
"List voice commands."
Conveniently, that leads us directly into actually building out all of this functionality!
GPS FunctionalityAs we'll get to, and as you'd expect, location data is pretty pivotal to a lot of the features involved in the Smart Hiking Stick. To that end, shoutout to this tutorial for helping get me going on utilizing the GNSS for location data.
The GPS coordinates are used in quite a bit of the functionality within the program, which includes providing coordinates when alerts are sent out, getting weather information, geofencing, and more.
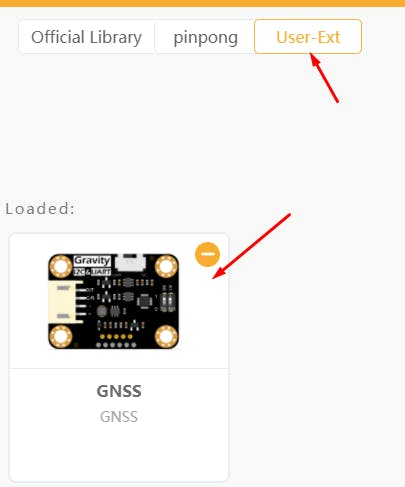
What ended up working for me was taking the relevant code from the DFRobot_GNSS_I2C class in the aforementioned tutorial and simply including it within my python script. Beyond that, getting setup within Mind+ is similar to setting up the UNIHIKER itself. This time you go to blocks --> extensions --> user-ext and search for gnss.
One important note is that the device needs to be set somewhere with good signal. The red light isn't just a power indicator - it means you don't have signal and won't get readings! Conveniently, there won't be any issue getting clear signal hiking in the great outdoors, but just setting it on the desk while debugging doesn't seem to cut it. Propping it up against a window works, which you'll be able to visualize when the light turns green. At this point the provided code will cooperate and you'll get good gps readings.
GeofencingThe stick is meant to be so feature-rich that it is just universally useful on any hike for any user. However, there are 2 main use cases I had in mind that inspired the project in the first place. These both rely on geofencing to automatically perform functions for convenience and safety.
Vision Impaired Solo Hikes - The goal is that a vision impaired user would be able to just get up and go on hikes with drastically decreased risk. There are utilities built into the stick to make the process that much smoother, as well as safety features. First, the user defines their home geolocation, which can be set with a simple voice command. This can be changed anytime, so if the user moves or is even just staying somewhere else for awhile, this can be updated painlessly. There is a geofence that is then set on that user's home location. When the user leaves their home with the Smart Hiking Stick, a hike is automatically determined to have started. There is then a time frame that the user is expected to complete the walk, and if the walk isn't completed in that time frame we know to send an alert with the user's location. This can be easily extended or cancelled to avoid false alarms. When the user returns to their home geofence, the walk is then concluded automatically, as we know the user has returned home safe and sound.
Extended Through-Hikes - This is one of the aspects that initially inspired the project. Those doing extremely long hikes, like those through-hiking the Appalachian Trail require food drop-offs. Realistically, a vision impaired user would likely be using the previously mentioned solo hike features rather than for food drop-offs, but this is one of the key aspects that inspired the project to begin with. Through-hikers in general would clearly benefit, and it feels worth at least opening that realm of possibilities for disabled users. This would likely be something best done with a group of people, and the Smart Hiking Stick would be able to automatically provide massive convenience to everyone present. Coordinating food drop-offs requires a good amount of pre-planning and specific timings as is. With the Smart Hiking Stick, there would be pre-defined geofences that trigger notifications. When the user enters a geofence, the person(s) in charge of bringing food for the drop-off would automatically receive a message.
When we check the geofences, we get 5 values and take the median value. This is to get rid of outliers. If we simply average them and a value is way off, the average value would also be incorrect. We then have a simple equation to check if our current location is within a geofence. If so, the relevant functionality is triggered.
Blues WirelessI went all in with Blues Wireless this time around. The Smart Hiking Stick is useful on the go, but a huge part of its feature set is related to safety for those with visual disabilities. We have several alerts that get sent out whenever there is a safety concern or crisis. Since we have that setup, I also included code for simply sending messages via voice commands. As we'll get to shortly, Blues can also make calls to external api's for fetching data while out and about, far from wireless connectivity.
It's worth noting that even though we send the gps coordinates from the hiking stick, Blues Wireless has this data as well even without being given these values.
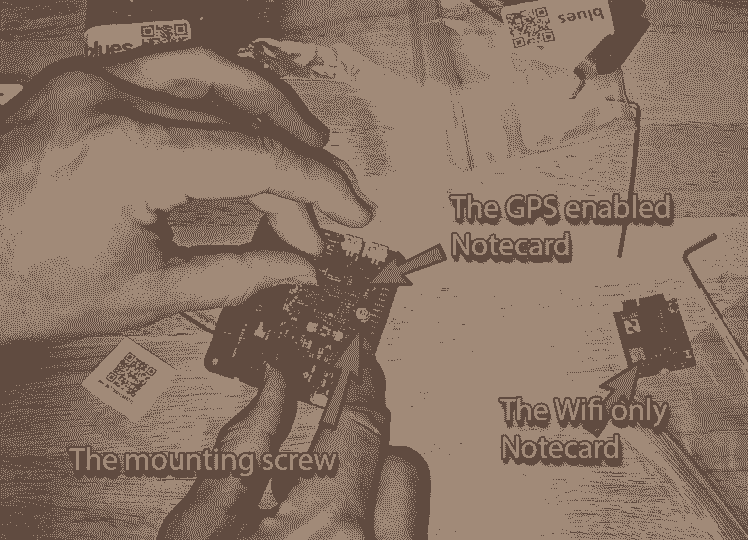
I included both the Notecarrier-F and the Notecarrier-A in the project because I started with the Notecarrier-F but went ahead and also setup the Notecarrier-A as well. You only need one of these for the project. I'll go through setting up the Notecarrier-A below:
There's a little mounting screw on the Notecarrier - unscrew it and put the Notecard you want to use in. The black one is the Notecard WiFi, which is wifi only, so we're going to use the green one, which has GPS enabled. Simply slot it into place, put the mounting screw back in, and plug it into your computer.
Next, navigate to the quickstart guide. This is a guide, but also how to get your device up and running within your project. You should be able to click the button to Connect a Notecard at this point, but if you can't just switch out your usb cable - it needs to be a cable that can actually transfer data, not just power the device.
Test your setup by pasting the following into command line: {"req":"card.version"}
This should give you basic data about the device, which confirms it's cooperating. Next navigate to https://notehub.io/projects and create a project, if you don't already have one ready for this device. This provides the project UID that you need for getting your device connected to your project. Simply modify and run the following commands and you'll be up and running.
{"req":"hub.set", "product":"<your project's UID>"}
{"req":"hub.sync"}
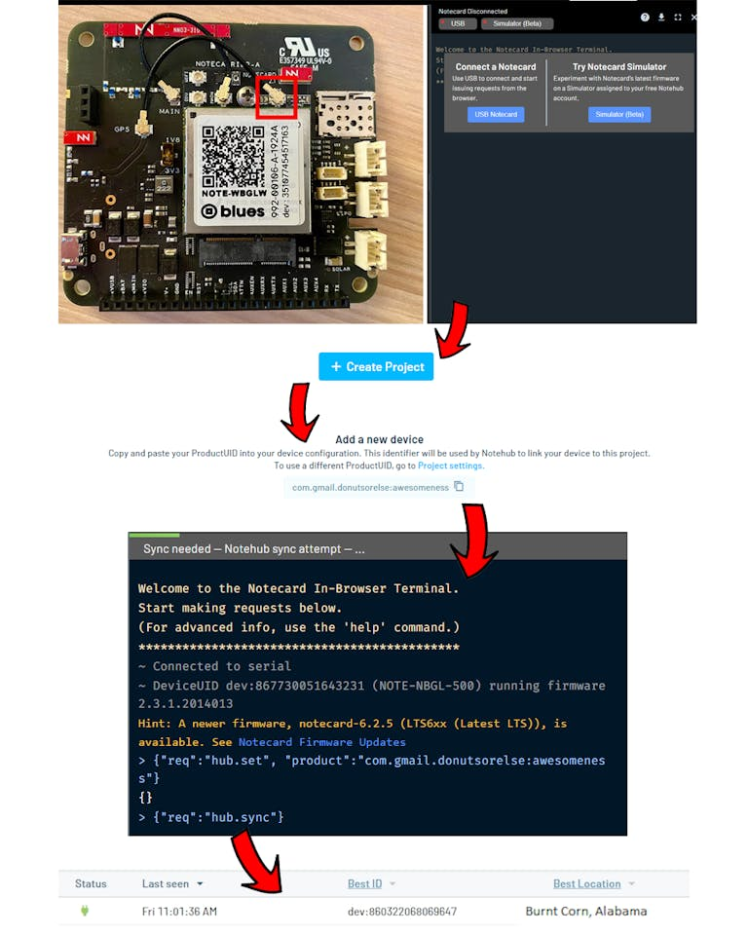
As far as the code aspect of things go, the UNIHIKER runs in python, so we're using the Blues python library. In terms of getting everything working correctly, I tried a few approaches but what I had success with was connecting via serial. Sometimes the simplest approach is the best - I simply plugged the Notecarrier into the UNIHIKER via usb and was able to connect via serial.
We initialize the notecard when the program starts, but I included a setting for whether to send Blues Alerts. However, we initialize the notecard anyway because this allows us to fetch weather data even if we don't want to send alerts/messages, which we'll get to shortly. When we send alerts, there's a simple function that all alert/message logic flows into, where we add the last known coordinates to the message in the request object and send the transaction.

It's worth noting that since we're using a notecard with gps capabilities, the coordinates are already available from these Blues transactions themselves. However, since we use the gnss' coordinates anyway, we have the lat/lng readily available.
We use Blues a lot here already, since it's what we use for all the safety alerts with location data, so why not also use it to send out messages in general? Among the various commands is "send a message". When prompted, we listen for what the user wants to say and send the message.
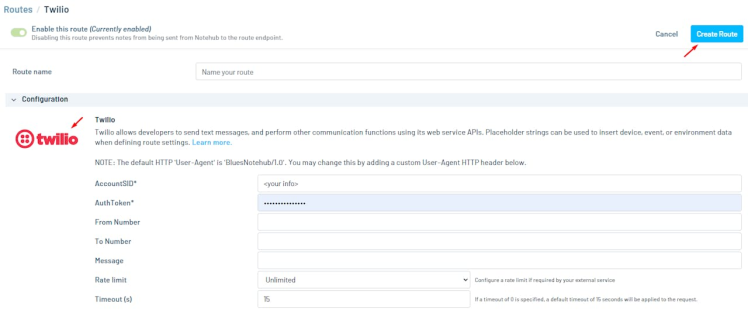
To that end, there are a lot of options for where to route the events that come in. The one that stands out to me as most intuitive is to have these routed into text messages, which can be accomplished with Twilio. As one may expect, this can be accomplished by clicking the Create Route button and filling out your Twilio information as seen below.
In the next step, we need to make a call to an external api. Since we're discussing the Blues Wireless part of the equation, let's go ahead and set that up now. First, go to your project.
In the upper right corner click the Create Route Button. Within the options below, you'll see Proxy for Notecard Web Requests. Click that, and fill in the form similarly to what is shown below. You can pick your own route name and alias. I made them the same to make things easy but you don't need to. We'll get to the specifics of the weather api calls in the following section.

The feedback I got for the project was largely positive, but the main concern that was brought to my attention was weather. Relying on other senses, like hearing, while it's pouring rain would understandably make things difficult. I would also think that it'd be a little harder to tell that rough weather is coming until it's too late. As such, it felt critical to add a feature where the hiking stick itself regularly checked for poor weather on the go. This can be accomplished with the Blues networking services we just setup. Blues is able to do more than send alerts and can be utilized to make calls to services, which in our case will be the openweathermap api.
To get access to the nicer api calls, you have to sign up for a subscription, but it's free for the first 1000 calls a day which is more than enough for personal use. For anyone following along and building this themselves, I'd recommend setting up the subscription sooner than later. It takes awhile to process the status of the account and gives an error on seemingly valid api keys, which can lead to confused ooga booga noises. I may or may not know this from experience.
why api call no work? (give it time after subscribing)
")
why api call no work? (give it time after subscribing)
As for the code itself, included in the project is a simple test wherein we make the call for weather information via Blues wireless. This program succinctly shows how to make the calls to the weather api via Blues while also providing you a functional starting place. We print out a ton of information in this test function, which of course was cherry picked within our Smart Hiking Stick application based on what users would likely find useful.
Through some extensive trial and error I found that what worked best for getting this api to work correctly is to use the following as your route url (with your own api key, of course): https://api.openweathermap.org/data/3.0/onecall?lat=[.lat]&lon=[.lon]&appid=<your api key here>&exclude=minutely, hourly
What that does is allows you to inject your latitude and longitude in your code. I encountered some weird issues from the openweathermap api that weren't replicated in a browser, but using that url works. Excluding the minutely and hourly weather reports is also necessary, as you'll get a response length error if you don't cut down on the information being received.
We check the weather every 15 minutes while the stick is in use. The user can activate all weather alerts if desired, but I have this feature turned off by default. Otherwise, the user will be notified only if there is concerning weather and what the percent chance of that weather will be.
Beyond that, we have access to weather information at our fingertips at this point, so I also included voice commands that allow the user to get updates. I added the ability to inquire about all the weather items that I could see a user actually wanting to know, which are - temperature, chance of rain, wind speed, and humidity.
Fall DetectionIn searching for the syntax for how to correctly utilize the accelerometer functionality within the Unihiker, I came across a project that was specifically a fall alert system that utilized the Unihiker so shout out to that project for providing a good starting point. One key thing I added was the gyroscopic values. The user may do any number of things that would cause a sudden increase in acceleration, and we don't want false positives on fall alerts for intentional actions. Instead, we see if the stick is more horizontal than it should be and only trigger if that is the case.
The first point of action if a fall is detected is that we request an update from the user. The text to speech of "A fall was detected. Are you okay? Please say yes or no." is played. Despite having the response request be a simple yes or no, there is a larger set of valid responses a user can say that will be understood by the hiking stick. The text to speech helps the user find the stick and also provides a very straightforward initial process for determining if the user is injured.

If the accelerometer picks up a rapid fall, we first give it a moment to see if the stick is picked back up. We can determine this with the values we can pull from the UNIHIKER as well. If the stick is moved back upright, we cancel the alert. If the user is hurt, they can use a voice command to send an alert. This allows us to avoid sending unnecessary alerts while also ensuring the user can get help if needed.
User confirming they are ok

User confirming they are ok
When the fall is detected, a timer starts. If we haven't cancelled the alert within the allocated time, which I have set to 1 minute, we send out an alert. The assumption here is that the user is injured or unconscious, and we need to take action and request help.
Importantly, the user can also just tell the stick to call for help anytime by saying help or SOS.
Automated Walk SafetyThe through hiking for the AT logistics are actually much easier than setting up a walk. The geofencing triggers alerts, we forward which geofence was triggered, mark it as triggered, and we're good to go. What's a bit more tricky is setting up walks that automatically start for the user and ensure they make it back safely.
We have an ongoing check for geofences. If the user isn't on a walk and leaves the home geofence, we start the walk. The user can also opt to start the walk themselves, so we also have a flag to indicate that the user has left their home. This way, when a user starts a walk it isn't ended as soon as the next geofence check sees that they're home.
The home geofence is easily set by saying "I'm home". Since it's so easy to set, this also means that if a user goes on vacation, they can have the same type of setup where they can have automated walks with their hotel/BnB/etc as their temporary home location.
The duration of a walk can be set by the user if they use a voice command. Otherwise, the assumption is that the most common walk has a known duration, so that value can be the default within the stick. This keeps the user interaction to a minimum, so they can just get up and walk. If they decide to take a longer walk, they simply extend the duration with a voice command.
When the user heads out for a walk, a timer is started. When the timer completes, we check in on the user to see if they're ok. We use the same positive or negative evaluation to provide ample ways to respond. If they give a positive affirmation that they're ok, we extend the walk duration. If they don't respond or say no, we send an alert via Blues.
There is quite a lot of code within this project, and I did my best to cover what the code did within each relevant section. However, there are a few more notes to touch on because, again, there is a lot going on.
For one, a lot of processes need to happen simultaneously. We don't want the ultrasonic sensor to stop producing tones because you're talking and the stick thinks it needs to process a voice command, right? This is relevant to basically every thread we have running - if all the various functionalities had to wait on each other, the stick would offer a lot less utility. As such, I utilized multithreading. This can be kind of a pain sometimes. In some ways, this caused fewer issues than I expected. In other ways, I did have to make adjustments to the code to accommodate this approach. The two main examples that are top of mind are with voice commands, where a timeout is added so that we don't have a chance of getting indefinitely stuck waiting for the next command, and the ultrasonic sensors, which required a different approach than the buzzer function. I wanted to note this so that anyone who decides to build off this doesn't revert those changes and end up confused when their program locks up!
Beyond that, to adjust how often threads are run, just adjust how long they sleep before running through their loop again. There are some variables setup at the start that will keep the program running well, such as specifying the audio codec so that the text to speech output goes through the speaker as intended.
I believe the following is a full list of the pip commands required for the Smart Hiking Stick program to run in full:
pip install pyserial
pip install threading
pip install queue
pip install notecard
pip install pinpong
pip install pygame
pip install sys
pip install logging
pip install pyttsx3
pip install SpeechRecognition
pip install re
pip install os
pip install paho-mqtt
These can be installed via the Library Management tab in Mind+.
Hopefully the code was explained well enough throughout this journey! The full program is attached.
Modeling the StickThere are quite a lot of electronic gismos to keep safe from the elements here, so 3d modeling a nice enclosure for everything was inevitable. Since 3d modeling isn't my strong suit, I utilized a VR modeling program called Medium to create the initial design. Then, I brought in pieces of smaller existing models to ensure a good end result. The model is included within the project. To credit where credit is due, I used the front plate section of a UNIHIKER based project for the UNIHIKER housing, and I used part of the handle of this gun handle project so that there's a comfortable place for the fingers to rest on the stick.
A picture is worth a thousand words for understanding the setup of the model, but I'll do a quick run down anyway. The top section is an enclosure for the speaker, which keeps it safe from the elements and ensures that audio playback faces toward the user in a convenient manner. There is a grip at hand height for comfort. There is a slot for the UNIHIKER to fit into. As noted in the video, the initial model I had included enough height for the UNIHIKER but the initial version I printed didn't account for the expansion board - that is fixed for the model I've attached (along with numerous other fixes). The holes you see throughout are for cables - the intention is for nice cable management (improvements were made since the initial print for this as well). There are little overhangs to protect electronics from the elements by guiding water away if it comes up. The large slot below the grip is for the power bank, because....
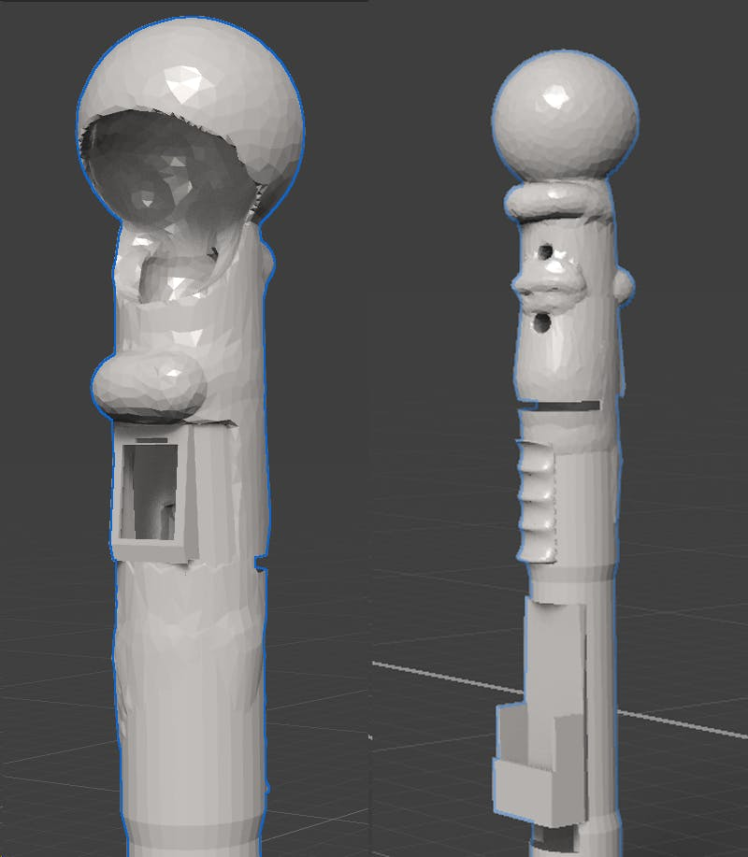
One feature I determined early on would be really important was solar power. When exploring power bank options, I discovered that some come with solar power harvesting built in. So, that meant the solar power integration part of the project was put into the modeling part of the process. I added an outward facing slot for the power bank to sit in that would keep it secure but allow it to absorb the sun's rays. This elongates the usage period and allows the user to continuously recharge the stick during any breaks.

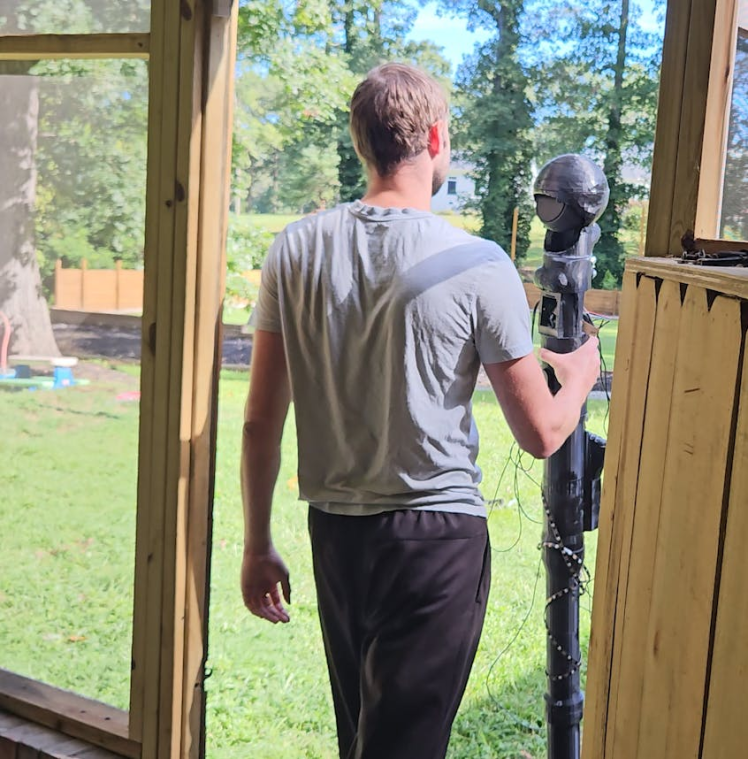
As far as the one I printed goes, I do realize that black isn't the most logical choice for a hiking stick, since it'll be more likely to heat up. However, I'm building this project out for others and am just creating a very, very thorough proof of concept, so I went with a color scheme that I thought looked nice. It's also made out of PLA, which would likely melt out in the sun for extended periods of time. It's a great material for solid prototyping, though! For those wanting to make put this together to take out on adventures in the sun, I'd both suggest a lighter color for the print and a material with a higher melting point.
You'll notice in the video that I discovered needed modifications as I printed it. As such, the model attached in the project has improvements made to it, hence not matching the one in the video.
Lights (Camera, Action?)You never know when you'll get turned around or even just underestimate how long a hike will take and end up walking in the dark. Or maybe you're just out camping! The hiking stick itself can turn into a light source. The initial intention was to have this built into the UNIHIKER setup as well, but the LED strip I bought with those capabilities came DOA. Thankfully plan B is very nearly just as good. I just wrapped a simple button activated LED strip around the stick such that with a single press the stick illuminates. Unless the user is 100% blind, this just feels like a universally helpful feature. In the case of 100% blindness, the ultrasonic sensors would be able to function in the dark regardless.
Bonus FunctionalityIn another recent project I put together I setup a Smart Home system, which can be controlled by voice commands. Our Smart Hiking Stick just so happens to have voice commands already setup as well as wifi capabilities, so it stands to reason that we give it the ability to control these custom Smart Home functionalities as well.
Within our voice command logic, we listen for the word "butler". What we hear after "butler" is the command we send to a flask server we have setup on a CM4Stack from M5Stack. With this, the Smart Hiking Stick will be able to control any and all extra features we add to our Smart Home setup without any changes required.
Onward to the Great Outdoors!The end result is a solar powered Smart Hiking Stick with a built in light, safety monitoring in many forms, alerts, navigation features, the capabilities to automate walks and hikes, and more. It can help act as the eyes of those who have vision disabilities and offers a plethora of features such that those without impairments would have plenty of use for it as well. There are also pretty clear additional user groups that would benefit greatly, such as the elderly. As noted in the feedback, there are different groups of people with vision impairments, and they may have different needs and different methods of navigating. My goal here was to provide as many tools as possible, such that it covers the needs of any user, from fully blind to not impaired at all. With the amount of time and effort I put into these types of projects, I do like to be able to put them to use myself and with this iteration I can already be warned of bad weather, send a message, or even see how fast I'm going.
This project took quite a lot of time and effort so hopefully this helps someone out there! It works but I probably won't hike the AT for another 15 years or so, so there's plenty of time for improvements as inspiration hits - I'd love to see any remixes or add-ons anyone puts together!
Schematics, diagrams and documents
CAD, enclosures and custom parts
Code
Credits
Related products


g