Maker Board Monday: Teensy 4.0
Teensy boards are favorite microcontroller units (MCUs) of the maker community, and it's easy to see why. They are fast, cheap, Arduino IDE-compatible, come in various sizes, and are well-documented. Other reasons for the Teensy's success include the consistency with which PJRC, the creators of Teensy, has released new boards and accessories to an increasingly loyal community.
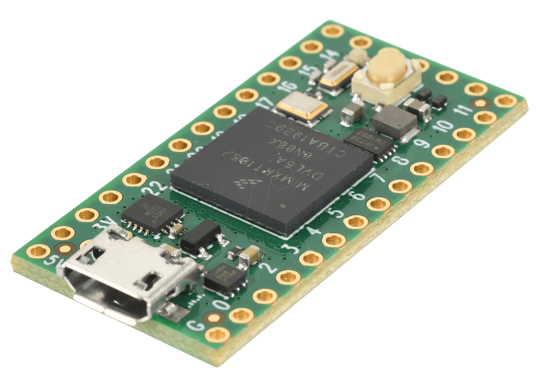
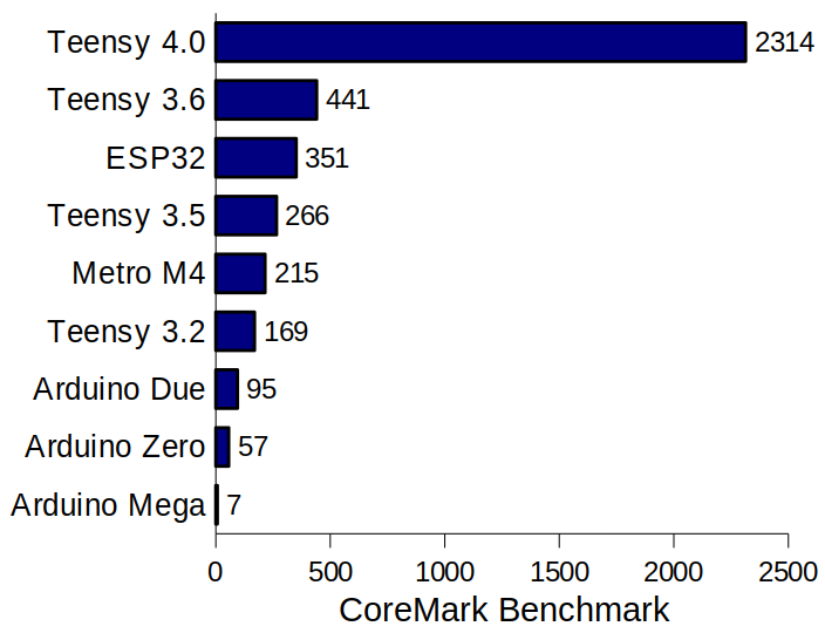
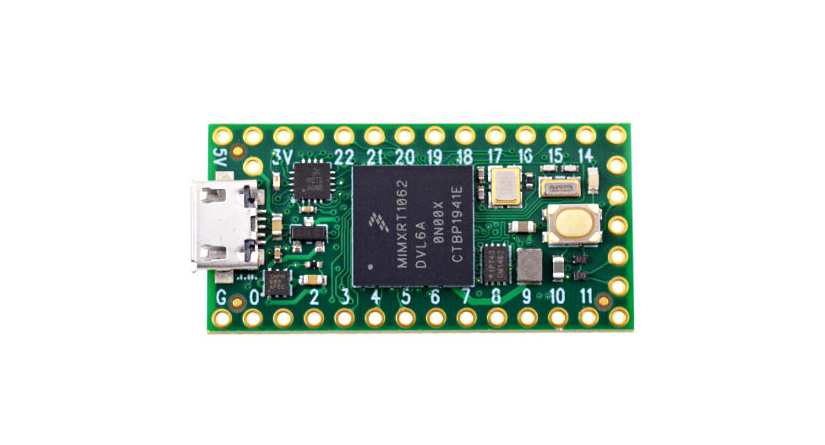
Today we are looking at the Teensy 4.0, the newest addition to the Teensy lineup. While every Teensy has been an upgrade of sorts, the Teensy 4.0 is significantly more powerful than its predecessors, and likely any other microcontroller on the market currently.
 The Teensy is built around an ARM Cortex-M7 processor running at 600 MHz, with an NXP iMXRT1062 chip. We'll cover the exact specifications below, but needless to say for a board not too different in size to an Arduino Nano, it completely blows it away.

Add to this multiple Teensy specific libraries for the Arduino IDE, custom hardware for working with audio and LEDs, and a huge community giving tips and tutorials via the Teensy forums, it's easy to see why they keep growing in popularity. The Teensy 4.0 is $19.95 direct from the PJRC store, putting it in a similar price range to several official Arduino boards. Given that it seems so much better in every way, should you make the switch to Teensy?
Teensy Board, Big Brains
We'll go through the specs and user experience of the Teensy 4.0 in a moment. For now, should you get a Teensy 4.0?

Yes. Teensy boards are easy to use, super powerful, and Arduino IDE-compatible. They are perfect for hobbyists and professionals alike. Not only that but the Teensy 4.0 marks an interesting point in microcontrollers. This is about as powerful and versatile as you can get before the board becomes something else entirely.
From simple blinking LED Arduino sketches, right down to "bare-metal" ARM programming in the C language, a single Teensy 4.0 board (or if you need even more pins, the Teensy 4.1) will cater to most skill levels.
That said, there are situations where other products might suit you better. If you don't need the power, a clone Arduino Nano is around 20 times cheaper than a Teensy. Complete beginners may get more out of an Arduino starter kit, and those wanting to work with connectivity might consider an ESP8266 or ESP32 based board.
Regardless, the incredible speed, huge choice of connectivity options, and onboard rollback function (allowing the board to self flash a blink sketch on a button press, making it virtually un-brickable), put the Teensy 4.0 head and shoulders above almost every other board out there.
Teensy 4.0 Specifications
Nothing comes close to the Teensy 4.0 on speed, and the options for connecting peripherals are impressive too:
- ARM Cortex-M7 at 600 MHz
- 1024K RAM (512K is tightly coupled)
- 2048K Flash (64K reserved for recovery & EEPROM emulation)
- 2 USB ports, both 480 MBit/sec
- 3 CAN Bus (1 with CAN FD)
- 2 I2S Digital Audio
- 1 S/PDIF Digital Audio
- 1 SDIO (4 bit) native SD
- 3 SPI, all with 16 word FIFO
- 3 I2C, all with 4 byte FIFO
- 7 Serial, all with 4 byte FIFO
- 32 general-purpose DMA channels
- 31 PWM pins
- 40 digital pins, all interrupt capable
- 14 analog pins, 2 ADCs on chip
- Cryptographic Acceleration
- Random Number Generator
- RTC for date/time
- Programmable FlexIO
- Pixel Processing Pipeline
- Peripheral cross triggering
- Power On/Off management
Teensy Boards: A Justified Obsession
I've always tried to use a wide range of microcontrollers in my projects. Partially so that as a writer I can speak with at least some authority about new hardware, and partly to justify my ever-growing collection of MCUs and single-board computers (SBCs).
Teensy boards have made this a difficult practice to follow. Much like having a favorite kitchen knife or screwdriver, regardless if using a Teensy is overkill for a project, I'm always tempted.
Why? Because as a general rule a Teensy board has opened up my projects to new possibilities. Some time ago I created a custom pedalboard for a friend. The build was simple enough, momentary switches wired into an Arduino Micro, which was acting as a USB host to connect to a digital audio workstation (DAW) for live-looping and sample-triggering.
Teensy boards are also capably of acting as USB HID devices, and as well as music software controllers they are equally suited to making custom keypads, or as YouTuber Great Scott shows, a custom controller similar to the Nintendo Switch Joycons.
Enter the Teensy 3.2, along with the Teensy Audio Adaptor board. All the initial functionality of the original foot pedal build was retained and required almost no code modification, but adding the ability to trigger samples from the Audio Adaptor SD card slot to play out of the onboard 3.5mm audio out, made a previously computer-dependent device could now act as a stand-alone sampler.
Gadget Reboot gives a good rundown of how easy it is to get a Teensy sampler up and running on a breadboard:
The video also features the Audio System Design Tool, a block-based visual programming tool for crafting audio systems, which outputs Arduino code for uploading to your board. The Teensy 4 also has a compatible Audio Adaptor (although modifying an older Audio Adaptor for compatibility is a pretty easy job), or, you can solder a microSD slot onto the board itself, and use one of the two onboard DACs to roll your own – resulting in a tiny, insanely powerful audio board.
This is just a single use case where Teensy was a simple alternative, which in my case improved a project with very little stress.
Speed Matters
While most beginners to intermediate makers are unlikely to really need the insane speed the Teensy 4 offers, it is nice to know that no matter how much I butcher my code it'll likely run without issue. Anyone learning the basics of robotics will likely understand the double whammy of learning mind-bending new concepts while worrying about whether their code will run fast enough to be effective.
For a quick intro to the Teensy 4.0, and a demonstration of how much faster it is than its predecessor, Alex Glow of Hackster.io put them both through their paces in a streamed comparison video.
While we all want to improve our code practices over time, the luxury that a super-fast, super easy to use controller gives us is a benefit to learning. Ultimately a more capable board will lead to larger-scale projects, and if needs be the MCU could be swapped out for something cheaper and lower cost after prototyping.
It's clear that the Arm Cortex-M7 processor performs better than almost anything else out there, and given that it's a popular industry-grade processing unit, this is no surprise. But can you use a Teensy to learn "proper" hardware programming?
Learning the Ropes
For many who learned hardware via the Arduino IDE, myself included, there is an almost perverse desire to learn "real" hardware programming. It's a strange obsession, seemingly based on the idea that somehow Arduino code isn't good enough, and the convenience of a graphical user interface.
I'm not going to speculate on where the truth lies in terms of useful learning techniques, but Teensy creator Paul Stoffregen himself has some insightful theories on why people feel this way. That said, to somewhat stave off this curiosity, there are some bare-metal projects out there, such as mensi's collection of teensy bare-metal code examples, and blazer82's baremetal-blink repository, both on GitHub.
Barely Scratching the Surface
Any short look at an MCU is not going to cover everything it can do, and it is especially true here. I think I've made my love for what PJRC are doing with the Teensy line clear, and if what I've written here doesn't convince you it's highly likely someone else's take on it will.
Teensy boards have been a central part of my setup for quite some time, and while there will always be a time for Arduinos and their many cheap clones or ESP8266/32 breakouts for connectivity, the Teensy 4.0 is the latest in a line of boards I've found hard to leave alone.


Leave your feedback...