Custom IoT - Function Pointers
Earlier, we learned how to code our server and client to form a basic MQTT system. In this last project of the whole MQTT series, we will learn how to implement function pointers in our client so that it responds as soon as a variable has been updated.
Custom IoT Solutions - Intro to the Internet of Things
Custom IoT Solutions - ESP32 vs ESP8266
Custom IoT Solutions - HTTP vs MQTT
Custom IoT Solutions - Create an HTTP Post System
Custom IoT Solutions - How to Make HTTP GET Requests
Custom IoT Solutions - MQTT Overview
Custom IoT Solutions - MQTT Framework
Custom IoT Solutions - MQTT Pub and Sub
Client Function Pointers - Responding to Events
The code that we have created up until now allows a client to connect to a server, send data to be stored, and receive data as it is updated. While this is perfectly ok for projects that transmit data only, it is not the most practical for those that need to respond to updates. For example, an Internet of Things (IoT) temperature sensor can send messages to the server to either turn on or off a heater but how can the heater, who is also connected to the server, respond to these changes?
One method would be to scan all variables that we have subscribed to and wait for a change in value. This method, however, is not very practical as it requires for loops in the main section of code. This method also consumes CPU resources that could be better used such as driving a display, reading user input, and handling sensor signals. This method is known as polling and does not allow for real-time responses to sudden changes in signals or variables.
Instead, our system will be coded so that as soon as a variable is updated, a function (which is defined by the user), is called. This allows a custom function to execute as soon as a change is detected making our code run in real-time. It also means that the CPU does not need to spend time looking for variable changes as the function is executed as soon as the server messages the client that a variable change was just detected.
Function Pointers
We all know what functions are in C++: pieces of code that can be executed as a block independently of anything else. We also know what pointers are: references to a location in-memory. Therefore, a function pointer is a pointer that points to a function. If a function pointer is called as a function, it will execute whatever function it is pointing too! To better understand how they work, let’s see a simple example!
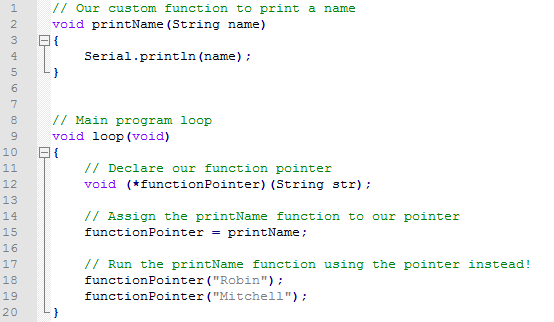
The first section of code is the function that we want to run. This function, when executed, will print the string that we pass it (in this case, a person's name).
The next section of code is the main loop that the program runs. The first line of code creates a function pointer whose type is void, and accepts one argument, str. This declaration must match up with the function we want to pass so if for example the function that we want to pass returns an integer and takes three parameters would need a function pointer whose type is int, and accepts three parameters.
The next line of code assigns the printName function to the function pointer. Note that this does not copy the code, but instead tells the function pointer where the function is in code.
The last section of code runs the printName function using the function pointer instead of calling the actual function itself. Here, we pass it the author's name.
Implementing into our system
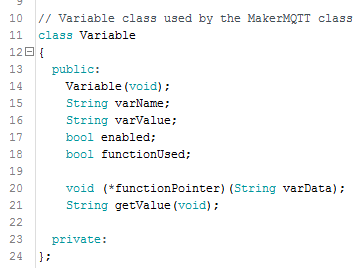
The first piece of code that we need to update in our system is the variable class. The two pieces of code we add are the function pointer declaration and a flag that determines if we need to execute the function when a variable update is detected.
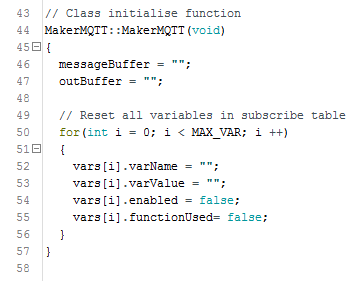
The second piece of code that needs adding is the initialization of the variable array in the MakerMQTT class constructor. The line of code being added ensures that the functionUse flag is set to false on startup.
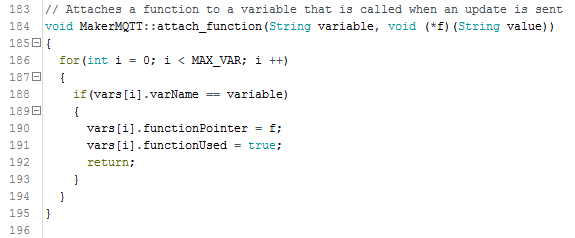
The third piece of code that needs adding allows the user to attach their own function to a variable. The user passes the variable they want to attach a function to as well as a void function and the attach_function code block will search for the variable and set the variables function pointer to the passed function. At the same time, the functionUsed flag is set to true as it is assumed that by calling this function the user wants the function to be called.
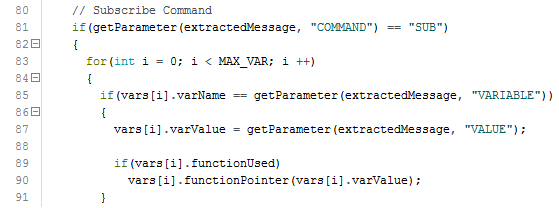
The last section of the code is very simple and resides in the updateSystem block. When a SUB command is received from the server (indicating that an update has been sent), the code checks to see if the functionUsed flag is true. If it is, then the function pointer is called with the variable value as the parameter. This calls the users function and that function executes immediately in real-time.
Usage Example
To use the attach_function method we simply need to make a function that will be activated when a change is detected and then call the attach_function.


Whenever updates are sent to the humidity variable, the function dataReceived is called and in this example, the value that was updated is printed to the console.
Conclusion
While not completed, our MakerMQTT system is now able to respond in real-time, provide publishing capabilities, and keep devices connected. To take this project further you can add your own custom commands that can cause the server to perform tasks or send messages to specific clients. Security can be added to the messaging protocols to obscure information while authorization systems can allow only certain devices to connect. An HTML site can be hosted in the same directory allowing for graphical representations of data and dashboard control elements. While this system is basic, it gives you a lot of power and freedom to design your own completely custom in-house IoT solutions that don’t rely on expensive packages, use complicated methods, or restrict your data rates. The world is your oyster!






Leave your feedback...