

Boost Your Pico Projects: Introducing the Raspberry Pi Pico VS Code Extension
The Raspberry Pi Foundation has introduced a new Visual Studio Code extension specifically designed for the Raspberry Pi Pico series. This extension simplifies development and debugging, making it more accessible for both beginners and seasoned developers. Currently, it supports the Pico, Pico W, and Pico 2 boards.
Watch Ian discuss the Raspberry Pi Pico VS Code Extension in this weeks episode of The Electromaker Show
Exploring Built-in Features
One standout feature of this extension is the integrated hardware API documentation. Access hardware APIs directly within VS Code without leaving your editor. For instance, if you're working with PWM, you can search for "PWM" in the hardware API section, and the relevant documentation will appear right away. This streamlines the coding process by providing immediate reference material.
The extension also supports advanced project types, including options to create RISC-V projects. While it currently supports Pico boards, there's potential for future compatibility with other RP2040 and RP2350 boards. This makes it a versatile tool for various development needs.
Enhancing Your Development Experience
The Pico VS Code Extension offers an all-in-one environment for writing, compiling, and uploading code. It simplifies the setup process, reducing the need for external tools and multiple windows. With easy access to examples and templates, you can kickstart projects quickly. Integrated documentation and straightforward project creation improve productivity, allowing you to focus more on coding and less on configuration.
Getting Started with the Pico VS Code Extension
Step 1:
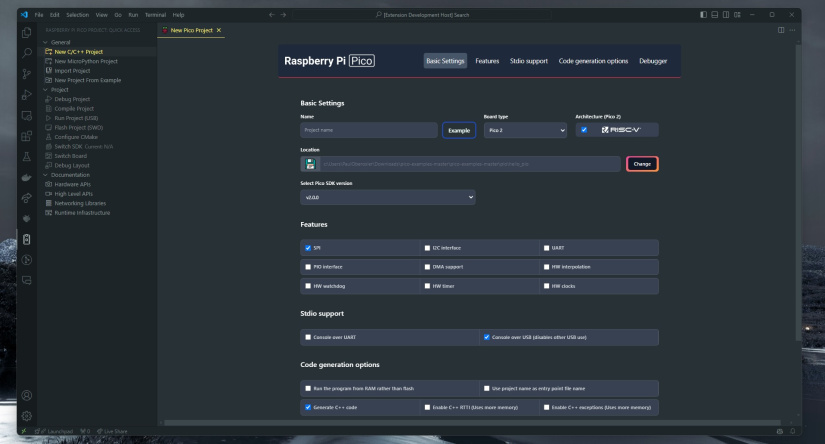
To begin, open Visual Studio Code and navigate to the Extensions tab. Search for "Pico" and install the extension. After installation, reload VS Code to activate all the features. You should notice a new Pico sidebar and additional buttons for compiling and running code.
Step 2:
Next, create a new project using example code. In the Pico sidebar, select "New Project from Example" and choose the "Blink" example. Select your board—such as the Pico 2—and specify your project settings, including the project folder and Pico SDK version. The extension will set up the project and open it in a new VS Code window.
Step 3:
With your project ready, you can compile and run your code directly from VS Code. Use the built-in compile and run buttons at the bottom of the editor. Before running, ensure your Pico board is in bootloader mode by holding down the boot select button while plugging it in. Once uploaded, you should see the onboard LED blinking, confirming a successful deployment.
Pico VS Code Extension - Final Thoughts
The Raspberry Pi Pico VS Code Extension streamlines the development process for Pico-series boards. Its integrated features and user-friendly interface make it a valuable tool for anyone working with the Raspberry Pi Pico. To get started or learn more, visit the official Raspberry Pi blog post.

Ian Buckley is a writer, musician, and perpetual tinkerer. Commonly found surrounded by hobby electrical components, he's also a keen programmer and likes to build crazy-sounding instruments with microcontrollers. In addition to Electromaker, Ian writes over at MakeUseOf and has bylines at the likes of Online Tech Tips as well as Help Desk Geek.


Leave your feedback...